Overview
Build Mode is where you construct and furnish every lot in inZOI. Open it by pressing [I] or clicking the Build Mode icon in the bottom-right corner of the screen. Everything you place costs Meow, the in-game currency, so a household's budget determines how much you can build at any given time. The interface is split into a left-side content panel and a top toolbar, with different tabs for structural elements, furniture, custom objects, and craftable items.
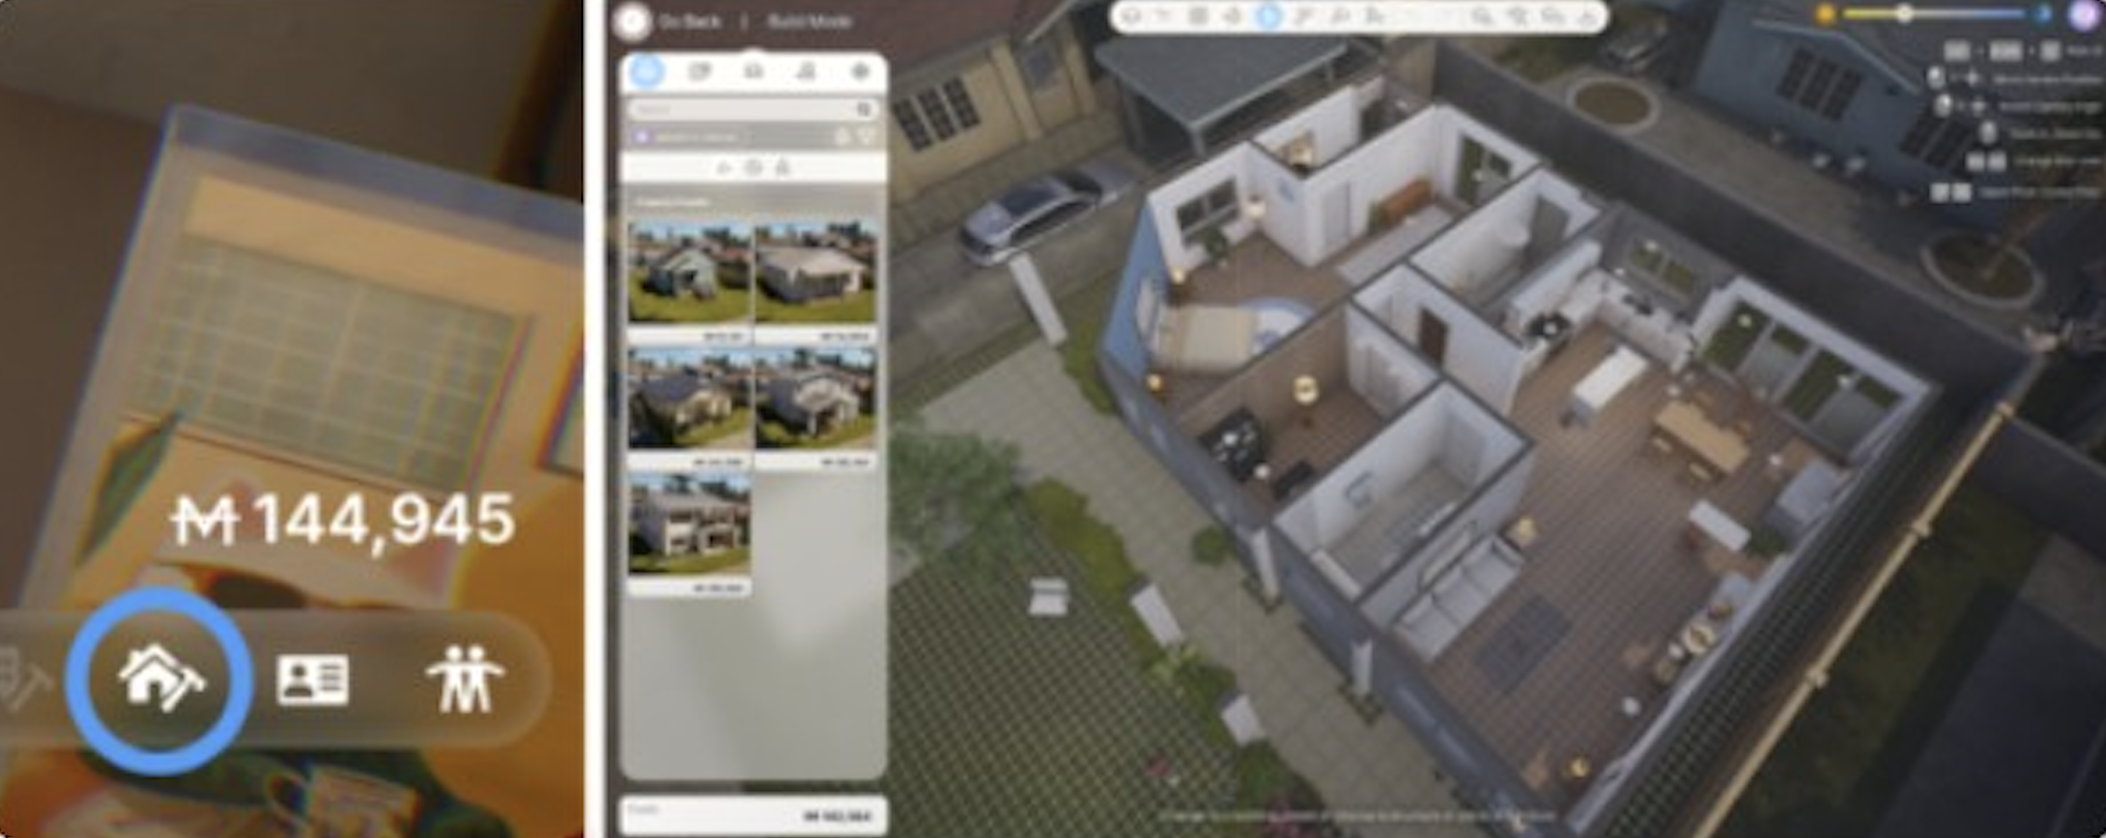
Build Mode is available on any lot your household occupies. For a restriction-free sandbox environment with no budget, use Build Studio instead. Completed builds can be saved as presets and shared with other players through Canvas.
The March 2026 update (v0.7.0) introduced 932 new build items, seven standardized property sizes for improved Canvas compatibility, adjustable swimming pool water levels, rugs with adjustable sizes, and several quality-of-life improvements to placement and snapping.
Interface Layout
The left panel holds all placeable content, organized into tabs. A search bar at the top of the panel lets you find specific items by name. The top toolbar contains navigation and editing tools that stay visible regardless of which tab is active.
Top Toolbar
Tool | Description |
|---|---|
Floor navigation | Switch between ground level, upper stories, and basements. |
Grid toggle | Show or hide the placement grid. Press [G] as a shortcut. |
Snap settings | Control how objects snap to the grid and to other objects. |
Room selection | Select an entire room for moving or editing. Press [R] as a shortcut. |
Object deletion | Remove placed objects. Press [Delete] to remove the selected object. |
Lot/house movement | Reposition the entire house or lot on the property. |
Left Panel Tabs
The left panel has five main tabs: Building Presets, Structure, Furniture, Custom, and Craft. Each tab has its own sub-categories and items.
Building Presets Tab
This tab provides ready-made designs that you can place in a single click. It contains two types of presets:
House presets: Complete pre-built homes. Drop them onto an empty lot for an instant house. These include walls, roofs, doors, windows, and basic furnishings.
Room presets: Pre-designed individual rooms (kitchens, bathrooms, bedrooms, etc.) that can be placed inside an existing structure.
Presets downloaded from Canvas appear here as well. You can also save your own creations as presets using the save function at the bottom of the Build Mode panel.
Structure Tab
The Structure tab handles all architectural elements. This is where you lay out the bones of a building before furnishing it.
Item | Description |
|---|---|
Walls | Draw interior and exterior walls. Walls define room boundaries and support upper floors. |
Doors | Place entry doors, interior doors, sliding doors, and arched doorways. Door placement creates an opening in the wall automatically. |
Windows | Various window styles from small panes to floor-to-ceiling glass. Windows cut into the wall when placed. |
Stairs | Connect floors vertically. Multiple staircase styles are available, from straight staircases to spiral designs. |
Rooms | Pre-shaped room outlines that can be dropped and resized. Faster than drawing walls manually for standard room shapes. |
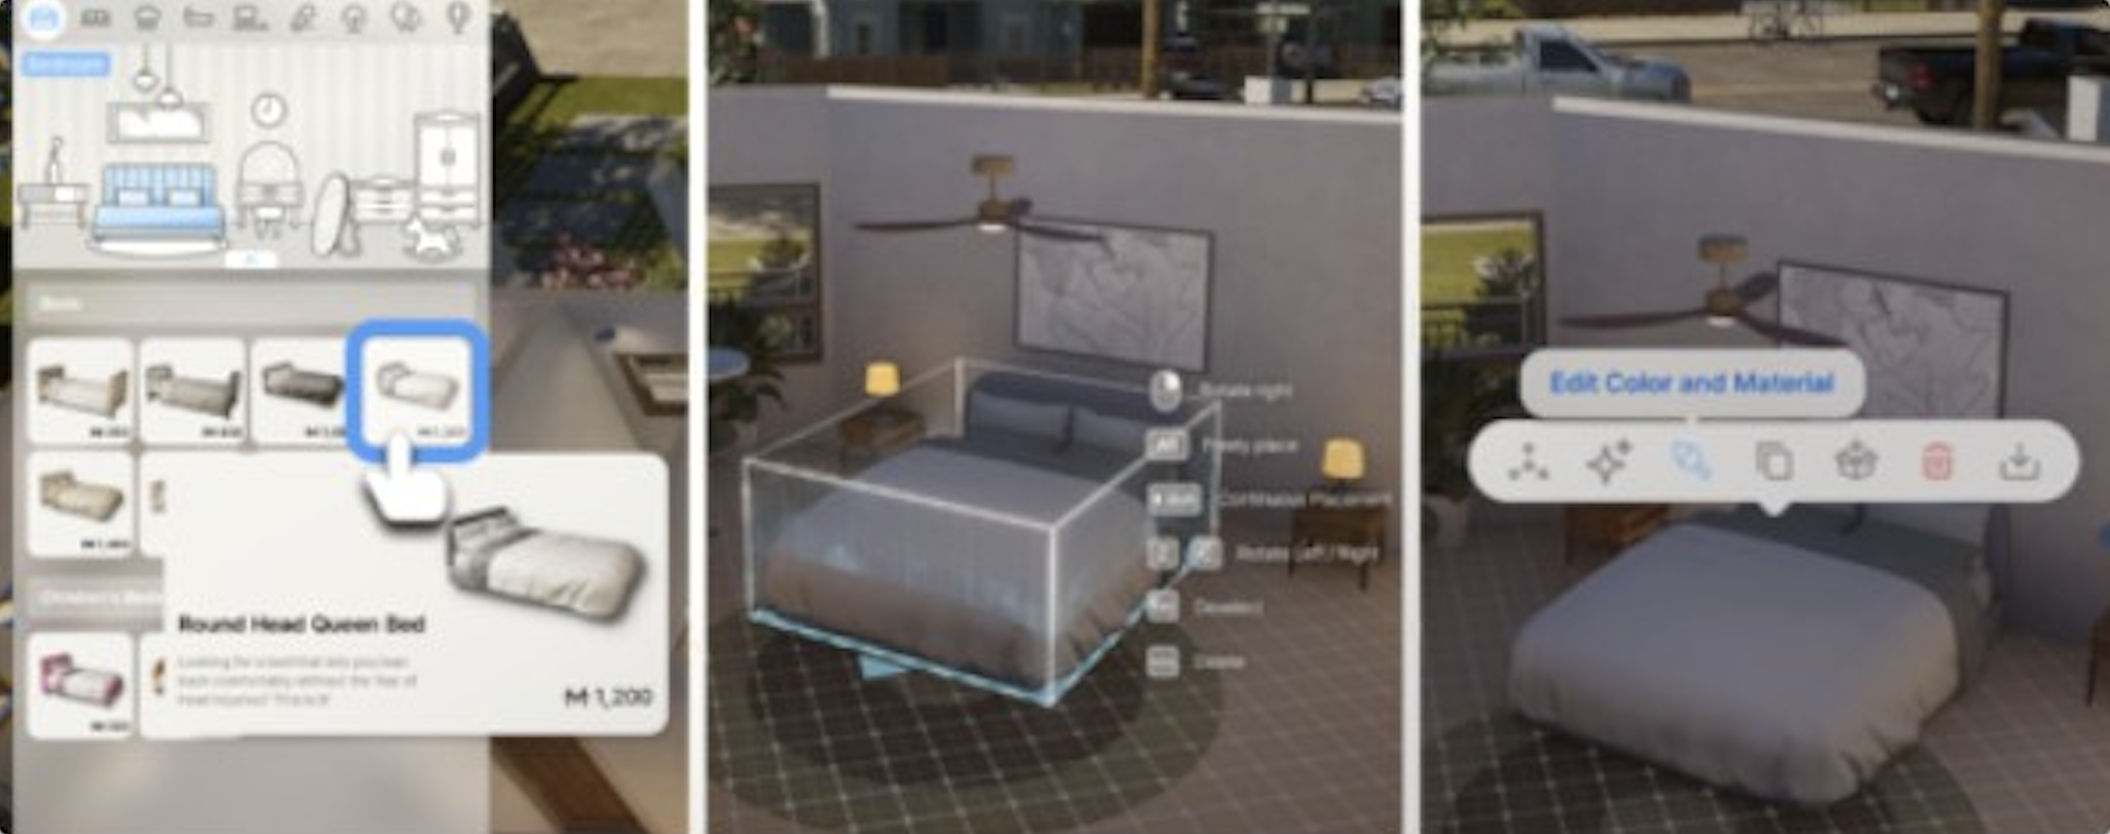
Furniture Tab
The Furniture tab is the largest section. It contains every interior item from sofas and tables to kitchen appliances and bathroom fixtures. Items are organized by room type and function. When you select a furniture piece, two customization options appear:
Edit Color and Material: Change the color, fabric, wood type, or metal finish on any surface of the object. Most furniture pieces have multiple editable surfaces, so you can mix a leather seat cushion with wooden armrests on the same chair.
AI Texture: Generate a custom texture pattern using the AI text-to-image tool. Type a description and the system produces a pattern that wraps onto the selected surface. This is part of the broader My Texture system described below.
The furniture tab covers everything your Zois interact with during daily life: beds for sleeping, desks for working, kitchen equipment for preparing meals, bookshelves, entertainment systems, instruments, exercise equipment for fitness routines, and decorative objects.
Custom Tab
The Custom tab provides two AI-powered creation tools that let you go beyond the standard furniture catalogue:
3D Printer: Upload a 2D image and the system converts it into a 3D in-game object using on-device AI. See the full 3D Printer article for details on how the image-to-3D conversion works.
Custom Furniture: A mix-and-match system where you combine different parts (legs, surfaces, frames) to build furniture that doesn't exist in the standard catalogue. Each part can be individually resized and recolored.
Objects created through either tool can be saved and uploaded to Canvas for other players to download.
Craft Tab
The Craft tab lets you build functional items by choosing and combining individual components. There are four craftable furniture types:
Computer Chair: Select a base, backrest, armrests, and wheels. Each component affects the finished chair's appearance.
Computer Desk: Pick a desktop surface, legs, and optional drawers or shelves.
Floor Lamp: Choose a base, pole, and lampshade. Different shade shapes change the light spread.
Computer: Select a case, monitor, keyboard, and peripherals.
Components can be mixed freely. A computer chair with one style of backrest and a different style of armrest produces a unique combination. Colors and materials are editable on every component.
Deep Customization
Every furniture piece in Build Mode can be repainted and retextured. This goes well beyond choosing from preset color swatches.
Color and Material Editing
Select any placed object and open Edit Color and Material. Each surface of the object is editable independently. A sofa might have three editable surfaces: the frame, the seat cushion, and the throw pillows. For each surface, you can change the material type (wood, metal, fabric, leather, stone, plastic) and the color. The material choice affects how light interacts with the surface, so a glossy metal finish looks different from a matte fabric.
Wall, Floor, and Roof Painting
Walls, floors, and roof surfaces are paintable through the Customize Paint menu. Select a wall and you can apply wallpaper, paint, brick, stone, tile, or wood paneling. Each side of a wall can have a different finish, so the interior and exterior don't have to match. Floor surfaces accept tile, hardwood, carpet, concrete, and other materials. Roof tiles, shingles, and metal roofing are all available under the same system.
My Texture
My Texture is inZOI's custom pattern system. It has two input methods:
Image upload: Upload any image from your computer and it becomes a tileable texture. Use it on walls, floors, furniture surfaces, or clothing.
AI text-to-image generator: Type a text description (for example, "blue marble with gold veins") and the system generates a pattern. The generated texture can then be applied to any surface just like an uploaded image.
Custom textures created through My Texture are saved to your library and can be reused across different builds. They also work in Build Studio.
Pool Building
Swimming pools are placed through the Structure tab under Buildings > Exteriors > Swimming Pool. The process works differently from standard room construction:
Select the pool tool from the Exteriors sub-menu.
Draw the pool outline by placing wall segments. The shape is freeform, so pools can be rectangular, L-shaped, curved, or irregular.
All lines must connect to form a closed shape. If the outline has gaps, the pool won't generate.
After closing the shape, adjust the pool depth and wall steepness using the provided sliders.
Pools are functional. Zois can swim in them, and the pool satisfies fitness and fun needs. Pool walls and floors can be retextured using the same Customize Paint system as interior surfaces.
Adjustable Pool Water Levels (V0.7.0)
As of the March 2026 update, swimming pool water levels can be adjusted. Players can customize the water height and depth for different visual looks and functional configurations. This allows for shallow wading pools, partially filled decorative features, or full-depth swimming pools. The water level slider appears alongside the existing depth and steepness controls when editing a pool.
Seven Standardized Property Sizes (V0.7.0)
The March 2026 update introduced seven standardized property size formats across all properties in Dowon, Bliss Bay, and Cahaya. This change was made to prevent build cutoff issues when downloading properties from Canvas. Previously, properties had irregular dimensions that made it difficult to share presets reliably between different lots.
How it Works
When loading a save file after the v0.7.0 update, players receive a notification if any of their properties have been resized to match one of the seven standard formats. Custom buildings on resized properties are automatically preserved as presets before the resize takes effect, so no work is lost. Properties that were reduced in size display a preset load notification, and property prices have been adjusted accordingly with a minimum of 1,000 Mew preserved.
Players can also trigger a manual property refresh through Options, then Gameplay, then Refresh Property Manually.
Notable Property Changes
Several specific properties received dimension adjustments as part of the standardization:
Dowon, Junghwa Parkville: Reduced from 25.5x20m to 25x20m.
Bliss Bay, 203 Somerset Place: Reduced from 30x26m to 30x25m.
Bliss Bay, 8 Beachfront Drive: Expanded from 22.5x15m to 25x20m.
Downloaded presets from Canvas that were built for non-standard dimensions may fail to load properly on updated properties if they exceed the new boundaries. A new Property Size search filter has been added to Canvas so players can browse and download presets that match their lot size.
New Build Items (V0.7.0)
932 new build items were added in the March 2026 update across multiple categories:
Category | Count | Details |
|---|---|---|
Holiday landmarks | 3 | Decorative landmarks for seasonal celebrations. |
Festival booths | 3 | Functional booths for seasonal festival events. |
Lobbies | 4 | Fire station, villa, and apartment building lobby presets. |
Bliss Bay apartment presets | 1 | New apartment layout preset for Bliss Bay. |
Textured tiles | 22 | New floor and wall tile patterns. |
Traditional objects | 8 | Cultural and traditional decorative items. |
Floor bedding | 2 | Single and double floor beds where Zois can sleep. |
Modular roofing | 3 | Customizable roof pieces for complex roof designs. |
Hanok walls | 1 | Traditional Korean-style wall piece. |
Partition fences | 1 | Interior room divider fence. |
Floor tables and cushions | Multiple | Low tables and floor cushions for floor-level dining and socializing. |
Infant items | Multiple | Toy car race track, inflatable baby bath, and infant toys for babies. |
Floor bedding and floor tables support the new floor-level living style, where Zois can eat meals, drink, and socialize while seated on floor cushions. This was a frequently requested feature for players building traditional Korean or Japanese-style interiors.
Build Quality-of-Life Improvements (V0.7.0)
The March 2026 update also brought several quality-of-life improvements to the building experience:
Improvement | Description |
|---|---|
Adjustable-size rugs | Rugs now support size adjustment so a single rug item can cover different floor areas. No more hunting for the right rug size. |
Expanded property editing | More world buildings are now editable in Build Mode, giving players greater control over the city environment. |
Fence and roofing guidelines | New visual placement guides help with fence and roof placement accuracy. |
Improved snap-to-grid | Object grid snapping is more precise and consistent across all item categories. |
Table height increase | Standard table height raised from 35cm to 45cm to prevent object clipping issues with items placed on tables. |
TV furniture expansion | TVs can now be placed on additional furniture types that previously did not support them. |
Keyboard Controls
Build Mode has a full set of keyboard shortcuts for faster editing. As of v0.7.0, all keys can be rebound through the custom keymapping system.
Action | Key/Button |
|---|---|
[Z] / [C] | Rotate the selected object by 45 degrees. Z rotates counter-clockwise, C rotates clockwise. |
[Alt] | Hold Alt while placing an object to enable free placement, ignoring grid snapping. |
[Shift] + click | Continuous placement mode. Place the same object repeatedly without re-selecting it from the panel. |
[V] | Select furniture. Click any placed object to select it for moving, rotating, or deleting. |
[R] | Room select mode. Click to select an entire room and all its contents. |
[G] | Toggle the placement grid on and off. |
[Delete] | Remove the currently selected object. |
[Ctrl+Z] | Undo the last action. |
[Ctrl+Shift+Z] | Redo the last undone action. |
For a full list of game controls including gameplay shortcuts, see Controls.
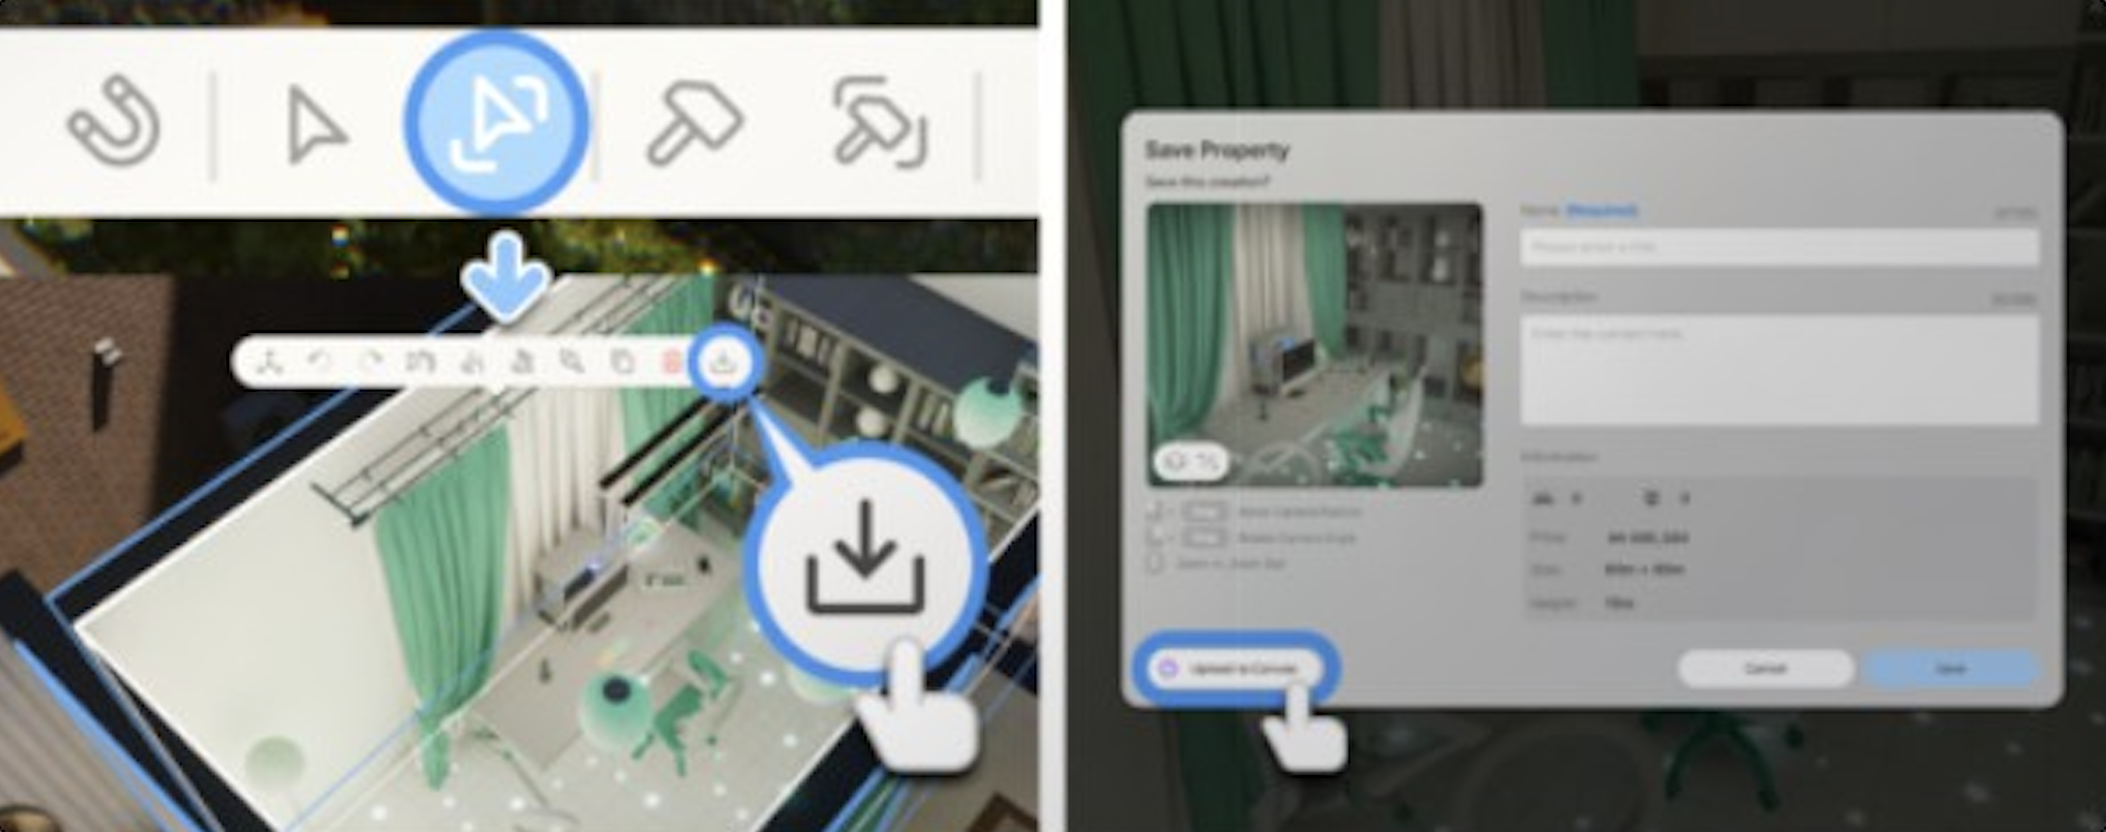
Saving and Sharing
Builds can be saved in two formats:
Property preset: Saves the entire lot including the house, all rooms, and all placed furniture. Useful for sharing complete homes.
Room preset: Saves a single room including its walls, floor, ceiling, and all furniture within it. Useful for sharing a well-designed kitchen or bathroom that can be dropped into any house.
Saved presets appear in the Building Presets tab for reuse in your own builds. To share with other players, upload the preset to Canvas. You can attach up to four screenshot images to each upload. Other players can browse, download, and rate your creations. Downloads sync to the recipient's game on their next session.
As of v0.7.0, the Canvas browser includes a Property Size filter so players can search for presets that match their lot's standardized dimensions.
Tips
Use the Building Presets tab to start with a basic house structure, then customize from there. It's faster than building walls from scratch.
The [Alt] free placement key is essential for precise decoration. Without it, objects snap to the grid and can't be placed on top of tables or in tight corners.
Shift+click continuous placement saves time when placing repeated objects like fence posts, lights along a hallway, or rows of chairs.
Test the AI Texture generator with simple, descriptive phrases. "Red brick" works better than long, complex descriptions.
The Craft tab items are fully functional. A crafted computer desk works the same as a catalogue one for skill building and job tasks.
Try the new adjustable-size rugs to quickly cover large floor areas without placing multiple rug objects.
Use the fence and roofing placement guidelines added in v0.7.0 to line up fences and roof segments precisely.
v0.9.0 Build Mode Additions
The v0.9.0 update (June 19, 2026) added a large batch of build content, much of it tied to the High School update, plus several workflow improvements.
New Content
Content | Count |
|---|---|
European-inspired antique furniture | 17 |
Build objects | 12 |
Tree stump (for city edit) | 1 |
School interaction objects | 115 |
Vehicle jump ramps | 4 |
Improvements
During shoulder view, all floors of a property are visible by default; revert under Game Options > Controls > Camera.
Shoulder view field of view was widened.
Furniture can be browsed by activity type as well as by room type.
Environmental detail was improved across all cities.
A new option adjusts the level of weathering on objects such as furniture and appliances.