Overview
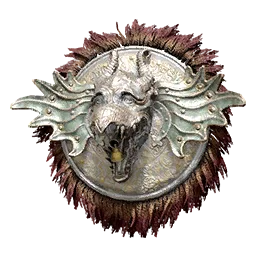
The Drake Shield is a unique Tier 4 shield in Crimson Desert that once belonged to Tristan, the Flame Knight. It bears a device shaped like an unknown creature resembling a dragon head, giving it one of the most visually striking designs among all shields in the game. The shield can unleash the force of absorbed attacks as fire, making it both a powerful defensive tool and an offensive asset in combat.
With a maximum Defense of 15 and Guard Rate of 30 at full refinement, the Drake Shield ranks among the strongest shields available. It also provides a Lv 2 Movement Speed bonus, allowing players to stay mobile while blocking. The shield comes equipped with the Draconic Retribution Abyss Core, which unleashes a fiery blast that knocks enemies away when activated.
Base Stats
The following table shows the Drake Shield's stats at maximum refinement (+10). At base level (+0), the shield starts with 3 Defense and 5 Guard Rate.
Stat | Value |
|---|---|
Type | Shield |
Tier | T4 |
Defense (at +10) | 15 |
Guard Rate (at +10) | 30 |
Lv 2 | |
Sell Price | 3,780 Copper |
Abyss Core |
Refinement Table
The Drake Shield can be refined from +0 to +10 at any Blacksmith. Each refinement level increases Defense and Guard Rate while retaining the Lv 2 Movement Speed bonus. Higher refinement levels require progressively rarer materials.
Level | Guard Rate | Materials Required | ||
|---|---|---|---|---|
+0 | 3 | 5 | Lv 2 | (base) |
+1 | 4 | 7 | Lv 2 | 2x Iron Ore |
+2 | 5 | 9 | Lv 2 | 3x Iron Ore |
+3 | 6 | 11 | Lv 2 | 4x Iron Ore, 2x Copper Ore |
+4 | 7 | 13 | Lv 2 | 5x Iron Ore, 4x Copper Ore |
+5 | 8 | 15 | Lv 2 | 6x Iron Ore, 6x Copper Ore, 1x Bloodstone, 1x Abyss Artifact |
+6 | 9 | 17 | Lv 2 | 8x Iron Ore, 8x Copper Ore, 3x Bloodstone, 1x Abyss Artifact |
+7 | 10 | 20 | Lv 2 | 10x Iron Ore, 10x Copper Ore, 5x Bloodstone, 1x Abyss Artifact |
+8 | 11 | 23 | Lv 2 | 15x Iron Ore, 15x Copper Ore, 8x Bloodstone, 2x Scolecite Ore, 1x Abyss Artifact |
+9 | 12 | 26 | Lv 2 | 25x Iron Ore, 20x Copper Ore, 12x Bloodstone, 6x Scolecite Ore, 1x Abyss Artifact |
+10 | 15 | 30 | Lv 2 | 1x Aeserion's Scale, 1x Abyss Artifact |
Refinement costs increase significantly at +5 and above due to the introduction of Bloodstone and Abyss Artifact requirements. The final upgrade to +10 requires Aeserion's Scale, one of the rarest refinement materials in the game.
Abyss Core: Draconic Retribution
The Drake Shield comes pre-equipped with the Draconic Retribution Abyss Core, which unleashes a powerful fiery blast that knocks nearby enemies away. The effect is visually similar to the fire attacks used by the Flame Knight boss himself, releasing a wave of flame energy outward from the shield.
Property | Detail |
|---|---|
Abyss Core Name | |
Effect | Unleashes a fiery blast that knocks enemies away |
3 | |
Recharge Method | Block 3 incoming attacks |
Equipment Slot | Shield |
Draconic Retribution has three charges that can be used consecutively for rapid crowd control. Once all charges are spent, blocking three enemy attacks will fully recharge them. This creates a natural gameplay loop: absorb incoming hits with the shield to build charges, then release the stored energy as devastating fire blasts when surrounded or pressured.
Like other Abyss Cores, Draconic Retribution can be removed from the Drake Shield and socketed into a different shield if the player prefers a different defensive option. Conversely, a different Abyss Core can be equipped on the Drake Shield through the Embed Abyss Gears menu at any Blacksmith.
Shield Bash Charge System
The Drake Shield's unique mechanic goes beyond passive defense. When you block an attack with the Drake Shield equipped, you generate a charge. Once charged, you can perform a shield bash that triggers a mini Volcanic Eruption effect. This is effectively an offensive counter-move: absorb an incoming hit, then retaliate with a fire-based AoE burst.
The volcanic eruption from the shield bash creates a significant opening in combat. The fire burst staggers nearby enemies, allowing you to follow up with aggressive combos like Turning Slash or other heavy attacks. This makes the Drake Shield one of the few shields in the game that actively contributes to offensive play rather than being purely defensive.
To maximize the Drake Shield's potential, adopt a parry-heavy playstyle: block enemy attacks to generate charges, then immediately follow each shield bash with your highest-damage combo. The volcanic eruption stagger window is brief but reliable, rewarding players who time their blocks aggressively.
How to Obtain
The Drake Shield is found inside the Flame Knight's Castle, located on the west side of Demeniss, above the letter D on the map. Reaching the castle and acquiring the shield requires completing the Letter of Silence side quest, which unlocks after Chapter 8 once the player has started the Ashen Steps quest. The Flame Knight boss will not spawn until this quest is active.
Step-by-Step Location Guide
Progress through the main story until you complete Chapter 8 and begin the Ashen Steps quest. This unlocks the Letter of Silence side quest, which leads to the Flame Knight's Castle.
Travel to the Flame Knight's Castle on the west side of Demeniss.
Defeat Tristan, the Flame Knight boss (see Boss Fight section below for strategy).
After the boss is defeated, head up the stairs from the Spada Sword area and proceed to the far east wall of the castle.
Look for the Drake Shield in the center of a storage area along the east wall. The item will be marked with a small dot on the mini map.
The Drake Shield is a one-time pickup and cannot be purchased from merchants or crafted at a Blacksmith. Make sure to thoroughly explore the east side of the castle after the boss fight, as the shield can be easy to miss if you leave the area too quickly.
Other Rewards From Flame Knight's Castle
Clearing the Flame Knight's Castle and exploring the surrounding area yields several valuable pieces of equipment beyond the Drake Shield.
Reward | Type | Notes |
|---|---|---|
Drake Shield | Found on the east side of the castle after the boss fight | |
Dropped or found after defeating the Flame Knight | ||
Additional Scorchflame Plate piece from the castle | ||
Found in the castle area |
These rewards make the Flame Knight's Castle one of the most lucrative locations to clear in the mid-to-late game. The Scorchflame Plate set is a well-regarded armor collection formerly worn by Tristan himself, and pieces of it can be found across several locations in the Demeniss region.
Boss Fight: Tristan, the Flame Knight
Tristan, the Flame Knight, is the boss encounter standing between the player and the Drake Shield. He is considered one of the more challenging bosses in Crimson Desert, using wide sweeping fire attacks, shield bashes, and devastating combo chains.
Preparation
Bring fire-resistant armor or consumables that reduce fire damage. Many of his attacks deal fire damage over time.
Stock up on healing consumables. The fight can be long, and his combos hit hard.
A shield with decent Guard Rate is recommended for blocking his melee chains. The Shield of Conviction or Lifsoth Large Shield are solid choices for this fight.
Make sure your weapons are refined as high as possible. Tristan has a large health pool.
Key Mechanics
Mechanic | Details |
|---|---|
Fire Wave | Tristan slams his shield into the ground, sending a wave of fire outward. Dodge to the side or jump over it. |
He charges forward with his shield raised. This attack has tracking, so dodge at the last moment rather than early. | |
Combo Chains | Tristan strings together 3 to 5 melee swings. Blocking the full chain will drain stamina quickly, so consider dodging the last hit and counterattacking. |
Flame Eruption | At lower health, Tristan erupts fire around himself. Back away when you see the wind-up animation to avoid taking heavy damage. |
Strategy
The safest approach is to stay at medium range, bait out his combo chains, and punish during his recovery frames. Avoid being greedy with attacks after his Shield Charge, as he often follows it with a quick slash. When Tristan uses Fire Wave, dodge to his flank and land two or three hits before backing off.
One of the most effective tactics against Tristan is to keep your distance and wait for his shield slam followed by the eruption attack. Dodge his fire projectiles during this phase, then immediately use Blinding Flash (L1+R1 on PlayStation / LB+RB on Xbox) to stagger him. Follow up with the Blinding Flash finisher for a window of heavy attacks while he recovers. Watch carefully for his charging attack, which covers significant distance and deals heavy damage if it connects. Dodge to the side at the last moment rather than rolling backward, since the charge has forward tracking.
Players using ranged weapons can keep distance and chip away at his health, but watch out for his Shield Charge, which covers a long distance. The fight rewards patience over aggression.
Comparison with Other Shields
The Drake Shield competes with several other high-tier shields for the best defensive option in Crimson Desert. Below is a comparison of the top shields at maximum refinement.
Shield | Guard Rate | Speed Bonus | How to Obtain | |
|---|---|---|---|---|
Drake Shield | 15 | 30 | Lv 2 Move Speed | Flame Knight's Castle |
8 | N/A | N/A | Church of Calphade treasure chest | |
8 | N/A | N/A | Lifsoth region | |
6 | N/A | Lv 2 Atk Speed | Defeat Saigord (Fallen Kingdom quest) | |
6 | N/A | N/A | Defeat Cassius Morten (Chapter 6) | |
14 | 25 | Lv 1 Atk Speed, Lv 1 Move Speed | Dewhaven region |
The Drake Shield offers the highest Defense and Guard Rate of any standard shield at max refinement, paired with a strong Lv 2 Movement Speed bonus. Its main advantage over other top shields is the combination of raw defensive stats with the Draconic Retribution Abyss Core, which adds offensive crowd control capability. The Dewhaven Shield comes close in stats but offers a split between Attack Speed and Movement Speed rather than a full Lv 2 in either.
Tips
Do not leave the Flame Knight's Castle without checking the east side. The Drake Shield is tucked behind boxes and is easy to overlook.
The Draconic Retribution Abyss Core recharges by blocking, so adopt a defensive playstyle to keep the charges ready. Block three attacks, then release the blast to clear surrounding enemies.
If you prefer a different Abyss Core on your shield, you can remove Draconic Retribution and use it on another shield, or replace it entirely. Visit a Blacksmith to manage your Abyss Gears.
Prioritize refining the Drake Shield to at least +5 for a solid boost in both Defense and Guard Rate. The jump from +4 (7 Defense, 13 Guard Rate) to +5 (8 Defense, 15 Guard Rate) is meaningful and only costs 6 Iron Ore, 6 Copper Ore, 1 Bloodstone, and 1 Abyss Artifact.
The Lv 2 Movement Speed bonus makes the Drake Shield a strong choice for builds that rely on repositioning during combat. You can block incoming attacks without losing much mobility.
Pair the Drake Shield with a one-handed sword or spear for a balanced offensive and defensive loadout. The shield's high Guard Rate lets you safely absorb hits between strikes.
Items found in the Flame Knight's Castle area are marked with small dots on the mini map after the boss is defeated. Use the map to locate any rewards you might have missed.
Lore
The Drake Shield was once carried by Tristan, the Flame Knight, a formidable warrior who made the castle west of Demeniss his stronghold. The shield bears a carved device in the likeness of an unknown creature, widely believed to resemble a drake or dragon. According to its description, the shield has the power to store the force of attacks it absorbs and release that energy as fire.
This connection to fire aligns with Tristan's fighting style and the broader Scorchflame Plate armor set associated with him. Whether the creature depicted on the shield is a real entity within the world of Pywel or a symbolic emblem remains unclear, but the dragon head design gives the Drake Shield a distinctly imposing appearance that sets it apart from other shields.