Moonlit Forest
Complete guide to the Moonlit Forest, Starsand Island's main dungeon and exploration zone. Covers all 12 zones in progression order, three boss fights (Crystalith, Glintortle, Ruin Guard), camp portals, mining resources, navigation mechanics, Gravestar puzzles, special arrows, and the Explorer profession connection.
On This Page
Overview
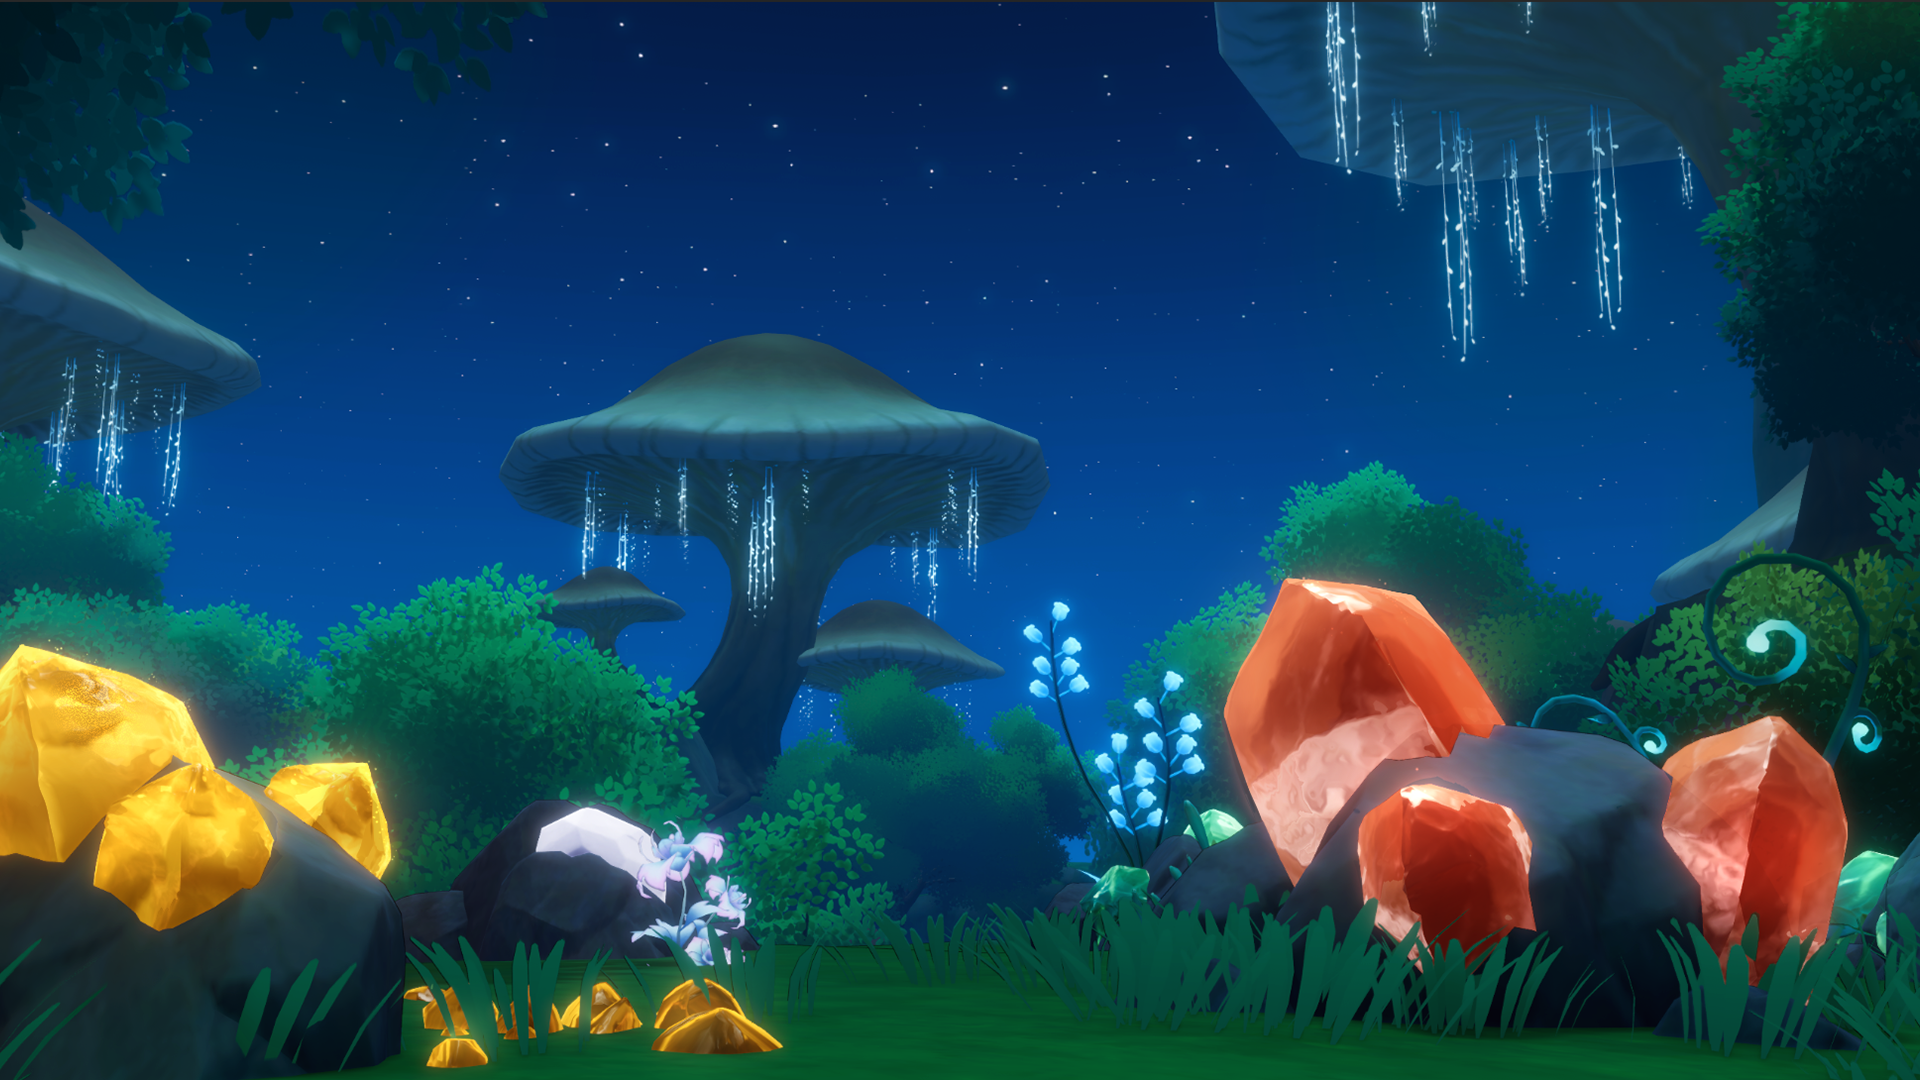
The Moonlit Forest is the primary dungeon and exploration zone in Starsand Island. It is a separate underground world bathed in blue and purple hues, filled with massive mushrooms, hostile creatures, valuable ores, and three major boss encounters. The forest is the only hostile PvE zone in the game and is the progression path for the Explorer profession. Resources found here, including iron, gold, and Spirit Cube Fragments, are essential for advancing every other profession.
How to Access
The entrance is located behind the player's home at Hopeland, blocked by a Damaged Door with visible yellow weak spots. To open it, visit Zephyria at the Exploration Club to begin the Apprentice Explorer quest. Zephyria provides a Slingshot blueprint (2 Softwood + 2 Fiber). Craft the Slingshot, aim at the golden weak spots on the door, and shoot to break it open. A portal at the end of the cave transports you into the Moonlit Forest. There is no mob crossover between the forest and the main island.
Zone Progression
The Moonlit Forest contains 12 named zones arranged in a roughly linear progression. Each zone has its own camp, resources, and challenges.
# | Zone | Key Features |
|---|---|---|
1 | Entry area; Fluorite, Copper, Tin, Quartz; Celeb Moths, Green Fireflies; first bridge (15 Stone to repair) | |
2 | First Gravestar/Astral Path puzzle; Runebird encounter; Copper, Iron, Coal, Salt | |
3 | Bubble crossing platforms; Luminwing Butterflies (6am-6pm, sunny/snowy); Luminfrog enemies; leads to first boss | |
4 | Crystalith boss arena; post-boss treasure chests; Gold and Primorite deposits | |
5 | Waterfall area; elevator to lower section with Sleep Lilies and Coal Ore; Left Ruins Key location | |
6 | Bronze Gate (requires both Ruins Keys); Magnetite deposits; Glintortle boss beyond the gate | |
7 | Fire and Water Arrows required; Fluffweave (exclusive material); Waterwheel puzzle; Diamond, Oilstone, Flamecore | |
8 | Upper cliff camp; Gold, Primorite, Oilstone; accessed via Waterwheel | |
9 | Wooden scaffolding sections; Echo Bean Seeds | |
10 | Ladder paths; Runebird patrols | |
11 | Fishing spot under the Waterwheel; Eldergrain (exclusive material); accessed by reversing the Waterwheel | |
12 | Final camp; Ruin Guard boss; Moonstone, Aurorite (rarest ores); Echo Beans |
Camp Portals
Each zone has a camp with a tent (rest), campfire (cooking), worktable (crafting), and a Moonweaver crystal. Damaged Moonweavers appear dim and vine-covered. Repair each one with 5 Fluorite to activate it. Once repaired, camps form a fast travel network: teleport freely between any repaired Moonweaver or the home portal on the surface. Fluorite is abundant throughout the forest, found in mineral nodes along cliff edges and rocky areas. Repair camps as soon as you discover them to avoid lengthy backtracking through hostile territory.
Enemies
Enemy | Zones | Attacks | Strategy |
|---|---|---|---|
Swooping dives, ground-slam shockwaves | Run in circles to dodge, fire Slingshot between attacks; Charged Blast Pellets deal more damage | ||
Water projectiles; difficult to dodge in tight spaces | Kill quickly (about 5 hits); strafe sideways to dodge projectiles |
Defeating enemies drops Runebird Fragments and Luminfrog Fragments, needed for Explorer profession quests. Non-hostile wildlife includes Celeb Moths, Green Fireflies (Evernight Forest), and Luminwing Butterflies (Dreamfall Garden, sunny or snowy days between 6am and 6pm).
Boss Fights
Crystalith (First Boss)
Location: Dreamfall Garden / Crystalith Hideout. Type: Huge golem with an orange glowing abdomen.
The Crystalith throws boulders (dodge by strafing) and performs a ground smash that sends a shockwave (jump over it). Its weak spot is the glowing abdomen. When the Crystalith draws power from the central crystal, its abdomen glows brightly, signaling a double-damage window. Bring approximately 50 to 60 Charged Blast Pellets. Do not leave the arena or the boss resets to full health.
Glintortle (Second Boss)
Location: Beyond the Bronze Gate in Mural Valley. Type: Giant armored turtle with water-based attacks.
The Glintortle fires water waves (jump over), bubble beams (dodge sideways), and performs a dizzying spin attack (retreat immediately). Its weak spot is the glowing crystal on top of its shell, which only becomes visible after certain attack animations or when the turtle is dazed. Use a Bow with Bomb Arrows for effective damage; Slingshot ammo barely scratches its armor. Deploy Mini Sentry Bots at the start of the fight to split aggro. Defeating the Glintortle unlocks the Fire Arrow and Water Arrow blueprints.
Ruin Guard (Final Boss)
Location: Moonlight Meadow. Type: Large mechanical guardian with four sequential attack patterns.
The Ruin Guard cycles through: (1) Flying Ore Throw, which exposes its head during the windup; (2) Spin Slice, a lunging melee attack you must retreat from; (3) Flame Beam, a sustained laser that tracks slowly while the head is exposed; (4) Green Charge Vines, which spawns damaging vine zones under your feet. Its weak spot is the top of its head. Bomb Arrows to the head can stun it, causing it to drop its head to the center of the arena for a massive damage window. Bring 20 to 30 Bomb Arrows plus 50 or more standard arrows and HP-restoring food. The boss resets if you leave the arena.
After defeating the Ruin Guard, an altar appears. Place 3 Moonstone, 3 Spirit Berry, and 1 Prayer on the altar to summon the Luna Deer mount. The Prayer item is obtained from Zephyria after returning to report the victory. The Luna Deer is the ultimate reward for completing the entire Moonlit Forest.
Navigation Mechanics
Gravestar and Astral Path Puzzles
Stone doors called Astral Paths block progression between zones. Each door has empty star sigils indicating how many Gravestars are needed (typically 3 per zone). Find and break the corresponding Gravecrystals (orange glowing rocks with a smoky aura) using a pickaxe to free the Gravestars. Freed Gravestars automatically float to their matching Astral Path and unlock the door.
Ruins Keys and the Bronze Gate
The Bronze Gate in Mural Valley requires two keys to open, leading to the Glintortle boss. The Right Ruins Key is given by Zephyria upon completing the Intermediate Explorer certification. The Left Ruins Key is found in a round wooden chest at the bottom of the elevator in Azure Bay (take the elevator down to the lower waterfall section).
Special Arrows
Arrow Type | Function | Key Uses |
|---|---|---|
Charged Blast Pellet | High-damage Slingshot ammo | Crystalith boss (50-60 needed); Runebirds |
Bomb Arrow | Explosive, high damage | Glintortle and Ruin Guard bosses; head stuns |
Water Arrow | Grows vine bridges over gaps | Creating crossable paths from chopped tree trunks |
Fire Arrow | Burns roots, brambles, obstacles | Clearing tree root blockages in Harvest Yard; lighting torch pillars |
Fire Arrows require Flamecore (crafted at an Ammo Maker). Bomb Arrows require Phosand (crafted from Coal and Sunveil Shrooms). Both arrow blueprints unlock after defeating the Glintortle.
Resources and Mining
The Moonlit Forest is the primary source of metals and rare materials in the game. Ores and resources regenerate daily. Lower-tier ores (Copper, Tin, Quartz) are concentrated in the first half of the forest, while higher-tier materials replace them deeper in.
Resource | Zones Found | Notes |
|---|---|---|
All zones | Common; used to repair camp Moonweavers (5 per camp) | |
Copper, Tin, Quartz | Basic ores; requires Stone Pickaxe or better | |
Iron, Coal, Salt | Mid-tier; Iron is essential for nearly all tool upgrades | |
Gold, Primorite | Advanced ores; requires Impact Hammer to mine efficiently | |
Mural Valley (Glintortle arena) | Translucent white deposits; requires Impact Hammer | |
Diamond, Oilstone, Flamecore | Late-game ores; Flamecore used for Senior Crafter vehicle | |
Moonstone, Aurorite | Rarest ores; needed for the Ruin Guard altar and endgame crafting | |
Fluffweave | Harvest Yard (exclusive) | Unique textile material not found elsewhere |
Darkwater Shore (exclusive) | Unique material from the Waterwheel area |
Ore Chunks and the Ore Analyzer
Mining veins has a chance to drop Ore Chunks in three tiers. Common Ore Chunks come from early-zone veins and yield Stone, Copper, Tin, and Ancient Precision Parts (exclusive, used for endgame crafting). Uncommon Ore Chunks from the midsection yield various ores plus Spirit Cube Fragments. Rare Ore Chunks from the deepest zones have a higher Spirit Cube Fragment drop rate. Process chunks in an Ore Analyzer (built from 8 Hardwood + 2 Copper Sheets). Set up analyzers early and keep them running to accumulate Spirit Cube Fragments over time.
Treasure Chests
The Moonlit Forest contains 48 standard treasure chests plus boss-fight chests. Standard chests are found along paths, on cliff ledges, behind puzzles, and inside hidden areas. Acorn Chests are exclusive to the forest, some spawning when Astral Path puzzles are solved. Boss chests can be collected from Crystalith, Glintortle, and Ruin Guard encounters. Many chests are locked behind Gravecrystals, collection puzzles (gather all mushrooms or flowers in an area), bridge puzzles, or require specific arrow types to reach.
Tips
Craft Stump Stools from Softwood and place them around the forest. Sitting on them restores stamina for free, which is essential during long mining sessions.
Deploy Mini Sentry Bots at the very start of boss fights (not midway) for maximum effectiveness. They draw aggro and deal passive chip damage throughout the encounter.
Never leave a boss arena mid-fight. All three bosses reset to full health if you step outside the boundary.
Bring HP-restoring food (Grilled Chicken Wings work well) to boss fights, especially the Ruin Guard.
Resources regenerate daily. Visit high-value zones (Harvest Yard for Diamond and Flamecore, Moonlight Meadow for Moonstone) on a regular rotation.
The Impact Hammer is the strongest mining tool and can break all ore types. Prioritize unlocking it through the Junior Crafter tier.
If you get knocked out, the penalty is that the current in-game day ends. Plan difficult fights for early in the day to minimize lost time.