Corrupted Caliburn is an endgame boss encountered during the A Shadow in the Void quest in Chapter 12 of Crimson Desert. Fought at Dimensional Bonds in the Abyss, this three-phase encounter tests parry timing, clone management, and stamina control.
Corrupted Caliburn is an endgame boss fought during the A Shadow in the Void quest in Chapter 12: The Abyss of Crimson Desert. After Duke Caliburn escapes through a portal into the Abyss following the events of The Blood Coronation, Kliff pursues him across multiple Abyss islands to the central island known as Dimensional Bonds. There, Caliburn has been twisted by the power of the Abyss into a corrupted form, and the resulting boss fight is a skill check before the true final encounters of the game.
This is a three-phase fight that revolves around parry timing, shadow clone management, and punishing the narrow recovery windows at the end of Caliburn's attack strings. Players who have mastered the parry system and the Nature's Snare ability will find the fight significantly more manageable, while those who try to brute-force their way through will struggle with the relentless clone pressure.
After Duke Caliburn vanishes through an Abyss gate, the quest tooltip directs you to pursue him into the Abyss. Your goal is to reach the large central Abyss island called Dimensional Bonds. There are two routes to get there:
Standard route: Navigate through multiple Abyss island chains, solving their respective puzzles and challenges along the way. This is the intended progression path and includes encounters with shadow enemies.
Shortcut: Head to the crashed spaceship in the Demeniss region, located in the river between the Spire of Clockwork and Drywind Valley. Activate the floor panel by using your Axiom Force grapple on the electrified square, slam it into place with Force Palm, and then bring the rectangular battery to the upper section. Once powered, the spaceship flies you directly to Dimensional Bonds.
Attack Patterns
Corrupted Caliburn combines melee combos with shadow clone feints and ranged attacks. The defining challenge of this fight is distinguishing between real attacks and clone diversions. Caliburn will often make it look like he is about to attack or teleport, but instead a shadow clone strikes from an unexpected angle. These clones cannot be damaged.
Caliburn pauses and summons multiple shadow clones that stab at your current position simultaneously.
Dodge away from your current position as soon as you see the clones materialize. Do not attempt to parry the clones.
Arcing Crescent
A ranged attack where Caliburn cleaves the air and launches crescent-shaped energy projectiles toward you.
Dodge to the side. The projectiles travel in a straight line and can be avoided with lateral movement.
Red Rain
Caliburn causes multiple red energy beams to rain down from the sky, creating glowing red impact zones on the ground.
Keep moving and dodge continuously. Do not stand still. Watch for the red markers on the ground and avoid them.
Red Reaver
Caliburn leaps high into the air and charges up arrow shots aimed at your position.
Block and absorb with Nature's Snare if you react quickly enough. Otherwise, dodge to the side as the arrows land.
King's Cross
Caliburn creates a large sword glowing with red energy. After a brief delay, multiple clones appear and strike the ground, causing linear eruptions in six directions from the impact point.
Position yourself between the eruption lines. The six-directional pattern leaves gaps you can stand in safely.
Teleport Overhead Smash
A combo finisher where Caliburn teleports above you and slams down with tremendous force. Deals very high damage on hit.
Dodge the downward slam. If you avoid it, Caliburn is locked in a long recovery animation, giving you several seconds to attack freely.
Shadow Clone Mechanic
The most challenging aspect of the Corrupted Caliburn fight is the persistent shadow clone mechanic. Throughout all three phases, Caliburn uses clone feints to misdirect you. He will telegraph what appears to be a direct attack or a teleport, but instead a shadow clone executes the move while Caliburn repositions. The clones cannot be damaged and deal real damage on contact.
The key to managing clones is patience. Watch Caliburn's movements closely across multiple attempts to learn which animations lead to real attacks and which are clone diversions. The last move in any attack string is almost always performed by the real Caliburn, making it the safest moment to counterattack.
Strategy
Learn the attack strings. Spend your first few attempts observing Caliburn's combo patterns without overcommitting to attacks. Understanding which moves are real and which are clone feints is essential.
Punish combo finishers. The Teleport Overhead Smash is Caliburn's most dangerous move, but also his most punishable. If you dodge the slam, you get several seconds of free damage while he recovers.
Use perfect parries to break his guard. Perfect parries are the fastest way to stagger Caliburn and create damage windows. When he is in melee range, bait his melee attacks and parry them to break his stance. Chain light and heavy combos immediately after a successful stagger.
Stay relatively close. At range, Caliburn has access to more dangerous attacks like Red Rain and Arcing Crescent. Staying in melee range limits his options to more predictable, parry-friendly melee combos.
Block Red Reaver with Nature's Snare. When Caliburn leaps into the air for Red Reaver, you can block and absorb the arrow shots with Nature's Snare if your timing is good. This negates one of his stronger ranged attacks entirely.
Heal during the fight, not between phases. Caliburn does not give you breathing room between phases. Heal mid-combat rather than retreating to create distance, as backing off invites more ranged attacks.
Recommended Preparation
Armor: Upgrade to high refinement levels. Heavy plate gear is recommended for the damage reduction, as Caliburn's hits are punishing.
Healing items: Stockpile 100 to 200 grilled meat or equivalent healing items. The fight is long and healing mid-combat is essential.
Stats: Health Level 4 stat upgrades are recommended before attempting this fight.
Skills: Ensure Nature's Snare and Force Palm are available. Both are important for countering Caliburn's ranged attacks and creating stagger windows.
Parry proficiency: If you are not comfortable with the parry system, practice on earlier bosses first. Perfect parries are central to this fight.
Combat Stats
The following stats come from the official game database. Corrupted Caliburn has 1,020 HP, which is relatively modest compared to world bosses like Gabriel Caliburn (1,350 HP). This reflects his role as a story-gating encounter rather than a prolonged attrition fight. His Attack of 145 is substantial, and his Knockout threshold of 750 means sustained combo pressure is needed to trigger stagger windows. The Fatal stat of 5 indicates a low but non-zero chance of critical hits on the player.
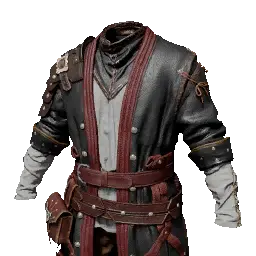
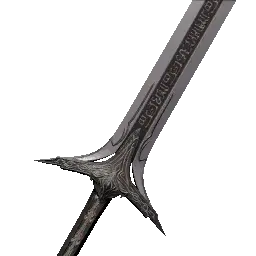
Corrupted Caliburn wields the Ashen Sentence, a Two-Hand Sword that accounts for the wide arcing slashes and charged overhead strikes throughout the fight. His armor set is built entirely from the Shadow Soul line: Shadow Soul Leather Armor on the upper body, Shadow Soul Leather Cloak as his cloak, Shadow Soul Plate Gloves on his hands, and Shadow Soul Plate Boots on his feet. This mixed leather-and-plate set reflects the Abyss corruption theme, blending shadow-infused cloth with reinforced plate pieces.
His skills are both passive. Boss Large Human is the shared AI archetype passive that all large humanoid bosses use in the game, governing general combat behavior and scaling. Corrupted Caliburn Buff is a unique passive specific to this encounter that activates his Abyss-enhanced abilities, including the shadow clone mechanic and dark energy attacks seen throughout the fight.
Defeating Corrupted Caliburn yields high-tier weapon materials used for endgame gear progression. The fight also advances the main story, opening the path to the final boss encounters of A Shadow in the Void.
Boss Rematches
In Patch 1.07.00 on May 15, 2026, Corrupted Caliburn was added to the Boss Rematches roster. The rematch venue is Fort Musket on land, distinct from the original Abyss encounter at Dimensional Bonds. The 1.07 update placed Corrupted Caliburn on the standard rematch roster alongside Muskan, Goyen, Crowcaller, and the Clockwork White Horn. All five Abyss-origin bosses in the 1.07 batch have been re-staged on land for the rematch flow, so the player can drop into the fight directly without re-entering the Abyss.
The rematch uses the standard Reminisce and Resonate modes documented on the Boss Rematches page. Reminisce restores the original first-encounter stat profile. Resonate scales the boss up to the player's current progression so the encounter stays meaningful for endgame builds. Memory Fragments lists the entry under the Knowledge menu once the original clear has been logged.
Drops and consumables follow the standard rematch rules. The unique endgame weapon-material drops from the original first clear remain locked to that kill, and consumables used during the rematch are refunded after the battle ends. The 1.07 update placed the rematch on land at Fort Musket rather than reopening the Abyss arena where the original encounter takes place.
Because the rematch reuses the cinematic intro from the original Abyss encounter, the Fort Musket re-staging plays back the original set-piece animation before the fight begins. The entry is browsed from Memory Fragments under the Knowledge menu once the original clear has been recorded.
Duke Gabriel Caliburn is first encountered during The Blood Coronation quest, where Kliff investigates his offices in Demeniss to find information about Myurdin's whereabouts. That initial encounter ends in a scripted defeat. Later, after an assault on Caliburn's fortress, the Duke escapes through a portal into the Abyss. The Abyss corruption twists Caliburn into his Corrupted form, empowering him with shadow clone abilities and dark energy attacks. His transformation reflects the broader theme of the Abyss corrupting those who seek to exploit its power.
Tips
The shadow clones cannot be damaged. Do not waste stamina trying to attack them.
If you are struggling with clone feints, focus on reacting only to the final hit in each attack string, as that is always the real Caliburn.
Keeping close to Caliburn reduces the variety of attacks he uses and makes his melee combos easier to parry.
The six-directional eruption from King's Cross has consistent gaps between the lines. Find a safe spot and do not panic-dodge into an eruption.
Red Rain is one of his most dangerous attacks at range. If you see the red markers appearing on the ground, prioritize constant movement over trying to attack.
Database Stats
Combat attributes recorded in the game database for TWO-HAND SWORD.