Overview
Kearush the Slayer is a massive, gorilla-like beast and a mandatory main story boss encounter in Crimson Desert. It is encountered at Hernand Castle in the Hernandian Territory during Act 5 of the campaign, where it has been unleashed upon the castle's helpless troops who seek outside help to contain it. Kearush is one of the game's imposing boss encounters, and its size hints at even larger creatures elsewhere in Pywel.
Kearush was first revealed on October 22, 2025 as part of an a 2025 exclusive show alongside Muskan and Walter Lanfordwith approximately 23 minutes of gameplay footage showing all three boss fights. The official Crimson Desert social media accounts promoted the reveal.
Appearance
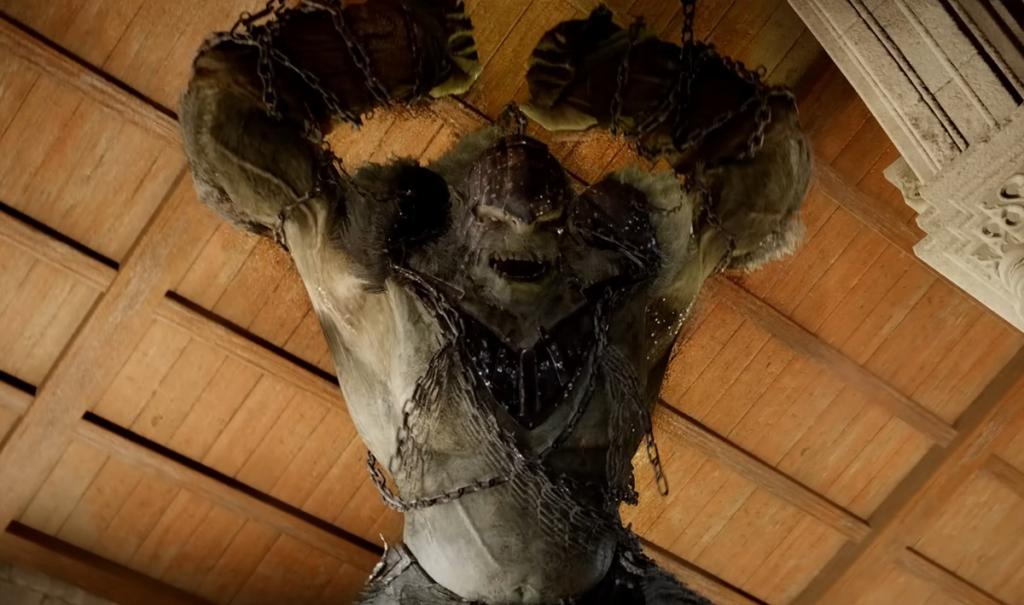
Kearush is a gargantuan beast that moves with a gorilla-like posture, using its massive arms to chargeclimb, and slam the ground. Its body is covered with armora helmet, and chains, suggesting it was previously captured or restrained before being unleashed at Hernand Castle. Despite its Hulk-like intensity in combat, journalists noted that Kearush looks "strangely fluffy and pettable," with pre-release preview describing it as a "prototypical Big Smashy Dude" whose fuzzy appearance creates an odd contrast with its lethal fighting style.
Location and Lore
Kearush is encountered at Hernand Castle in the Hernandian Territory. The scenario: "A beast unleashed on the Hernand Castlethe helpless troops seek help in containing this enormous ground shaking slayer." This framing suggests Kearush was deployed as a weapon against the castle's garrison, and Kliff intervenes to help contain the creature.
The armor, helmet, and chains on Kearush's body raise questions about its origin. Something or someone outfitted this beast with restraints, which implies it was captured and held before being set loose. Whether this was the work of the Black Bear forces, a rival factionor some other group has not been confirmed.
Health and Phase Structure
Kearush has three health barsa fight-extending mechanic shared with several other Crimson Desert bosses including the Staglord. The encounter is a prolonged, physically demanding fight that emphasizes swift, kinetic movement and forces players to stay mobile throughout all three phases. Each depleted health bar triggers increased aggression from Kearush, with its attack combinations becoming faster and more unpredictable.
Boss Statistics
The following base stats are. These numbers define how much damage it deals, how much punishment it can absorb, and at what Knockout threshold it becomes vulnerable to a stagger.
Stat | Value | Notes |
|---|---|---|
733 | Base health pool per health bar. The three-bar fight structure means total effective HP is significantly higher. | |
Attack | 26 | Base physical attack power. Hits feel heavy even in Phase 1; this value scales with phase progression. |
20 | Damage reduction from incoming attacks. Upgrading weapons to Level 4 or higher helps overcome this threshold. | |
100 | Governs sustained attack output and recovery speed between combo strings. | |
Knockout | 400 | The stagger threshold. Dealing enough Knockout damage within a short window forces Kearush into a vulnerable stunned state, opening a free damage window. |
Preparation
Kearush is one of the tougher fights in the first half of Crimson Desertand going in underprepared is a recipe for a long, painful learning experience. Taking some time to gather foodupgrade equipmentand pick up a few specific items beforehand makes a real difference.
Equipment and Level
Upgrade your weapons and armor to at least Level 4 at a Blacksmith before attempting this fight. Higher weapon damage shortens the encounter, and better armor means a single combo does not instantly delete your health bar. If your gear is underleveled, consider exploring other areas and completing side quests first.
Canta Helm
Visit Rhettthe arms dealer, and buy the Canta Helm. This piece of headgear has the "Nullifies Roar" affix, which completely negates one of Kearush's stun attacks. Without this helm, Kearush's roar stuns Kliff in place and opens him up for a follow-up hit. With the Canta Helm equipped, that entire attack becomes a free window to deal damage or heal.
Food Stockpiling
This is a long, three-phase fight, and you will burn through food faster than you expect. Stock up before entering Hernand Castle
Hearty Grilled Meat is the go-to healing food for this fight. Each portion restores around 220 health. Buy raw meat in bulk from the butcher at the Greymane Camp or in Hernandthen cook it at a campfire. Aim for at least 15 to 20 portions.
Buy additional food items from general merchants. Their stock resets every 24 in-game hours, so visit them on consecutive in-game days if you need to build up a reserve.
If you have access to a ranch at the Greymane Campcollect eggs from chickens. Cooked egg dishes provide a decent backup food source.
Spirit-restoring food (like Chewy Rice Cakes) is also worth carrying. You will drain Spirit quickly from repeated dodging across all three phases.
Palmar Pills
Palmar Pills are your insurance policy. A regular Palmar Pill lets you self-revive with 30% health at a Palmer Spirit tree when you die. Refined Palmar Pills restore you to full health on revive, and a supply of these can be found behind the waterfalls near Hernand. Always carry at least one or two before starting this fight; they turn a wipe into a second chance without restarting from scratch.
Fire Weakness
Kearush is extremely vulnerable to fire damage. When hit with a fire-imbued attack, Kearush's fur catches alight and the beast drops to the ground, rolling around to extinguish the flames. This counts as a hard crowd-control effect, and it lasts several seconds. During this window Kearush is completely helpless, giving you free hits without any risk of retaliation. Fire is by far the most effective elemental tool in this fight.
Obtaining Fire Weapons Early
If you do not yet have a fire imbue skill unlocked, you can still access fire damage before this fight. Enemies at the Karin Quarry (near Hernand) sometimes drop fire spears. These are consumable thrown weapons that apply fire on hit. Pick up as many as you can find. The supply is limited since the quarry enemies do not respawn indefinitely, so grab every fire spear you see on your way through that area.
Even a small number of fire spears can swing the fight. Each one that connects forces Kearush into the rolling animation, and that free DPS window adds up across three health bars. Save your fire spears for the later phases where Kearush's aggression ramps up and safe attack windows become scarce.
Attack Patterns
Kearush's attacks are built around raw physical power. It uses its massive arms and body weight to create area-of-effect damage zones that punish stationary players. Learning the visual tells for each attack is essential because many of its strikes cover wide areas and chain into follow-ups.
Attack | Description | |
|---|---|---|
Ground and Pound | Beats its chest, then slams the ground with both hands, followed by a continuous rampaging series of smash attacks. This is its most dangerous combo and covers a large area. | Roll away at the chest-beating tell. Do not try to block the full combo; create distance and wait for it to end. |
Wall Climb Leap | Climbs nearby walls, then lunges from the wall toward the player's position. The leap covers significant distance and deals heavy impact damage. | Watch for Kearush moving to a wall. Roll sideways when it launches. The landing has recovery frames you can exploit. |
Instant Body Slam | Jumps high from the ground for a body slam directly at the player's current location. Faster than the wall climb variant. | Dodge roll at the apex of the jump. Staying mobile reduces the chance of being directly under the landing zone. |
Stomp and Swing Combo | Tries to stomp the player with its feet, then follows up with sweeping hand swing attacks that cover a wide arc. | Dodge the initial stomp, then roll behind Kearush during the hand swings to avoid the arc. |
Multi-Hit Hand Smash | Smashes the ground with its bare hands multiple times in rapid succession, then finishes with a heavy elbow slam. | Back away during the hand smashes. The elbow slam at the end has the longest recovery window for counterattacking. |
Two-Hand Smash | Distances itself from the player, observes their movement, then jumps forward to crush them with a two-handed overhead strike. | The observation pause is the tell. Sidestep when Kearush commits to the jump. |
Grab and Throw | Reaches out and grabs Kliffthen hurls him across the arena. Becomes more frequent in Phase 3. Deals heavy damage and repositions you unfavorably. | Roll sideways when you see the grab reach. Do not backstep; the grab has forward tracking that catches backward movement. |
Rampage Mode | Enters a berserker state with increased attack speed and aggression. Chains multiple attacks together with shorter recovery windows. | Play defensively during rampage. Focus on dodging and wait for it to exhaust itself before re-engaging. |
Mounting Mechanics
Like the Queen Stoneback Crab encounter, Kearush can be mounted. Players can clamber onto its back in a Dragon's Dogma-style interaction and stab it repeatedly with their sword to deal significant damage. This is one of the most efficient ways to drain its health bars, but it comes with a major risk.
Mounting Kearush and stabbing its back is one of the most efficient damage strategies, but players should be ready to disengage when it begins thrashing violently.
The Back Hang skill, located at the final tier of the Grappling skill tree, is the key to making mounting reliable. Back Hang lets you latch onto large enemies from the side or rear and deliver repeated stab damage while staying out of reach of most ground-level attacks. If you have not unlocked Back Hang yet, consider investing in the Grappling tree before this fight. Without it, mounting Kearush is riskier and harder to initiate cleanly.
Dodge and Spirit Management
One of the biggest mistakes players make against Kearush is relying on backstep or perfect dodge to survive his rapid multi-hit combos. Each perfect dodge still consumes Spiritand Kearush's fast combo strings hit so many times in quick succession that spamming perfect dodge will drain your Spirit bar completely. Once your Spirit is gone, you cannot dodge at all, and Kearush's finishing blow at the end of the combo will catch you standing still.
The safer approach is to roll away from Kearush at the start of a combo string rather than trying to dodge through each individual hit. Create space, let the combo play out, then move back in to punish the recovery window. Rolling costs less Spirit than repeated perfect dodges, and it puts you at a safe distance where the multi-hit chains cannot reach.
Dodge forward-right during single attacks to get behind Kearush, land two or three quick strikes, then disengage and prepare to dodge again. Avoid trying to parry Kearush's attacks. His attack timing does not reward parry attempts, and a missed parry against something this large usually means eating the full hit. Evasive rolls are far more reliable across all three phases.
Combat Strategy
The Kearush fight rewards players who can read attack patterns and find openings between combos. Standing at mid-range is the most dangerous position because most of Kearush's attacks are designed to punish players at that distance. Either stay very close (to exploit gaps between swings) or far away (to avoid area attacks entirely).
Phase 1 (Blue Health Bar)
Kearush's first phase is the most forgiving. His attack patterns mostly consist of 3- to 4-hit ground slam combos with clear wind-up animations. Dodge backward or sideways when you see the wind-up, wait for the combo to finish, then rush in for two or three hits during the recovery window. This phase is a good time to learn his attack tells without too much pressure.
Use this phase to practice the rhythm of the fight and conserve your food supply. Do not burn through your Hearty Grilled Meat here unless you absolutely need it. If you have fire spears, save them for later phases.
Phase 2 (Green Health Bar)
Phase 2 adds the Wall Climb Leap to Kearush's moveset. He jumps to a wall, hangs there briefly, and then launches himself at your current position. When you see him move toward a wall, start repositioning away from the wall's trajectory. Roll in any direction the moment he leaps off. The landing impact covers a wide area, so give yourself plenty of space.
Kearush also becomes more aggressive in this phase, with shorter pauses between combos. If you have fire spears, this is a good time to start using them. Each fire spear that connects forces Kearush into the rolling animation, giving you several seconds of uncontested damage.
Phase 3 (Red Health Bar)
Phase 3 is where the fight gets brutal. Kearush runs through everything from the previous phases but faster, with longer combo strings replacing the standard 3-hit patterns. He grabs more frequently, throws Kliff more aggressively, and enters Rampage Mode more often. Recovery windows between combos shrink noticeably.
Patience is the only reliable approach here. Attack only after Kearush finishes a full combo, not during it. Trying to squeeze in extra hits mid-combo is how most deaths happen in this phase. If you saved fire spears for Phase 3, now is the time to use them. The fire knockdown animation gives you the same safe window even when Kearush's natural recovery windows have become dangerously short.
If you die in Phase 3, use a Palmar Pill to self-revive rather than restarting the entire fight. A Refined Palmar Pill brings you back at full health, which is often enough to finish off the last portion of the final health bar.
Tips
Kearush's chest-beating animation always precedes the Ground and Pound. Use it as a consistent cue to create distance.
The Two-Hand Smash has the longest wind-up of any attack. If you recognize the observing stance early, you can get in a full combo before dodging the strike.
During Rampage Mode, do not attempt to mount. The increased aggression makes it nearly impossible to stay on safely.
Do not spam backstep or perfect dodge against rapid multi-hit combos. You will drain all your Spirit and get caught by the finishing blow. Roll out to safety instead.
Fire is your best friend. Even a single fire spear hit forces Kearush to the ground for several seconds. Save at least a couple for Phase 3.
The Canta Helm ("Nullifies Roar" affix) turns Kearush's roar stun into a free damage window. Buy it from the arms dealer before the fight.
Ranged attacks (bow) are effective during the pauses between Kearush's attack chains, but the window is short. Prioritize melee damage when safe.
Bring at least 15 to 20 portions of Hearty Grilled Meat. This fight is long, and even skilled players take a lot of incidental damage across three health bars.
Always eat a full meal and drink an elixir before starting the fight. Entering the arena with active food and potion buffs gives you a noticeable edge in the first phase.
If Back Hang is not unlocked, invest in the Grappling skill tree before this boss. Mounting damage is the fastest way to chew through health bars.
Passive Skills and Boss Abilities
Kearush carries two passive abilities that are active throughout the entire encounter. These are inherent to its classification as a Troll-type boss and shape how the fight feels from start to finish.
Ability | Type | Effect |
|---|---|---|
Boss Troll Buff | Passive | A Troll-type boss enhancement that bolsters Kearush's overall combat performance. This passive is tied to its creature classification and is always active. This adds to the elevated durability and power that makes the fight a step above standard enemy encounters. |
Detect Buff Fear Target Strong | Passive | Kearush detects the player and applies a fear effect against strong targets. This is the mechanical basis for the roar stun attack, where Kearush's presence triggers a fear response in Kliff. Equipping the Canta Helm ("Nullifies Roar" affix) counters this passive directly, removing the stun and turning the fear window into a free damage opportunity. |
The Troll classification is significant beyond just Kearush. It places the boss within a broader monster taxonomy in Crimson Desert. Fire damage is especially effective against Troll-type enemies generally, which aligns with how fire spears and fire imbues create the most reliable crowd-control windows during the Kearush encounter.
Boss Roster Context
Kearush the Slayer is one of at least 76 bosses (per the Knowledge system) in Crimson Desert. It was revealed alongside Muskan (an eight-foot brawler) and Walter Lanford (a shotgun-wielding gunman) in the October 2025 a 2025 exclusive show. Where Muskan tests close-range brawling and Walter Lanford demands precision and evasion, Kearush combines area-of-effect avoidance with the mounting mechanic, giving the fight a unique verticality compared to the game's other encounters.
Database Stats
Combat attributes recorded in the game database for Kearush the Slayer.
Stat | Value |
|---|---|
HP | 540 |
Attack | 92 |
Defense | 50 |
Stamina | 100 |
Knockout | 500 |
Fatal | 0 |