Loading...
Loading...
Boarding
May 23, 2026 at 07:44 AM
Repaired four garbled words and a broken food link, and added wikilinks for crew gear, weapons, ammo, loot, and vendors
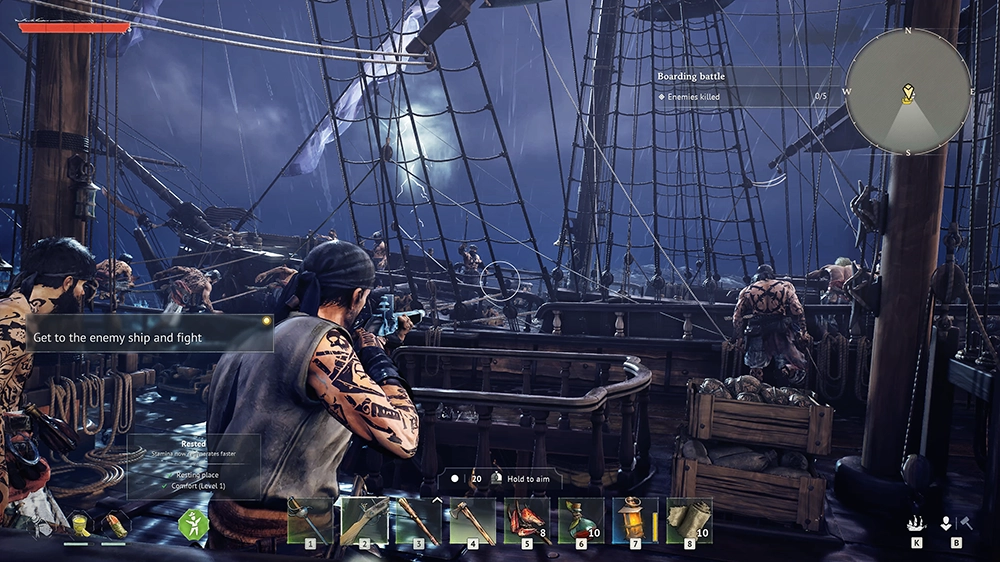
Boarding is a core phase of naval combat in Windrose. After weakening an enemy ship with cannon fire, players can pull alongside and board it, transitioning seamlessly to on-deck melee combat against the enemy crew. The transition happens without loading screens, consistent with the game's seamless ship-to-shore design.
Weaken the enemy ship with cannons. The goal is not to sink the ship but to wear it down enough for boarding. Start with bar shot into the enemy sails (5 to 6 volleys) to slow them, then switch to regular cannonballs to damage the hull.
Position your ship alongside the enemy. Dock as close as possible, keeping the enemy on your port or starboard side. Reduce speed to roughly 3/4 sail for tighter turning during approach.
Wait for the boarding prompt. When the enemy ship's health is low enough and you are close enough, a boarding prompt appears on screen. Do NOT jump onto the enemy ship before this prompt appears.
Press Space to initiate boarding. Your NPC crew boards the enemy ship alongside you. A progress counter appears in the top-right corner tracking how many enemies remain.
Fight the enemy crew. Defeat all enemy sailors in close-quarters combat. In the Seafarer quest, this means defeating 7 enemies.
Take the helm to end the boarding action once enemies are defeated or have surrendered.
Loot the ship for trade goods and rewards.
Jumping onto the enemy ship before the boarding prompt appears is one of the most common mistakes in the game. If you board early, the entire enemy crew will surround you while your own crew remains on your ship, resulting in a near-certain death in a 1-versus-6+ situation. Always wait for the formal boarding prompt so your crew boards alongside you.
When boarding is initiated, your NPC crew joins the assault on the enemy ship. Key details about crew performance:
Behavior | Details |
|---|---|
Crew serve primarily as tanks. | They absorb enemy hits effectively but deal minimal damage on their own. Let them take aggro while you attack from behind. |
Crew boarding can be delayed. | Community reports indicate inconsistent timing, with delays of up to 30 seconds in some cases before all crew members board. |
Without upgrades, crew dies quickly. | Unupgraded crews get overwhelmed rapidly, leaving you in a 1-versus-6+ fight. |
With fully upgraded Boarding Party Gear, crew is very effective. | One community member confirmed: "I fully leveled mine and my crew reliably handles most of the enemy sailors; I just mop up behind them." |
Boarding Party Gear is ship equipment that improves your NPC crew's combat performance during boarding. It is crafted at the Shipwright's Workshop and equipped via the Wharf's ship management interface.
Detail | Information |
|---|---|
Crafting Recipe | 7 Copper Ingots + 7 Rough Hide + 7 Coarse Fabric |
Crafted At | |
Equipped At | Wharf (Manage Ship interface, Ship Gear slots) |
What It Upgrades | HP, Defense, and Attack of your NPC crew during boarding |
Upgrade Location | Shipwright's Workshop Upgrade tab (same bench as cannons) |
Upgrading Boarding Party Gear is the single most impactful preparation for boarding encounters. Even the first upgrade noticeably improves crew performance, and at maximum level the crew can handle most enemy sailors almost independently.
Successful boarding yields trade goods that can be sold to Traders:
Image | Item | Type |
|---|---|---|
Insia of a Blackbeard Lieutenant | Quest-specific reward (Seafarer quest) | |
| Trade good | |
Trade good | ||
| Trade good (high value) | |
| Currency |
These trade goods cannot be opened or used directly. They are meant for sale to dedicated Traders at Tortuga, so store them at your base until you reach the live Tortuga merchant network in Early Access.
A confirmed combat mechanic: enemies cannot attack players on elevated or high ground positions. During boarding, players can climb to elevated areas on the enemy ship and use ranged weapons from safety while crew members hold aggro at deck level. This works as long as enemies have aggro on you or your crew. The same mechanic applies to land combat.
Community-recommended equipment for boarding encounters:
Slot | Recommendation |
|---|---|
Melee | Epic-tier saber or cutlass for fast, close-quarters fighting |
Ranged | Epic musket for opening shots before closing distance. Fire at 2 enemies before the boarding prompt to soften them up. |
Best available armor set, upgraded evenly across all pieces | |
Food buffs | Spicy Chicken with Sweet Potato (+20 Strength), Coconut Milk with Bananas (stamina boost) |
Alchemy buffs | Melee damage potions and weapon oils |
The Blunderbuss is particularly effective during boarding. Its in-game description calls it "a boarding crew's favorite weapon." It deals high close-range damage and has a chance to knock enemies down. The Dragon's Breath variant spits flame in a cone. The trade-off is limited range; it is best used after closing distance.
In co-op multiplayer, groups can currently include up to 8 players total, though official sources still recommend closer to 4 for smoother late-game performance, and each player commands their own ship. Co-op boarding has a confirmed limitation: if one player has already boarded an enemy ship with their crew, other players cannot initiate a second formal boarding with their own crews on the same ship.
Community workarounds:
All players ride on one ship. Non-drivers board enemy vessels to fight sailors while the captain stays at the helm.
Each player takes their own ship to swarm enemies with overwhelming force across multiple targets.
Individual players can still jump aboard to assist during another player's boarding action, even without a formal boarding prompt for themselves.
Upgrade Boarding Party Gear fully before attempting harder encounters; this is the most impactful preparation step
Never jump in before the boarding prompt; wait for your crew to board alongside you
Do not board ships higher level than you; the level difference makes combat extremely punishing
Use chain shot first to slow the enemy ship during the cannon phase, making positioning easier
Let your crew take aggro first; position behind your allies rather than leading the charge
Use ranged weapons before closing in; fire your musket at 2 enemies before boarding initiates
Exploit high ground; climb elevated positions and fire ranged weapons while crew holds deck-level aggro
Eat food and drink potions before boarding; stamina and damage buffs make a significant difference
Practice parrying; blocking and parrying during boarding reduces armor damage and tires enemies
Stock healing items; bandages and potions prevent one-shot deaths from elite enemies
The Seafarer quest is where players first experience boarding. After building the Shipwright's Workshop, crafting 12-Pounder Cannons (10 Copper Ingots + 10 Wood), constructing a Wharf, and equipping their ship, players sail to engage Blackbeard's fleet. The quest culminates in boarding a Blackbeard's Pirates' Ketch and defeating 7 enemy sailors. The February 2026 demo ended here, but the live Early Access build continues far beyond this tutorial encounter.
The boarding prompt appears once the enemy hull is significantly weakened. Community guides frame the threshold as the ship visibly starting to list and take on smoke. The specific percentage is not documented in primary sources. Below the threshold, trying to board does nothing; above it, the target becomes boardable but will still sink under sustained cannon fire if you keep hammering.
After the icon appears, pull alongside on the port or starboard, match their heading, and press SPACE. Grappling hooks throw automatically, your crew boards with you, and you can simply jump across to the enemy deck. The whole transition is seamless with no loading screen, the same as land-to-sea movement everywhere else in the game.
If you die during a boarding fight, there is no respawn on the ship. The entire naval encounter restarts, even if you had already cleared six of the seven sailors. This is one of the harshest penalties in the game and it is why experienced players rank Boarding Party Gear as the single most important ship upgrade, ahead of cannon damage and even hull bracing.
An unupgraded crew melts in under 30 seconds, leaving you alone against six or seven hostile sailors. A fully upgraded crew can reliably handle the majority of the enemy deck, leaving you free to mop up stragglers or to climb to high ground and pick off targets with ranged weapons. Upgrade Boarding Party Gear at the Shipwright's Workshop Upgrade tab before attempting any fight tougher than the first Seafarer-quest ketch.
When you successfully initiate boarding, any other hostile ships in the engagement are supposed to hold fire. Once the boarding animation starts, you can usually finish the melee without taking cannon splash from the rest of the fleet. Community testing during Early Access has confirmed one occasional bug: in rare cases, escort ships continue firing during boarding. If that happens, break off the boarding attempt, clear or drive off the escorts, and then re-board the original target.
When a convoy includes a visible loot-icon flagship surrounded by gunships, prioritize damaging the flagship to the boarding threshold as fast as possible. The flagship holds the valuable contraband and naval supplies; the escorts only drop basic piastres and occasional insias.
Cleared ships drop cargo that cannot be opened or used directly. Everything is meant for sale. Most items go to Traders in Tortuga or the hideouts of the Brethren of the Coast, Buccaneers, or Smugglers of Port Royal for piastres. Talisman bones, silver spoons, and ancient chalice loot must instead be sold at the Smugglers' Archipelago, which is unlocked through a follow-up quest after your first Tortuga visit. That vendor pays guinea for luxuries and stacks of piastres for contraband, making the archipelago run one of the highest-value trade loops in Early Access.
Boarding also drops faction insias from defeated sailors. Turn these in to the Bounty Agent at the Buccaneers' hideout to raise reputation rather than selling them.
Popping a grog right before the cannon phase is standard captain discipline, and it carries over into the boarding phase because grog effects run on a real-time timer, not on a combat state. A grog triggered at the start of the cannon exchange is still ticking when the boarding prompt appears, provided the naval fight did not stretch beyond the grog's duration. The Dead Eye Grog in particular grants a +15% damage buff for 30 minutes, which covers the entire naval engagement plus the boarding melee plus the mop-up afterwards.
Other grog variants buff different stats. The three general categories documented in community guides are damage, reload speed, and damage reduction. For a boarding-focused sail out, the damage grog is almost always the right pick because it amplifies the melee phase more than the reload speed or damage reduction grog, both of which matter more during the cannon phase. If you are running a hybrid sail-and-board loadout, stack a damage grog with a food buff like Spicy Chicken with Sweet Potato (+20 Strength, 30 minutes) so both timers overlap the whole engagement.
In fleet engagements, not every enemy ship is worth the boarding effort. Ships that will drop a pirate chest display a small chest icon above them once they hit boarding threshold. That icon is your primary signal: chest-icon ships are always the priority boarding target because they drop the valuable contraband, medical crates, and occasional Lieutenant-tier insias that move the Buccaneers and Brethren reputation needles.
Non-chest ships should usually be sunk rather than boarded. Sinking them is faster than running the full weaken-board-melee-loot cycle, and the loot they spill into the water frequently includes Combat Repair Kits. Scooping those kits during a long fleet fight is often what keeps the hull alive long enough to reach the chest-carrying flagship. A practical rotation: bar shot into the flagship to slow it, sink the nearest escort for its repair kit drop, patch the hull, then pull alongside the slowed flagship for the proper boarding action.
Chest icon present means board. The ship holds contraband and quest items that only come through the boarding loot flow
No chest icon means sink. Treat these as farm nodes for Combat Repair Kits and basic piastres
Hindered debuff can apply to either type, so track bar shot targets separately from chest targets
Once the boarding prompt fires and you press Space to jump across, the menu-based interactions from naval combat end. From that point on, every item you want to use (repair kits on yourself, a second grog if the first wore off, healing potions, ranged ammo swaps) has to be on the hotbar. Set the hotbar at the Wharf before you sail; do not try to rebind slots mid-boarding because enemy sailors do not wait for you to alt-tab through the inventory.
A recommended boarding hotbar layout: slot 1 for the melee weapon (saber or cutlass), slot 2 for the blunderbuss, slot 3 for healing potions, slot 4 for a damage grog, slot 5 for a food buff to reapply if the fight drags on. The melee weapon stays active by default; the hotbar entries are for the quick swaps you actually make under pressure.
Co-op boarding has a reward structure that the tutorial does not explain, and many launch-week groups learn the rules the hard way. Only one player can trigger the docking animation with Space, but every player who is on the enemy deck at the moment the last sailor falls collects the full piastre money reward. The docker additionally collects an exclusive supplies reward (contraband, medical crates, naval supplies) that does not distribute across the party.
How the splits work. Money rewards split across every party member standing on the enemy deck at the moment the final sailor falls. The amount each player earns is the full share, not a divided pool, so a 4-player boarding earns each player the full piastre value posted on the boarding prompt. The docker's exclusive supplies reward is separate: those trade goods (contraband, medical crates, naval supplies) only drop into the docker's hold, and rotating the docker role between fights is the cleanest way to distribute them across a full session.
How non-dockers get on the enemy deck. Two paths work whether or not the swimmer is the player who initiated the boarding. First, pull your own ship close enough that the two hulls are near-touching, then jump across to the enemy deck from your own railing; combat state does not interrupt the hop. Second, drop into the water and swim to the enemy hull, then climb the boarding ladder or grapple line from the water. Both paths leave a player on the enemy deck before the final sailor falls, which is the only requirement for the money reward.
Sinking without boarding is a solo loot loop. If the enemy ship is sunk instead of boarded, only the player who dealt the killing blow collects the dropped cargo. Non-boarding kill loot does NOT distribute across the party the way the boarding money reward does. This flips the incentive: a party that wants to share wealth should always push their targets to boarding threshold and then board them rather than continuing to fire once the boarding prompt appears. Boarding is the high-value action for group runs; sinking is the solo action.
Beyond its role as the loot-collection phase, boarding also doubles as an emergency recovery tool when a convoy swarms the player ship. Once the boarding prompt appears on any hostile ship in the engagement and Space triggers the docking animation, the remaining enemy ships in the fleet hold fire and hold position for the duration of the boarding state. This is the intended behavior that prevents the boarded player from eating broadsides from escort gunships during the melee, and it can be weaponized as a recovery window when the player's hull is about to collapse.
How the recovery pattern runs. Push one enemy ship to boarding threshold with normal cannon fire, then trigger the dock with Space. Rather than immediately jumping across to the enemy deck, open the ship inventory with Q and work through the Combat Repair Kits stored in the hold. Each kit restores hull HP even during the boarding pause, and the rest of the fleet remains disengaged for the whole stretch. Once the hull is topped back up, either commit to the boarding melee for the piastre reward or pull away cleanly and resume the engagement from a better position. Both paths are strictly cleaner than eating another broadside at 15 percent hull.
Why this matters for Blackbeard Ketch captains. The emergency-board pattern is particularly valuable for fast-light ship variants whose hull HP cannot absorb a prolonged multi-ship trade. The standard pattern for a Blackbeard captain caught in a 1v3 is to chain-shot the fastest enemy first, then push the slowest enemy to boarding threshold, then trigger the dock to freeze the remaining two escorts while the kit stack refills the hull. On a Brethren or stock Ketch with more raw HP, the pattern is useful but less load-bearing; on a Blackbeard, it is often the difference between escaping with cargo intact and respawning at the Wharf for the 20-Wood restore.
Not every ship that surfaces on the boarding minimap is worth the cannon spend and the melee risk. The single most reliable triage rule for naval combat engagements is the color of the enemy ship's nameplate. Vessels with golden text labels above the hull are freighters, and freighters carry the highest-tier boarding rewards in the game. Vessels with white text labels are routine merchant or patrol traffic and almost never justify the time investment outside the early questing tutorial.
On a level 12 to level 15 freighter at the standard hull-bracing tier, a clean boarding raid yields roughly 1,000 to 1,500 silver per ship, paid out as a mix of Coin Pouch and stacked Silver Ingot drops. Beyond the raw silver, the freighter's hold also drops consumable cargo (food crates, alchemy bases, naval supply parcels) that resells for additional silver at any port Trader. The full ship-to-port loop on a single freighter therefore tops out closer to 2,000 silver once the cargo is sold off, which makes freighter chains the most efficient on-water income source once Boarding Party Gear is upgraded enough to keep the crew alive.
White-text ships, by contrast, drop only minor pocket change and the occasional repair kit. Sink them for the floating loot rather than committing to the full weaken-board-melee-loot cycle. The triage hierarchy in a multi-ship engagement, in priority order:
Golden-text freighter: always the primary boarding target. Push to boarding threshold first, then melee for the silver and consumable cargo payout.
Golden-text Frigate or warship: board if the crew is manageable. Pays slightly less silver than a hauler-class freighter but drops higher-tier insias for reputation grinds.
White-text patrol or merchant: sink rather than board. The loot drops scooped from the water are usually worth more than the boarding payout for white-text targets.
Escort gunship in a freighter convoy: sink first to clear the cannon threat, then circle back to the freighter at boarding threshold.
The gold-text rule combines naturally with the existing chest-icon triage above. A ship that has both a golden nameplate and a chest icon at boarding threshold is the highest-value target on the map. A ship with neither is a sink-and-scoop target. Mixed cases (gold-text without a chest icon, or white-text with a chest icon) are judgment calls based on the rest of the engagement, but the silver yield from freighters specifically is what makes the gold-text marker worth memorizing as a lifelong habit.
The on-deck phase of boarding is a 60-second crowd-clear problem against six or seven sailors plus the captain. Three weapon archetypes solve that problem cleanly, and one of them does not even require crossing the gangplank. Pick the archetype that fits your existing build rather than re-spec for boarding specifically; all three work with the same Boarding Party Gear upgrade path and the same food and grog routines.
The Plague Halberd is the strongest single-weapon answer to a freighter deck full of sailors. Light attacks build Plague Echoes at one stack per swing, and at five stacks the special attack triggers a wide AoE explosion that simultaneously clears clustered enemies and heals the wielder for 35% of maximum HP. One full Echoes cycle wipes the front rank of the enemy crew, the heal refunds the chip damage taken closing the distance, and a second cycle finishes the deck before the boarding timer becomes a concern. Commit to swings between explosions; pulling out a pistol or any other weapon deletes the Plague Echoes stacks, so the halberd should stay equipped for the entire boarding action.
The Soul Eater pairs naturally with the halberd or any other primary melee weapon as a hot-bar second slot. Its special attack drains health from every nearby enemy in a wide AoE on a two-minute cooldown, and the drain pulse hits both decks simultaneously, which means a single trigger can pull HP off enemies still standing on the original ship plus any stragglers that boarded back across. Treat Soul Eater as the panic button for boarding fights that go sideways: when the Plague Halberd Echoes are not stacked yet and the wielder's HP is collapsing, the Soul Eater drain is a guaranteed two-minute heal that does not depend on building a stack count first.
The third archetype skips the melee phase entirely. The Reliable Musket headshots clear a freighter's crew at full musket range, which means the wielder can stand on their own deck (or on a rooftop, crow's-nest, or other elevated position the enemy AI cannot path to) and pick off every sailor without ever crossing the gangplank. Pair the musket with a Sturdy Rapier in the off-hand for parry coverage in case a sailor does close the gap. The pattern is especially efficient on freighters because the high ground exploit and the AI pathing limitations stack: the enemy crew clusters on the deck, the wielder stays at range, and the boarding action resolves before the AI ever lines up a shot.
The Dominating Presence talent is the single most efficient damage talent for boarding work. After any enemy dies within 8 meters, the wielder gains +18% melee damage for 60 seconds. A standard boarding action lasts roughly 60 seconds from the first kill to the final sailor falling, so the buff covers the entire melee phase off a single proc. Slot it before sailing out for a freighter chain even if it is not part of the standard land build.
The pet boar from the Boar Whistle is a free aggro sponge that survives boarding actions cleanly. Summoning the boar mid-fight (the whistle works on the enemy deck the same way it works on land) pulls aggro off the wielder for the duration the boar stays alive, which buys the time needed to land a Plague Halberd Echoes special or to reposition for a Reliable Musket headshot line. The boar pairs well with the Boarding Party Gear-upgraded NPC crew because the two combined absorb almost all incoming damage while the wielder focuses on the kill cycle.
Crowd-clear melee: Plague Halberd primary, Soul Eater hot-bar slot 2 for the emergency drain.
Sniper / no-cross: Reliable Musket primary, Sturdy Rapier off-hand, position on high ground or your own deck.
Talent slot: Dominating Presence covers the full 60-second boarding window from the first kill onward.
Pet support: Boar Whistle pet pulls aggro and tanks. Summon mid-fight as needed; the cooldown only triggers if the boar dies.
All three loadouts share the same support layer described in the existing recommended-loadout and grog sections above. The weapon choice changes the kill cycle; the food, alchemy, and grog timers do not.