Loading...
Loading...
Crafting
April 17, 2026 at 08:21 AM
Add Recipe Discovery, Workstation Upgrades via Attachments, and Discovery-Rarity Interaction sections from hpdqqRDfVXY transcript
Crafting in Windrose uses a discovery-based system where new recipes unlock only after you encounter specific materials for the first time. Finding copper ore, for example, enables ingot creation, which then unlocks new workstation recipes. Players must also learn blueprints from the Curios menu after discovery, and exploration notes found at Points of Interest can unlock additional building and crafting recipes.
Several quality-of-life decisions set Windrose's crafting apart from other survival games: tools never break or degrade once crafted, dismantling placed buildings returns all materials, and any resources stored at your base are automatically accessible from nearby crafting stations.
Any resources stored in chests at your base can be accessed from crafting stations without carrying them in your inventory. If you have 200 wood in a chest, you can use that wood at your workbench without picking it up first. This eliminates the constant inventory shuffling that plagues most survival games.
A "Deposit Same in Chest" feature lets you quickly sort items into matching storage containers without opening each one individually. You can also use mass-transfer to move items in bulk between storage and inventory.
Different station types handle different item categories. Most stations must be placed within bonfire range to function. Some require a roof overhead, while others must remain outdoors.
Station | Cost | Function | Placement |
|---|---|---|---|
Bonfire | 5 Wood | Camp center; defines the radius for station placement | Anywhere |
Workbench | 5 Wood | Primary station for tools, bags, and basic items | Bonfire range |
Cooking Fire | 3 Wood + 3 Stone | Food preparation; also provides Comfort +1 | Bonfire range |
Charcoal Kiln | 25 Wood + 20 Clay | Converts 1 Wood into 1 Charcoal for smelting | Outdoors, bonfire range |
Smelting Furnace | 15 Clay + 30 Stone | Processes ores into ingots (6 Copper Ore + 1 Charcoal = 1 Copper Ingot) | Outdoors, bonfire range |
Large Smelting Furnace | 20 Hewn Stone + 10 Iron Ingot + 20 Clay | Faster smelting (Iron Ingot in 15s instead of 30s) | Outdoors, bonfire range |
Weaponsmith Workshop | 10 Wood + 5 Copper Ingot | Crafts and upgrades weapons | Roof required, bonfire range |
Armor and Clothing Workshop | 5 Wood + 10 Coarse Fabric | Crafts armor and clothing | Roof required, bonfire range |
Alchemy Table | 5 Wood + 2 Clay Pot | Crafts potions and healing elixirs | Roof required, bonfire range |
Spinning Wheel | 10 Wood + 5 Rope | Processes plant fiber into cloth and fabric | Roof required, bonfire range |
Tanning Rig | 10 Wood + 5 Rope | Processes animal hides into leather | Roof required, bonfire range |
Millstones | 15 Wood + 1 Millstone Parts | Grinds materials into powder (e.g., Gunpowder from Ash + Sulfur) | Roof required, bonfire range |
Enchanting Table | 3 Mire Metal Ingot + 10 Hewn Stone + 10 Plant Fiber + 2 Essence Arborum | Enchants materials for enhanced properties | Roof required, bonfire range |
Jewellery Table | 10 Wood + 5 Iron Ingot + 3 Silver Ingot | Crafts rings, necklaces, and accessories | Roof required, bonfire range |
Shipwright's Workshop | 15 Wood + 10 Coarse Fabric + 5 Copper Ingot | Crafts ship components, cannons, and repair kits | Roof required, bonfire range |
Wharf | 10 Wood + 10 Coarse Fabric | Repairs destroyed ships; must be placed at the shoreline | Shoreline, bonfire range |
Disassembly Table | 10 Wood + 10 Clay + 4 Copper Ingot | Deconstructs equipment for partial material recovery | Bonfire range |
Seedbed | Requires Fertile Soil | Plant crops for farming | Bonfire range |
Crafting stations display a level number (e.g., "Workbench 1"). Higher-level recipes require the station to be upgraded. Upgrades are performed by building companion structures adjacent to the main station within bonfire range. Each companion raises the station's effective level by one.
Base Station | Upgrade | Cost |
|---|---|---|
Workbench | Tool Shelf | 5 Mahogany |
Sawhorse | 20 Wood + 10 Copper Ingot | |
Toolbox | 10 Wood + 20 Nails + 5 Iron Ingot | |
Cooking Fire | Cutting Table | 10 Wood + 2 Copper Ingot |
Cookware Shelf | 10 Hardwood + 2 Ironware | |
Supplies Rack | 5 Hardwood + 5 Coffee Beans + 5 Salt + 5 Nuts + 5 Lobster Mushroom | |
Alchemy Table | Stove and Pot | 5 Stone + 5 Clay + 1 Copper Pot |
Distiller | 5 Mire Metal Ingot + 5 Wood + 2 Crocodile Hide Piece | |
Reagent Table | 5 Hardwood + 2 Rum Bottle + 2 Silver Ingot + 2 Sulfur + 1 Ironware | |
Weaponsmith | Anvil | 10 Wood + 1 Anvil (crafted from 30 Iron Ingot) |
Bellows | 20 Mire Metal Ingot + 15 Crocodile Hide Piece + 5 Hewn Stone | |
Armor Workshop | Material Rack | 20 Wood + 15 Crocodile Hide Piece + 10 Linen Fabric + 10 Rough Hide |
Shoemaker's Bench | 30 Hardwood + 20 Tanned Leather + 15 Linen Fabric | |
Jewellery Table | Jeweller's Bench | 10 Wood + 5 Mire Metal Ingot + 3 Silver Ingot + 1 Gold Ingot |
The first few hours revolve around basic tool crafting and setting up a smelting pipeline. Copper Ingots are a major milestone because they unlock a huge number of new recipes across every station.
Item | Materials | Station | Notes |
|---|---|---|---|
Stone Pickaxe | 3 Wood + 3 Stone | Workbench | First mining tool |
Stone Axe | 3 Wood + 3 Stone | Workbench | First chopping tool |
Bandage | 1 Coarse Fiber | Workbench | Restores 900 HP over 30s; any damage cancels the heal |
Coarse Fabric | 3 Plant Fiber | Workbench | Key material for Armor Workshop and bags |
Rope | Plant Fiber | Workbench | Needed for Spinning Wheel and Tanning Rig |
Torn Sailcloth Bag | Plant Fiber + Cloth | Workbench | Increases carry capacity |
Torch | Wood | Workbench | Unlimited durability once crafted |
Charcoal | 1 Wood | Charcoal Kiln | Essential fuel for smelting |
Copper Ingot | 6 Copper Ore + 1 Charcoal | Smelting Furnace | Major milestone; unlocks many recipes |
Iron Ingot | 3 Foothills Iron Ore + 1 Charcoal | Smelting Furnace | 30s at regular furnace, 15s at Large |
Tip: breaking shipwreck wreckage with an axe yields Planks and Nails, which are otherwise harder to obtain early on. Lanterns (a wearable waist item) replace the handheld torch and free up your weapon slot.
Metal ores are found on progressively more distant and dangerous islands. Each new metal tier unlocks stronger weapons, armor, and crafting station upgrades.
Metal | Source | Used For |
|---|---|---|
Copper | Caves on starting islands | First metal tools, station upgrades, basic weapons |
Iron | Foothills islands | Mid-tier tools and weapons, Toolbox upgrade, Anvil |
Mire Metal | Swamp areas | Enchanting Table, Bellows, advanced station upgrades |
Silver | Later islands | Jewellery crafting, Reagent Table upgrade |
Gold | Later islands | Advanced jewellery, high-tier accessories |
Tumbaga | Blackbeard Treasure Maps | Weapon ascension from Rare to Epic rarity |
Raw materials come from standard survival sources: trees, rocks, ore deposits, plants, and animal drops. Resources vary by biome, encouraging exploration of the wider archipelago rather than farming one island. Caves scattered across islands contain ore deposits for mining. Higher-tier islands contain rarer resources that unlock advanced recipes.
Food crafting is particularly important because eating is the primary way to boost your stats. There are no hunger or thirst bars in Windrose. Instead, food provides temporary maximum health increases plus stat buffs. Players can stack up to three food and drink buffs simultaneously (two food plus one drink). Better food provides stronger buffs, so cooking becomes more valuable as the game progresses.
Rarity | Duration | Health Increase |
|---|---|---|
Common | 7 minutes | Small max HP boost |
Uncommon | 15 minutes | Moderate max HP boost |
Rare | 30 minutes | Good max HP boost |
Epic | 30 minutes | Large max HP boost |
Legendary | 30 minutes | Largest max HP boost |
Food can buff the six character stats: Strength, Agility, Precision, Mastery, Vitality, and Endurance. Higher-rarity foods provide larger stat bonuses. Some recipes require Cooking Fire upgrades (Cutting Table, Cookware Shelf) to prepare.
Food | Rarity | Ingredients | Buff |
|---|---|---|---|
Seafood Skewer | Uncommon | 1 Crab Meat + 4 Fish Fillet + 2 Tomato | +5 Strength |
Nut Pie | Uncommon | Nuts + Cocoplum + Cornmeal | +5 Precision |
Hearty Egg Broth | Rare | 2 Bird Meat + 1 Dodo Egg + 4 Sweet Potato | +10 Agility |
Spicy Chicken with Sweet Potato | Rare | 1 Bird Meat + 4 Sweet Potato + 4 Cayenne Pepper | +20 Strength |
Seasoned Crocodile Meat | Epic | 4 Crocodile Tail + 2 Mysterious Spices + 5 Cocoplum + 5 Leek | +20 Strength |
Gazpacho | Epic | Tomato-based | +20 Agility |
Raw foraged foods like coconuts, bananas, cayenne pepper, cocoplum, and corn are all Common rarity and provide a 7-minute max HP boost with no stat buffs. Cooking them into recipes is always worth the extra effort.
The Alchemy Table is unlocked by finding a Misty Orchid, a glowing blue flower found on islands beyond the starting one. Alchemy produces healing potions and combat elixirs that provide temporary stat bonuses.
Product | Type | Effect |
|---|---|---|
Minor Healing Potion | Potion | Instantly restores 40% HP |
Healing Potion (Great) | Potion | Restores 75% HP |
Elixir of Concentration | Elixir | Increases critical damage |
Elixir of Cruelty | Elixir | Enhances overall damage output |
Elixir of Firm Hand | Elixir | Boosts melee weapon damage |
Elixir of Pain Relief | Elixir | Provides damage resistance |
Elixir of Precision | Elixir | Improves ranged weapon damage |
Homeward Journey | Utility | Travel utility for returning to base |
Players who prefer not to gather and craft everything manually can use NPC workers at their base. The NPCs work while you are off exploring or fighting, and you pay them with in-game currency. See settlement building for more on the NPC workforce.
NPC Type | Description |
|---|---|
Doctor (Galen) | Provides a free healing potion every hour at each camp. Can be resettled at multiple bonfires across different islands. |
Merchants | Three types (Animal Products, Food, Natural Resources) can be placed at your base using Merchant Contract items. |
Farming Contractor | Purchased for 10 Gold Coins from the Recruitment Vendor at Tortuga. Provide 50 seeds and 20 Silver Coins, and after 8 hours the contractor returns the seeds plus harvested crops. Works passively, even while offline. |
The Disassembly Table (10 Wood + 10 Clay + 4 Copper Ingot) lets you deconstruct unwanted weapons, armor, and tools to recover a portion of the crafting materials. The process is irreversible and items are processed one at a time. Place it within bonfire range.
Note: this is different from dismantling placed buildings. Dismantling a building structure (via the build menu's demolition mode) returns 100% of the materials. The Disassembly Table specifically handles crafted equipment and returns partial resources.
Weapons and armor can be upgraded at the appropriate crafting stations using materials. The upgrade system increases weapon damage, armor durability, and bag capacity. When upgrading armor, all pieces should be upgraded evenly because the game averages your armor rating across all equipped pieces. Upgrading one piece to maximum while others remain at level 1 results in a low overall average.
Tumbaga Ingots, found via Blackbeard Treasure Maps, allow you to ascend weapons from Rare (blue) to Epic (purple) rarity at the Weaponsmith Workshop. Ascension grants powerful new perks specific to each weapon. Treasure Map chests typically contain 3 ascension ingots.
The Shipwright's Workshop (15 Wood + 10 Coarse Fabric + 5 Copper Ingot) handles ship components. It shares the Anvil and Bellows upgrades with the Weaponsmith Workshop.
Component | Details |
|---|---|
Cannons | 12-Pounder (10 Copper Ingot + 10 Wood), with 24-Pounder and 36-Pounder variants at higher tiers |
Boarding Gear | Crew equipment for ship-to-ship combat |
Combat Repair Kits | Repair your ship during naval engagements |
Ship Grog | Consumable buffs for naval combat (Deadeye Grog for precision, Gunroom Grog for crew endurance) |
The Wharf (10 Wood + 10 Coarse Fabric) must be placed at the shoreline and handles ship repairs. Salvaging a destroyed ship costs 20 Wood.
Cooking Recipes - All confirmed cooking recipes, food buffs, cooking stations, and ingredients
Tip | Details |
|---|---|
No tool durability | Tools never break or degrade. Once you craft a copper pickaxe, it works permanently. |
Remote crafting | Materials stored in base chests are available at all stations within bonfire range. No inventory shuffling required. |
Prioritize copper | Copper Ingots are the single most important early-game milestone. They unlock the Weaponsmith, Disassembly Table, and many crafting upgrades. |
Salvage shipwrecks | Break shipwreck wreckage with an axe to get Planks and Nails, both difficult to obtain early otherwise. |
Upgrade stations early | The Sawhorse and Cutting Table are relatively cheap upgrades that unlock many useful recipes. |
Check the Curios menu | New materials must be learned through the Curios menu after discovery before their recipes become available. |
Lantern over torch | The Lantern is a wearable waist item that frees up your weapon slot compared to the handheld torch. |
Shared base storage only works when both the chest and the station sit inside the same bonfire radius. If you place a chest near the edge of the circle and the preview barely turns green, double-check by opening the station's recipe list. The Available count on each ingredient should reflect everything in that chest. If it does not, the chest is outside the zone and needs to be nudged inward.
Deposit shortcuts speed up the constant back-and-forth of gathering runs:
Q while looking at a chest: Deposit Similar from the outside. Every stack in your inventory that matches something already in that chest is transferred in one keystroke, without opening the chest.
X inside an open chest: Deposit Similar from the inside. Same behaviour, useful when you already have the chest open to pull something out.
Deposit All buttons: visible in every chest UI for bulk dumps. Handy after a long exploration run when you want to empty the backpack completely.
Pair the shortcuts with the Q/X loop at every chest in your camp as soon as you return. The discipline of an empty inventory is what makes the next exploration run efficient, because backpack space is tight until you upgrade to the Sailor's Backpack and beyond.
Seasoned players keep their inventory as empty as possible before sailing out. The logic is simple: anything you carry out is space you cannot fill with new loot.
A healthy exploration loadout:
Carry: one or two weapons, two food buffs, a drink buff, 5 bandages, at least one bell, and a stack of bandage fabric for in-field crafting. Extra potions if you expect a dungeon.
Leave at base: copper bars, iron bars, plant fiber, coarse fabric, rope, and other raw materials. Stations pull them automatically when you return.
Because crafting stations can read from chests in the same bonfire zone, there is no practical benefit to hauling ingots around. Deposit everything, craft, then head back out with a clean slate.
Stations that function without a roof are placed outdoors, often on the shore or along paths into the camp. Stations that require a roof must sit under any flat or angled roof tile, but they do not need walls.
Station | Roof Required? | Notes |
|---|---|---|
Bonfire | No | Must be the first structure; defines the zone |
No | Starter station; survives in the open | |
No | Also grants Comfort +1 once placed | |
No | Outdoor only; smoke clips through ceilings | |
No | Outdoor only; Large Smelting Furnace follows same rule | |
Yes | Walls optional; roof alone is enough | |
Armor and Clothing Workshop | Yes | Same rule as Weaponsmith |
Yes | Pairs well with the armor and weaponsmith in one roofed hut | |
Yes | Late-game station; shares the same roof rule | |
Spinning Wheel | Yes | Processes plant fiber into cloth |
Tanning Rig | Yes | Processes hides into leather |
Millstones | Yes | Needed for gunpowder and other powder recipes |
Jewellery Table | Yes | Accessories and rings |
Yes | Cannon, sail, and hull upgrades | |
No | Must be at the shoreline; does not need a roof | |
No | Break gear down for refunds |
The gunpowder crafting chain is one of the longest station progressions in Windrose and ties together the Workbench, Smelting Furnace, Charcoal Kiln, and Millstones. Completing it means you never have to loot pirate camps for powder again.
Upgrade your Workbench to level two by crafting and placing a Sawhorse (20 Wood + 10 Copper Ingot).
Craft the Iron Pickaxe at the level two Workbench using smelted Foothills Iron Ingots.
Defeat Thomas Richards to gain access to the foothills region.
Mine Sulfur in the foothills; the first successful Sulfur mine unlocks the Homemade Gunpowder schematic.
Craft a Millstone Part at the Workbench, then place the Millstone Utility Bench under a roof inside bonfire range.
Burn Wood in the Charcoal Kiln to produce Charcoal; Ash is a byproduct of this process and the second ingredient for gunpowder.
At the Millstone, combine Sulfur and Ash to produce Homemade Gunpowder.
This is also the moment the game shifts from early to mid game. Once you can print your own gunpowder, firearm loadouts become genuinely viable and naval combat opens up because you can keep cannons fed.
Shared storage does have limits worth knowing:
The resource pool is per-bonfire. If you have two outposts on separate islands, each has its own pool; nothing syncs between them.
Recipes that require placed workstations (like the Millstone recipe referencing the Smelting Furnace) still need those stations present in the zone, even if the raw materials are in chests.
Fuel like Charcoal is consumed in real time at furnaces and kilns. You cannot batch-queue an entire expedition's worth of ingots while the station has no fuel; the job simply pauses until you refill it.
Upgrade materials for weapons and armor are pulled from the zone, but rare items used for ascension, like Tumbaga Ingot, must also be in range before the ascend button lights up.
Bonfire + Tent + Workbench on the starting island.
Cooking Fire next, to unlock the first food buffs (coconut, coconut milk with bananas, bacon and egg).
Charcoal Kiln once you have Clay; Smelting Furnace right after.
First Copper Pickaxe at the Workbench opens the full resource tree on the starting island.
Armor and Clothing Workshop + Weaponsmith Workshop under a shared roof.
Alchemy Table after you find your first Misty Orchid on island two. Craft bandages at the Workbench until then.
Sawhorse on the Workbench, then Iron Pickaxe, then the full gunpowder chain (Millstone Part, Millstone Utility Bench, and Sulfur gathering in the foothills).
Disassembly Table around the time you find your second or third upgraded weapon, so you can recycle older gear.
Shipwright's Workshop once you can afford it; this gates cannon upgrades that change naval combat.
Page | What It Helps With |
|---|---|
The first metal pickaxe and the handoff away from the Stone Pickaxe | |
The mining step tied to sulfur and the live gunpowder route | |
Powders, cornmeal, and the current homemade gunpowder recipe | |
The raw ore step behind the iron craft chain | |
The refined iron step behind tools, stations, and ship parts |
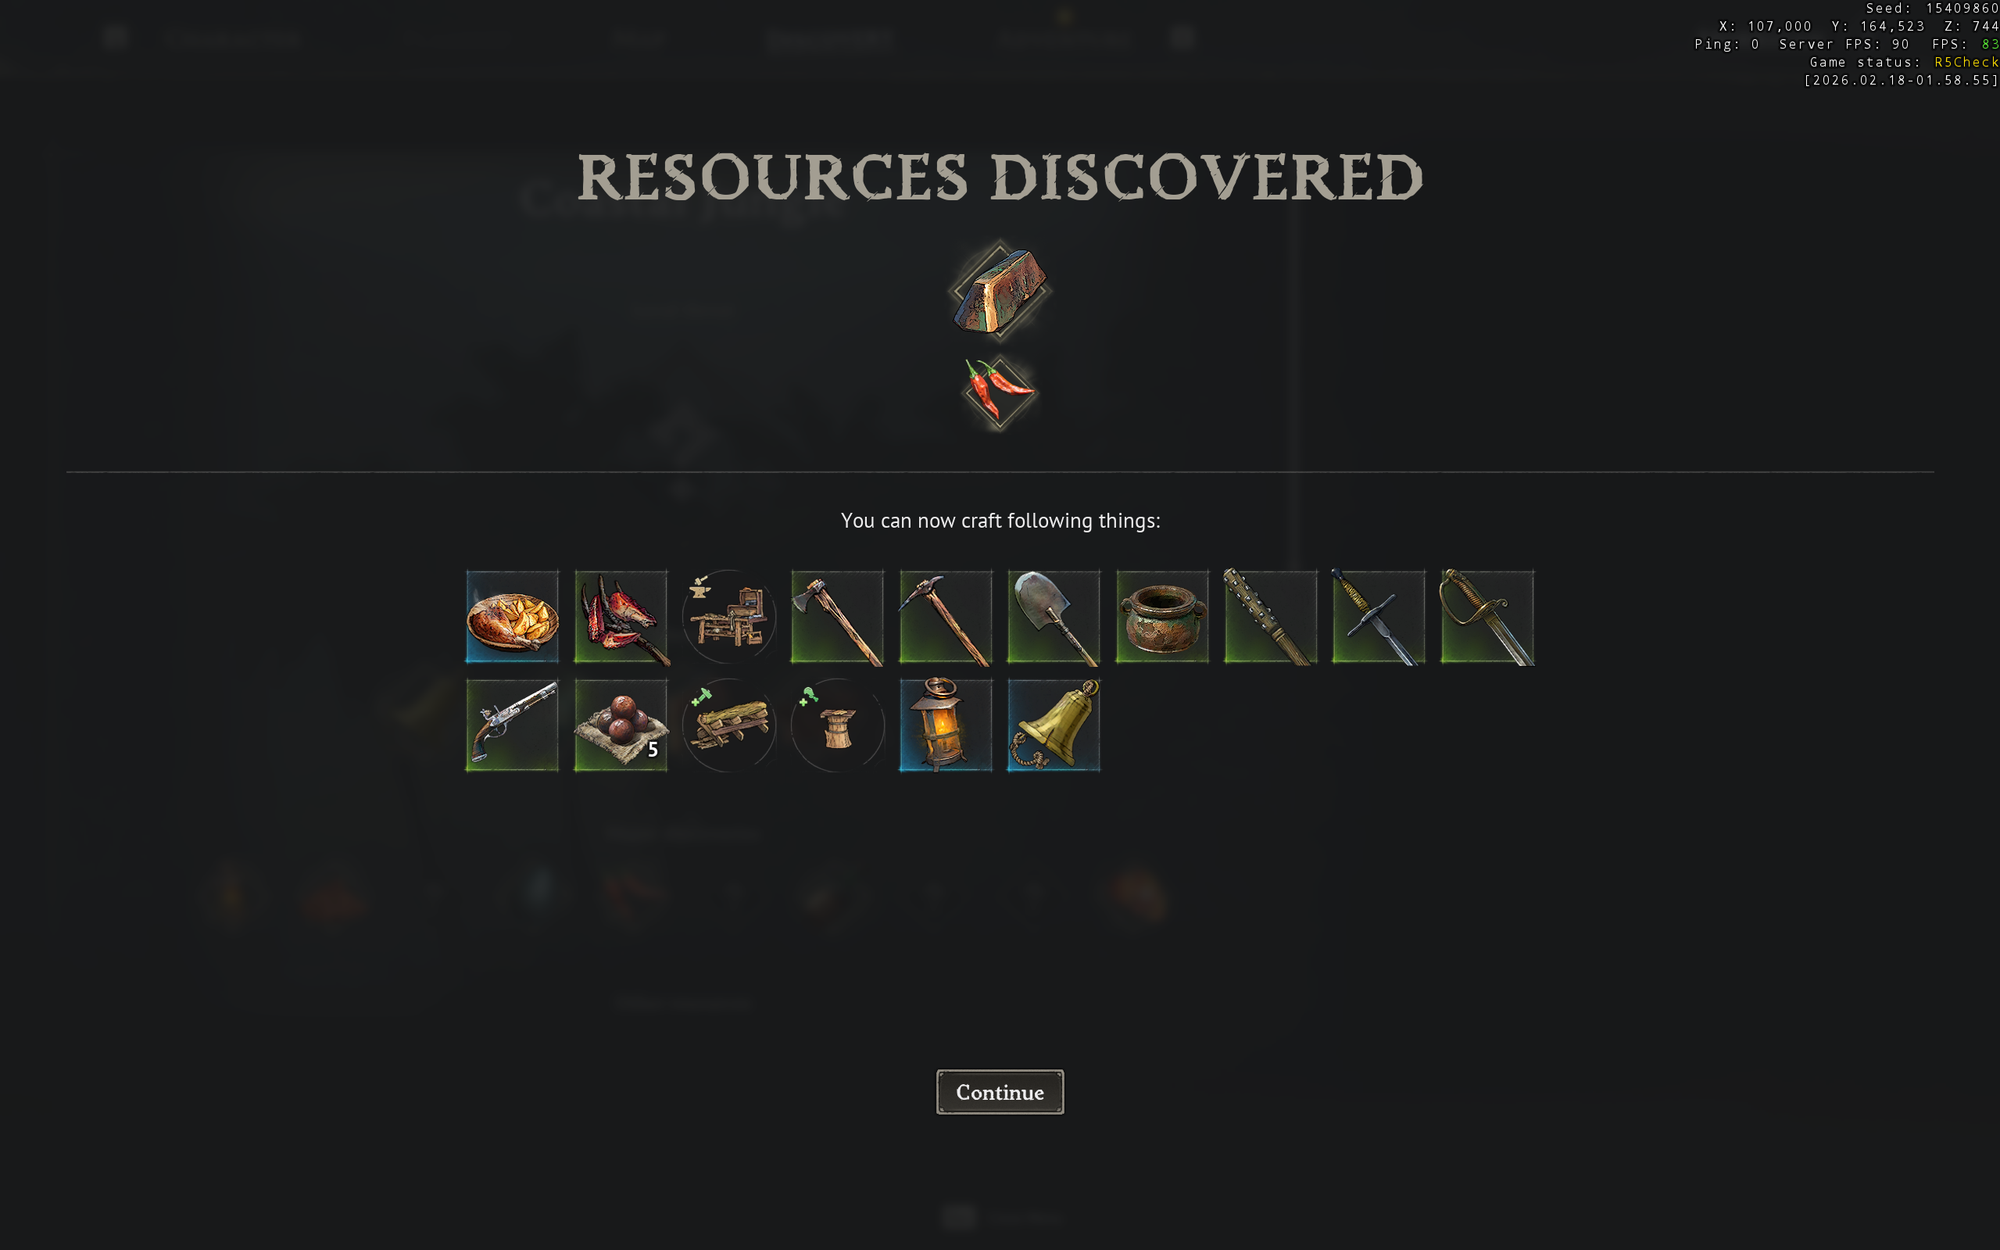
Crafting in Windrose is gated by a Discovery System rather than by experience points or skill trees. The rule is simple and it applies to every category of craftable item in the game: the first time the player picks up a resource, food item, weapon, or piece of armour, the related crafting recipes quietly unlock in the journal and the relevant workbench's recipe list. A player who has never held a piece of Copper ore will not see any copper recipes at the smelter or the Workbench, even if every other requirement is met. One pick-up is enough to flip the switch permanently.
The discovery model means early game exploration is the fastest path to a full crafting menu. Chopping an unfamiliar tree, picking an unfamiliar fruit, or looting a wooden chest in a ruin all count as first-time acquisitions and all spawn new recipes. Walking past a bush the player has never harvested is, in effect, walking past a batch of locked recipes. For the same reason, the single most productive early-game habit is to touch every new resource at least once, even if the intent is to sell or drop it afterwards.
Discovery applies to gear as well as raw materials. Finding a weapon or armour piece in the wild, looting it from a chest, or prying it off a defeated enemy unlocks the crafting recipe at the appropriate Armor and Clothing Workshop or Weapon Workshop. This matters because a lost or dropped piece can be recrafted at any time from the workshop afterwards. Players who find a hat, sword, or pair of boots they do not want immediately should still loot the item to register the discovery, then dismantle or sell it later without losing the recipe.
Food recipes are discovered the same way. Picking up a coconut the first time unlocks coconut-based recipes at the Cooking Fire; collecting a cayenne pepper, a cocoplum, or a dodo egg for the first time unlocks every recipe that uses that ingredient. The implication is that foraging behaviour translates directly into cooking menu depth. A thorough forager accumulates a broader recipe pool per hour played than a player who sticks to a narrow resource loop.
Discovery also interacts with regional progression. Higher-tier resources like Iron are locked behind tool tiers: the stone Pickaxe cannot break iron nodes, and a Copper Pickaxe is the key that unlocks iron mining. The pattern repeats across the archipelago. Each new region gates its high-tier resources behind the tool tier of the region before it, so the natural progression arc is: discover copper, smelt a copper pickaxe, discover iron on the next island, smelt an iron pickaxe, and so on. Defeating a region boss is typically what opens the way to the next island's resource set.
A small secondary rule: after a first-time pick-up, the player must sometimes open the Curios menu to confirm the discovery before the recipes appear on the relevant station. Curios is the in-game journal that tracks learned materials and their recipe unlocks, and glancing at it after every exploration run is the cleanest way to find out which recipes the trip unlocked.
Every crafting station in Windrose can be upgraded, but not by demolishing the existing station and building a higher tier. The upgrade system is additive: place a companion structure within the station's footprint and the base station gains access to a new tier of recipes. Nothing is destroyed, and the original station keeps all the recipes it already had. Each upgrade stacks, so a fully upgraded Workbench with a Tool Shelf, a Sawhorse, and a further tier attachment can craft every recipe the three companion levels enable, plus the base set.
Two in-game visual cues govern where attachments go and what they unlock:
White circle on the ground. When a companion structure is selected in the build menu, a white ring appears around the parent station showing the valid attachment radius. The companion must be dropped inside that ring. Placing it outside means the system does not register the upgrade and the new recipes never appear. The ring overlaps across multiple stations, so a compact crafting plaza can share one companion between two neighbouring stations if both rings include it.
Green plus icon on unlocked recipes. After an attachment is placed, the parent station's recipe list displays a small green plus badge next to every recipe that became available because of the new companion. The badge sits above the recipe's tool icon so a glance down the list is enough to see what the attachment bought. Recipes the base station already had remain unmarked.
The practical implication: if a station appears to be missing a recipe that other guides or the roadmap mention, the likely cause is a missing attachment rather than a missing resource. The station's tier number (for example, "Workbench 1" versus "Workbench 3") is the fastest diagnostic. Tier 1 means no attachments are active; each successful companion placement raises the tier by one.
Attachments cover every major crafting line:
Workbench line. Tool Shelf then Sawhorse unlock the copper-and-wood recipes and the intermediate tier of basic tools. This is the cheapest and most impactful upgrade chain for the first ten hours.
Cooking Fire line. The Cutting Table, Cookware Shelf, and Supplies Rack unlock Uncommon, Rare, and Epic cooking recipes in that order. See the Food and Potions article for the corresponding buff tiers.
Armor Workshop and Weapon Workshop lines. Dedicated attachments unlock higher-rarity gear recipes and feed into the Ascending Gear system that converts rare pieces into epic or legendary versions at the cost of Tumbaga Ingot.
Alchemy Table line. Companion attachments expand the elixir catalogue and are required for higher-rarity Potions.
One building-layout rule follows from the white-circle mechanic: attachments must share a base footprint with the parent station. Players who build a sprawling compound with stations spread across several buildings often end up with attachments that technically exist but are out of range and therefore inactive. The cleanest layout is a single crafting hall where every workbench line sits close enough to share overlapping attachment rings. This also interacts well with the Shared Storage radius, so chests placed in the same hall feed every station at once.
A subtle rule that the Rarity System depends on: discovery unlocks the base recipe, not the rarity tier. Finding a Common Cutlass unlocks the cutlass recipe at the Weapon Workshop, and the workshop can then craft Common cutlasses from that point forward. Upgrading the same weapon to Uncommon, Rare, Epic, or Legendary is a separate system that lives on the Ascension tab and requires Tumbaga Ingots, an upgraded workshop, and the workshop's anvil attachment. The discovery keeps the recipe on the menu permanently; the ascension system is what moves a crafted piece up the rarity ladder.
This separation is the reason a player can pick up a low-tier weapon on the first island, recraft it hundreds of hours later, and still ascend it to Legendary once the materials are in hand. The discovery never expires and the crafted item can be ascended any number of times up to its rarity cap. Players who like a specific weapon moveset therefore benefit from finding the lowest-rarity version early and ascending it later rather than waiting for a Legendary drop to appear in a chest.