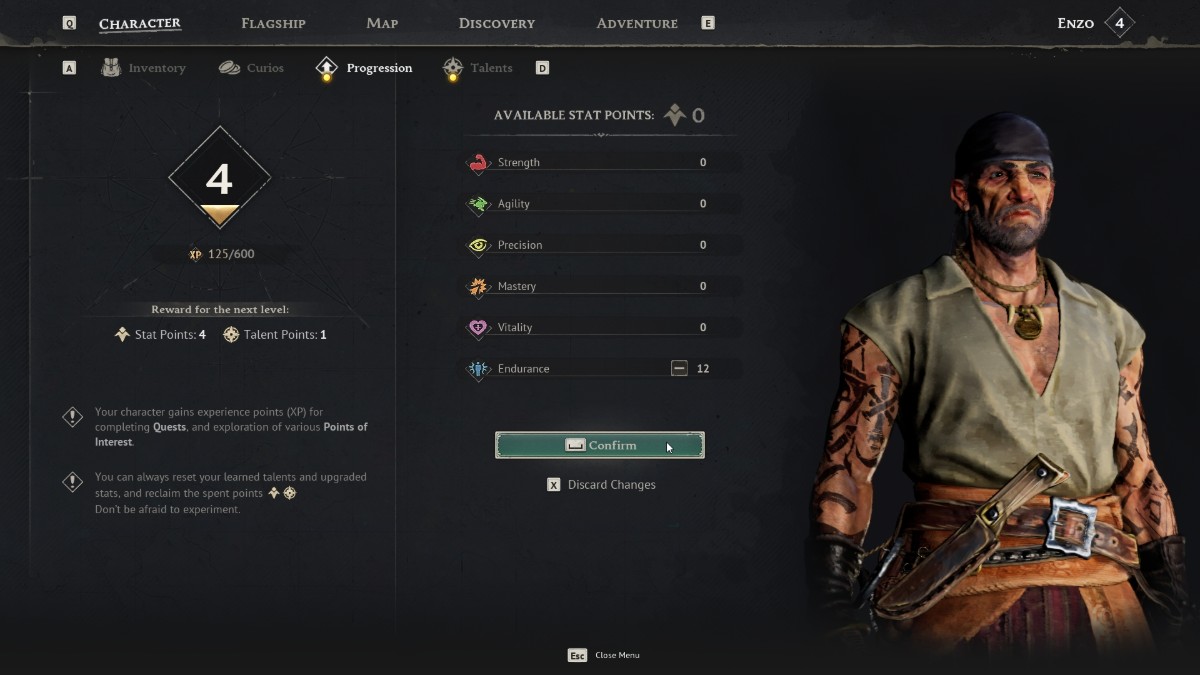
Character progression in Windrose revolves around a system of six attributes and a talent tree. Each time you level up, you receive three attribute points to distribute and one talent point to spend. Attributes influence core statistics like health, stamina, critical hit chance, and weapon damage scaling, while talents provide passive upgrades that shape your playstyle.
The Six Attributes
Windrose uses six attributes that define your character's capabilities. Each point invested in an attribute increases its associated stats. The game allocates three points per level to distribute across Strength, Agility, Precision, Mastery, Vitality, and Endurance.
Attribute | Primary Effect | Combat Role |
|---|---|---|
Strength (STR) | Scales Crude-damage weapons | Core stat for heavy weapons: clubs, maces, halberds |
Agility (AGI) | Scales Slash-damage weapons and dodge effectiveness | Key for fast weapons (sabers, greatswords) and stamina-dependent playstyles |
Precision (PRE) | Scales Pierce-damage weapons (rapiers, muskets, pistols) | Important for rapiers, muskets, and pistols. Note that the blunderbuss, despite being a firearm, scales with Agility rather than Precision. |
Mastery (MAS) | Increases Critical Hit Chance by 0.5% per point | Utility stat that boosts crit across all weapon types; does not directly scale any single damage type |
Vitality (VIT) | Increases maximum health by 13 per point; scales F-attack damage on some weapons | Essential for survivability; uniquely scales the Soul Eater greatsword's F-attack |
Endurance (END) | Increases maximum stamina pool (5 per point) and recovery speed | Determines how long you can fight before needing to recover |
How Attributes Affect Gameplay
Attributes influence three main areas: combat effectiveness, survival durability, and weapon scaling. Each weapon type in the game benefits from specific attributes. The game's interface indicates which attributes scale with which weapons, making it straightforward to build around your preferred loadout.
For example, heavy weapons like halberds and greatswords scale with Strength or Agility depending on damage type, while rapiers scale with Precision because they deal Pierce. Most firearms scale with Precision (muskets, pistols), with the blunderbuss as the Agility-scaling exception. A player who favors rapier combat should prioritize Precision; a halberd build wants Strength. Mastery is a universal booster that pairs with any weapon because it increases critical hit chance rather than scaling a specific damage type.
Leveling and Attribute Distribution
Leveling in Windrose is deliberately slow. Reaching only level 5 after roughly 8.5 hours of play was typical in the demo. The demo had a level cap of 5, which translates to 15 attribute points and 5 talent points across those levels. Community sources report the Early Access cap around Level 15 at launch, though the exact value may shift during Early Access balance patches.
Because level-ups are infrequent and each one only provides three points spread across six attributes, every point matters. Spreading points evenly across all six attributes results in a weak generalist. Focused builds that concentrate on two or three attributes are more effective.
Recommended Attribute Builds
Build Type | Primary Attributes | Weapon Pairing |
|---|---|---|
Melee Brawler | STR, VIT, END | |
AGI, END, MAS | ||
Fencer | PRE, AGI, MAS | |
Ranged Specialist | PRE, AGI, VIT | |
Tank | VIT, END, STR | Halberd with heavy armor |
Hybrid Vitality | VIT, AGI, END | Soul Eater (scales with both Agility and Vitality) |
The Talent System
In addition to attributes, you earn one talent point per level. The talent tree contains 39 talents across four branches (Fencer, Crusher, Marksman, Toughguy) to choose from. Talents are passive upgrades that provide bonuses like increased stamina, improved slash damage, better critical hit chance, damage resistance, or reduced movement stamina costs.
Notable confirmed talents include:
Talent | Effect |
|---|---|
Decreases stamina cost for dashing and jumping (recommended as early pick) | |
Reduces stamina drain while moving; universally recommended Tier 0 Toughguy pick | |
Improved Slash Damage | Increases damage of slashing weapon attacks |
Critical Strike | Increases critical hit chance |
Damage Resistance | Flat reduction to incoming damage |
Health Recovery | Increases the recoverable health pool after taking damage |
Damage to Health | Converts a percentage of damage dealt into health recovery |
In co-op play, the talent system becomes especially powerful. Players can specialize into different combat roles. One player might focus on tanking with VIT/END and damage resistance talents, while another goes full STR with slash damage talents for maximum DPS.
Food Buffs and Stats
Temporary stat bonuses from cooking stack on top of your base attributes. A character with 10 invested VIT points who eats Spicy Chicken with Sweet Potato (+10 VIT) effectively has 20 VIT for the buff duration. This makes food buffs an integral part of stat optimization for challenging content.
Equipment and Stats
Weapons and armor follow a rarity system that affects their stat bonuses. Higher-rarity equipment provides better base stats and may include special effects. Upgrading equipment at crafting stations further improves their effectiveness. Some armor sets offer specific bonuses:
Flibustier's Attire2pc -20% attack stamina cost; 4pc +15% one-handed damage
Marksman's Rig2pc -30% sprint/jump/dash stamina; 4pc +15% ranged damage
Privateer's Regalia2pc +10% flat Critical Hit Chance; 4pc +10% Critical Damage per nearby enemy (max 30% at 3 enemies)
Choosing armor that complements your attribute build amplifies your strengths. A Fencer build benefits from Flibustier's Attire because reduced attack stamina allows more swings, while a Marksman build pairs with Marksman's Rig for constant mobility between ranged shots.
Point Distribution Rule of Thumb
A common veteran habit is to protect two floors on every level-up before spending anything else: one point into Vitality and one into Endurance. The remaining point (or points, at higher levels) goes into the character's primary scaling stat, which is Strength for clubs, maces, and halberds; Agility for sabers, greatswords, and blunderbusses; or Precision for rapiers, pistols, and muskets.
The reasoning is practical. Vitality controls how many hits a mistake costs. Endurance controls how many dashes and attacks each fight can afford. Damage, by contrast, mostly comes from upgraded weapons and armor set bonuses. A character with balanced Vitality and Endurance simply outlasts a glass-cannon with the same weapon tier.
The rule flexes in two directions. In the early game, before rare weapon drops matter, all three points can go into Vitality and Endurance to survive first-island scuffles. In the late game, once gear and food buffs cover damage, extra points can go into Mastery to layer on critical hit chance.
When to Spend Strength, Agility, or Precision
Because the demo and early access levels up slowly (roughly level five after about eight hours of focused play), it is tempting to dump points into Strength or Precision before finding a weapon that scales with it. This wastes points. The smoother approach is to bank the first four attribute points into Vitality and Endurance only, explore one or two islands, and commit to a scaling stat once a clear weapon has dropped. Because all attribute points can be reset for free, there is no long-term risk; wasting early points just costs the respec currency.
Mastery in the Early Game
Mastery is the critical hit chance stat. In isolation it is weak in the first few levels because the base crit chance is so low that each mastery point only adds a tiny absolute percentage. A Mastery build is typically worth the investment after:
Finding a weapon with built-in crit bonuses, such as the Razor saber (+10% crit chance) or the Sturdy Halberd (+15% crit).
Running the Privateer's Regalia armor set, which grants +10% flat Critical Hit Chance at two pieces and +10% Critical Damage per nearby enemy at four pieces.
Picking up the Fencer's Surgical Cuts talent or the Crusher's Executioner's Aim talent, which add flat crit chance on their own.
Without at least one of these multipliers, early Mastery points produce much less damage than the same points in Agility, Strength, or Precision.
Food as Bonus Attribute Points
Food buffs stack directly onto the character sheet for the buff's duration, which means they function as temporary attribute points. A Vitality-heavy build using spicy chicken (+10 Vitality) and bacon and eggs (additional Vitality) effectively runs with twenty or more bonus Vitality while the buffs are active. Strength and Agility foods follow the same pattern. Before a boss fight, fill both food slots with the build's primary stat so the peak is timed to the encounter.
A Deadeye Grog (+15% damage for thirty minutes) layered on top of the two food buffs is a common boss-opener pack. Because the buff timers are long, travel and set-up time will not burn the entire window.
Respec, Not Rebuild
Attribute points and talent points can be reset at any time at no in-game cost beyond a small respec fee. This means stat distribution is not a permanent decision. Swap from a Strength crusher build into a Precision marksman build between islands if a better weapon drops, then swap back for a boss that resists pierce damage. The only resources that cannot be refunded are the materials spent upgrading a specific weapon or armor piece, so respec the character freely but commit carefully when upgrading gear.
Armor Set Bonus Corrections
An earlier version of this article described Privateer's Regalia 2-piece as "+10% crit chance per nearby enemy." The correct mechanics are:
Set Piece Count | Privateer's Regalia Bonus |
|---|---|
2-piece | +10% flat Critical Hit Chance |
4-piece | +10% Critical Damage per nearby enemy, up to a maximum of 30% (3 enemies) |
Only the 4-piece bonus scales per enemy; the 2-piece is a flat +10% crit chance. For full armor set accuracy, cross-reference the Privateer's Regalia article rather than relying on summary bonus descriptions in other pages.
Other armor set bonuses referenced on this page are verified correctly: Flibustier's Attire 2-piece -20% attack stamina cost / 4-piece +15% one-handed damageMarksman's Rig 2-piece -30% sprint/jump/dash stamina / 4-piece +15% ranged damage.
Developer Tips on Leveling and Stat Points
The Windrose developers have publicly shared guidance on how stat and talent points should be earned and spent. Because leveling is deliberately paced, understanding where experience comes from is as important as knowing where to put the points.
Experience Comes Only from Quests and Exploration
Experience in Windrose is awarded for completing quests and for exploring the world. Endless mob grinding does not level the character. Killing the same group of enemies on the starting beach for an hour returns no progress bar movement. This is an intentional design choice to stop players from brute-forcing their way past story milestones with farmed gear and stats.
The practical consequence is that stat and talent income is tied to story pace. If levels feel slow, the fix is to pick up the next quest line or sail to an unexplored island, not to camp a respawn point. Side quests, faction quests, and optional ruin clears all feed into the same XP pool.
Each Level up Grants Stat Points and Talent Points
Every level-up deposits a bundle of both attribute points and talent points into the character sheet at the same time. The two pools are separate: attribute points go into the six core stats (Strength, Agility, Precision, Mastery, Vitality, Endurance), and talent points go into the four talent branches. Neither pool spends down the other.
Two-Handed Swords and Blunderbusses Scale with Agility
The developers' recommended early loadout pairs a two-handed sword with a blunderbuss. Both weapons scale primarily with Agility. A player running this combo wants to push Agility as their primary scaling stat, with Vitality and Endurance covering survivability. The reason both weapons share a scaler is that the two-handed sword deals Slash damage (Agility-scaled) and the blunderbuss, as a short-range shotgun-style firearm in this game's classification, scales with Agility rather than Precision on the developer-confirmed loadout.
This is a useful reference point for new players. Any build where the primary melee weapon and the sidearm share a scaling stat lets all attribute points land on one damage lever, which compounds with food buffs and talent picks. Builds that mix mismatched scalers (for example a Strength club with a Precision musket) either need to split points or commit to the melee side and treat the firearm as an execute tool.
Build Experimentation is Encouraged
Because respec is free for attribute points, trying a build and swapping out of it has no lasting cost. The developer-recommended pattern is to commit to one direction (a two-handed sword with Agility, for example), play it through an island, and respec toward the weapon that actually drops on that island. This is how the game expects players to reach a final build: by iterating, not by planning everything before level one.
Finding a weapon with stat requirements the character does not meet is fine under this model. Either hit respec and rebuild around the new weapon, or shelve the weapon until a level up covers the shortfall. Nothing is lost by picking up an off-scaling drop; the respec loop lets the character convert any loot into a usable build.
Quick
Stat points per level: three, distributed freely across Strength, Agility, Precision, Mastery, Vitality, and Endurance.
Talent points per level: one, spent in the Fencer, Crusher, Marksman, or Toughguy branch.
XP sources: quest completion and exploration only (mob kills do not award XP).
Respec cost for stats: free. Reset and redistribute as often as the build demands.
Vitality effect: raises the maximum health pool.
Endurance effect: raises the stamina pool and speeds stamina recovery.
Weapon Scaling Letter Grades
Every weapon card in Windrose shows a letter grade next to each stat line. The letters run from D at the bottom up through C, B, A, and S, and they tell the player exactly how much extra damage one point in that stat will add to the weapon's output. Two weapons with the same base damage but different letter grades will end up in very different places after a level or two of stat investment, which is why the letter is worth checking before committing points.
Approximate damage per stat point by letter: Community testing converges on roughly 1% per point at C grade, about 1.25% per point at B, about 1.5% per point at A, and about 1.75% per point at S. The percentages apply to the weapon's baseline damage for the scaling stat. A-grade scaling also shows a mild drop-off curve past about 20 points invested, which caps the practical return from flooding a single stat. D grade exists on mismatched stat lines (for example, a Strength-scaling club will usually show D on its Agility line) and contributes almost nothing per point.
Higher rarity = higher letter grade. The same weapon silhouette (say, a Saber) rolls a better letter grade as the rarity climbs. Common and Uncommon variants typically land on C at best. Rare rolls cluster around B, and Epic ascensions push one of the lines into A. S grade exists in the data but is rare in the live build. This is a second reason rarity matters beyond the passive slot: the same point of Strength does noticeably more damage on an Epic club than on an Uncommon one, even before the passive effect fires.
Same-level 100% baseline. Before any of the letter-grade math applies, the weapon's listed damage number is the damage it deals against an enemy at the same level as the weapon. That is the 100% baseline, and it is the smaller of the two numbers on the stat card. Every delta from that baseline is additive with the letter-grade scaling. In practice the stat card is a floor, not a ceiling: gear, food buffs, grogs, and the letter-grade scaling all stack on top of it.
Level difference is the dominant factor. Attacking an enemy one level above your weapon reduces outgoing damage by roughly 12 to 13 percentage points, and the penalty keeps growing (with a diminishing curve) for each additional level of gap. By five levels under, the player is pushing out roughly half of the listed damage, and incoming damage from the overlevelled enemy spikes the opposite way: a level-five gap can multiply the hits they land by roughly an order of magnitude in harsh cases. This is the underlying reason the game feels "impossible" when sailing into a zone whose encounters are well above the current character level. Matching weapon level to the zone is more important than piling on stat points.
Stat points do not cancel a level gap cheaply. Because a C-grade weapon only returns about one percent of its damage per stat point, covering a single level of enemy-above penalty takes on the order of 12 or 13 points in the scaling stat. A-grade weapons cut that down to roughly nine points per level of gap, which is still two or three character level-ups worth of attribute points (each level-up hands out three points). Three levels of gap therefore require roughly 30+ points on a C-grade weapon or about 25 on an A-grade weapon, which is more points than a launch-build character can spend in one stat without draining Vitality and Endurance far below safe levels. Upgrading the weapon itself at the Upgrading Station (and in turn unlocking the iron-stage threshold that lets you ascend at the Weaponsmith Workshop) closes the gap much faster than the attribute sheet can.
Practical takeaway. The live build rewards a split that protects survivability first and damage second. Spend the early level-ups on Vitality and Endurance, keep one attribute line tagged for the primary weapon's scaling stat (Strength for clubs and halberds, Agility for sabers and greatswords, Precision for rapiers and firearms), and route any damage increase through the weapon level and ascension rather than through heavy stat dumps. Mastery becomes worth it only after a crit-focused weapon (Razor saber, Sturdy Halberd) or a crit-focused armor set (Privateer's Regalia) is already equipped. Crude damage weapons are a special case: they hit hard on the base number but the community testing above shows weaker stat-point scaling on Crude rolls than on Slash or Pierce rolls of comparable rarity, so they should be treated as flat-number weapons rather than scaling weapons. This mirrors the existing respec-first guidance: spend points the current weapon actually uses, and reset freely when the loadout changes.