Loading...
Loading...
Talent System
April 19, 2026 at 09:52 PM
Removed deleted image
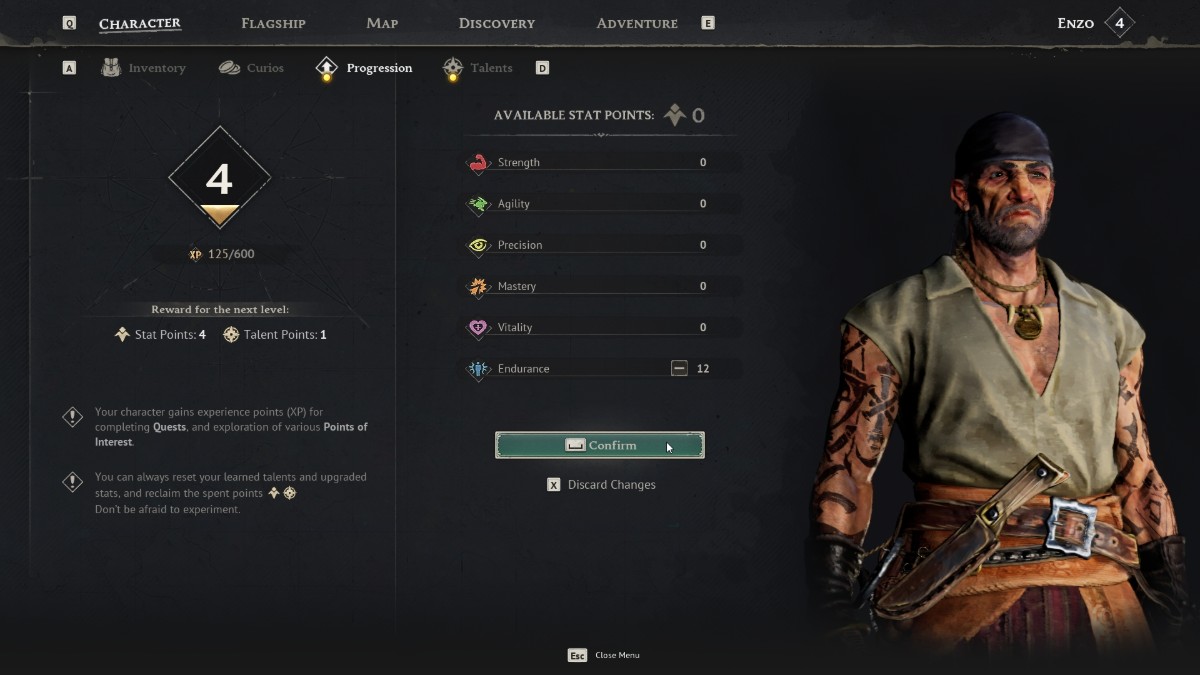
The talent system is Windrose's character progression framework. Experience comes primarily from quest completion rather than from killing enemies. Leveling up grants attribute points and talent picks that shape your character's build. Community sources report the Early Access level cap is approximately Level 15 at launch, with roughly 40 total talents distributed across four talent branches (Fencer, Crusher, Marksman, Toughguy). Community documentation tracks the full tree on sites like and. The exact cap may shift during Early Access balance patches.
Each level-up grants:
3 attribute points to distribute among six stats
1 talent pick from the pool of roughly 40 available talents across four branches
The demo capped at Level 5 (5 talent points total). Community sources report the Early Access launch cap around Level 15 (approximately 15 talent points, enough to fully commit to one branch plus dip Tier 0 of another). The exact cap should be verified in-game as it may change with patches.
The developers intentionally linked leveling to quest completion to prevent players from becoming overpowered through resource grinding alone. Confirmed XP sources:
Completing quests and story objectives
Fully looting ruins and pirate camps (clearing all containers)
The following activities do NOT grant XP: crafting, building, mining, killing animals or monsters, and destroying ships. This means progression is quest-gated rather than grind-based.
Characters have six core allocatable attributes. Each attribute governs specific gameplay mechanics and weapon scaling:
Attribute | Effect | Weapon Scaling |
|---|---|---|
Governs melee effectiveness with heavy weapons | Scales Crude damage (clubs, halberds, maces, greatswords) | |
Governs speed with fast weapons and dodge effectiveness | Scales Slash damage (sabers, cutlasses, blunderbusses) | |
Governs accuracy and ranged weapon effectiveness | Scales Pierce damage (rapiers, pistols, muskets) | |
Increases maximum health; scales F-attack damage on some weapons | Scales F-attack damage on weapons like the Soul Eater | |
Relates to stamina pool and stamina recovery | Some weapons scale damage with stamina pool | |
Increases Critical Hit Chance across all weapon types | Universal crit booster; does not scale any single damage type |
Community meta: experienced players recommend investing heavily in Vitality and Endurance for survivability, relying on gear quality for offensive damage rather than damage stats. Mastery is a valuable secondary investment for crit-heavy builds (Privateer's Regalia, Fencer's Surgical Cuts talent).
Every weapon displays a letter grade (S, A, B, C, D) indicating how strongly its damage scales with the associated attribute. S provides the strongest bonus, D the weakest. For example, a Basic Sabre at Level 8 has ATK 180, Slash 225, and Agility scaling grade B, while a Razor (Rare) at Level 1 has ATK 100, Slash 245, and Agility scaling grade A. The higher scaling grade on the Razor means investing in Agility yields proportionally more damage per point.
Talents are organized into four thematic branches. Each branch has three tiers (0/base, 1, 2) gated by prior points spent in that branch. Each level-up lets you pick one talent. The community meta is to take Toughguy Tier 0 early for survivability, then fully commit to one melee or ranged branch.
The duelist branch. Favors one-handed melee (sabers, rapiers) with counter-attacks, critical hits, and agility-based movement. Key talents include Deep Cuts (+3-9% slash damage), Agile (15-40% reduction in dash/jump stamina cost), Surgical Cuts (+3-9% one-handed critical hit chance), and Perfect Counter (+5-12% crit for 12s after blocking).
The heavy-weapon branch. Favors two-handed and crude-damage melee (greatswords, halberds, clubs, maces). Key talents include Bonecrusher (+3-9% crude damage), Retribution (+40-100% rally healing conversion), Massive (+5-10% two-handed damage), and Executioner's Aim (+4-12% two-handed critical hit chance).
The firearms branch. Favors ranged weapons (pistols, muskets, blunderbusses). Key talents include Planning Ahead (-5 to -25% passive reload time), Deep Impact (+3-9% pierce damage), Bull's Eye (+5-20% crit spot chance), and Quick Hand (10-25% faster active reload).
The survivability branch. Universally recommended for the Tier 0 Marathon Runner talent (+20-50 max stamina). Other key talents include You Will Answer for This (+25-75% rally gain), Stitches and Rum (+10-25% healing), Just a Flesh Wound (+6-12% melee resistance), and Too Angry to Die (30-70% HP restored on lethal hit, 10-16 minute cooldown). Stout Frame adds +120-240 max HP.
Damage Type | Attribute | Weapon Categories |
|---|---|---|
Slash | Sabers, cutlasses, greatswords, machetes | |
Pierce | Rapiers, pistols, muskets, blunderbuss | |
Crude | Clubs, maces, halberds |
Windrose features a rally healing mechanic similar to Bloodborne. After taking damage, a portion of the health bar remains in a lighter, recoverable state. Dealing damage back quickly recovers some of that lost health. Talents like Retribution (Crusher) and You Will Answer for This (Toughguy) increase both the recoverable pool size and the damage-to-health conversion rate, rewarding aggressive counterattacking after being hit.
Respec is available but requires a rare currency. This allows players to rebuild their character if a build is not working, though the cost prevents constant respeccing.
Talents complement the gear progression system. Equipment follows a rarity tier system (Common, Uncommon, Rare, Epic, Legendary, Mythic), and armor sets offer bonuses that align with specific playstyles. A Fencer build investing in Agility benefits from the Flibustier's Attire set (2-piece: -20% attack stamina cost; 4-piece: +15% one-handed weapon damage), while a Marksman stacking Precision pairs with the Marksman's Rig (2-piece: -30% sprint/jump/dash stamina; 4-piece: +15% ranged damage). Seven named armor sets have been documented by the community.
All equipped armor pieces are averaged for defense. Upgrading only one piece while leaving others at level 1 results in much lower effective defense than the upgraded piece's displayed value alone. Upgrade all armor pieces evenly for the best results. Gear can be upgraded up to level 8 at the Upgrading Station, and Rare items upgraded to level 8 can ascend to Epic rarity using Tumbaga Ingots.
Players can maintain two active food buffs simultaneously. The recommended strategy is one food slot for a stamina/endurance buff and one for a damage buff matching your weapon's scaling attribute (e.g. +10 Agility food for saber builds, +20 Strength food for halberd builds).
Feedback | Details |
|---|---|
Criticism | Many talents feel like small percentage increases ("1% increase to Y when X") that feel like placeholders. The system was called "underwhelming / confusing" in a dedicated Steam thread. |
Praise | Reviewers noted the system has "enough talents present to encourage actual builds, which is something many survival games never truly embrace." "a sizable skill tree allowing you to spec out your character however you want." |
Developer acknowledgment | The developers have acknowledged this as an area for expansion during Early Access. The FAQ states: "Our progression system focuses on allowing different playstyles to emerge." |
With roughly one talent point per level, the first four or five picks set the character's direction. Community-tested priorities that help almost any build survive the first few islands:
Marathon Runner (Toughguy Tier 0): +20 to +50 maximum stamina across three ranks. Stamina underpins every defensive tool, so this talent compounds with everything else. Most guides treat it as a near-mandatory opener.
Temporal Health Gain (Toughguy): Increases the recoverable (faded) portion of the health bar after taking a hit. With three ranks invested, a single well-timed counterattack restores a large fraction of the lost HP, which reduces bandage and potion spending.
Retribution (Crusher): Boosts the conversion rate of temporal HP back into HP when dealing damage, up to +40% at early ranks. Pairs naturally with Temporal Health Gain.
Agile (Fencer): Reduces stamina cost for dashing and jumping. This is the cheapest way to extend the one-two-hit-dash combat rhythm without investing directly in Endurance.
Two-Handed Stamina Reduction (Crusher Tier 2): Reduces stamina per heavy swing. Unlocked after three points in Crusher Tier 1, so worth planning ahead on halberd, greatsword, or club builds.
The exact percentages scale per rank, so stacking three points into a single talent often doubles or triples the effect. The Tier 1 to Tier 2 gate (three points in the prior tier) is the main constraint on how fast a branch specializes.
Both attribute points and talent points can be reset at any time. This turns the talent tree into a loadout problem rather than a permanent commitment. A typical flow: run a Crusher-heavy build for the first island, respec into Marksman for the Thomas Richards boss fight, then respec back once the dungeon is cleared. The only cost is the respec fee itself.
Because the respec is reversible, early talent choices should be read as first drafts. Invest aggressively into one branch to feel how it plays, then rebuild cleanly if the build is not matching the weapon or the armor set. Armor upgrades are the one place where resources do not come back cleanly, so decide the armor direction first and rebuild talents around it.
Against stand-up boss fights such as Thomas Richards in the coastal jungle, a temporary respec tilts heavily toward survivability rather than damage. The community template looks like this:
Melee Damage Resistance (Toughguy): Blanket reduction to incoming melee damage.
Temporal Health Gain plus Retribution: Converts each counterattack into sustain so bandage counts do not collapse mid-fight.
Stamina boosters: Marathon Runner and Agile so dodges stay available through long combos.
Food slot one: Spicy Chicken for +10 Vitality and extra maximum HP.
Food slot two: Bacon and Eggs for additional Vitality, or Coconut Milk with Bananas for +5 Endurance on dodge-heavy fights.
Potion slot: Dead Eye Grog for +15% damage over thirty minutes.
Gear: All equipment fully upgraded to the current tier cap. An unupgraded weapon or armor piece drags the averaged defense value down sharply.
After the boss falls, respec back into the preferred offensive tree. The respec is cheap enough to run on every gate boss, which effectively means the character can wear a specialized tank hat for each story milestone.
Each talent branch (Fencer, Crusher, Marksman, Toughguy) has three tiers. Tier 2 only unlocks after three points in Tier 1 of the same branch. With an Early Access level cap reported around level fifteen, this means a character can fully commit to one branch and still afford a Tier 0 dip into Toughguy for Marathon Runner. Spreading points evenly across two branches usually leaves both blocked below the Tier 2 payoff talents, which is weaker than a focused build plus a single Tier 0 splash.
A clean commitment pattern is: Toughguy Tier 0 for Marathon Runner, then all remaining points into a single branch that matches the weapon's scaling stat. The Crusher branch pairs with Strength or Agility two-handers, Fencer pairs with one-handed Agility or Precision builds, and Marksman pairs with any Precision firearm.
The Windrose developers have publicly clarified, through their shared launch tips, how talent points are generated and why grinding mobs does not move the build forward. This section consolidates those clarifications so new players do not spend hours farming enemies expecting to bank talent picks.
Each level-up grants one talent pick. Levels themselves are earned exclusively through quests and world exploration. The developers made this explicit in their launch tips: endless mob grinding will not get a character anywhere because questing and exploration are the only sources of experience in Windrose. Clearing the same camp repeatedly awards loot and practice with the combat system, but it does not add to the level bar and therefore does not unlock new talent picks.
The XP-granting activities are: completing story quests, finishing side quests and faction quests, fully looting ruins and pirate camps (clearing every container), and uncovering new map areas or points of interest. Building, crafting, mining, animal hunting, and pure enemy kills do not feed into the XP pool.
Every level-up deposits both types of point in the same breath: three attribute points for the core stats and one talent point for the tree. The talent pick is not a separate reward that has to be earned on top of the level. It lands automatically the moment the level bar fills, so any quest or exploration reward that pushes the character over the line effectively delivers both a stat budget and a talent pick in one step.
Because the two currencies are bundled, the pace of the talent tree is locked to the pace of the attribute tree. There is no way to farm more talent picks without also earning the attribute points, and vice versa. Planning the build means planning both pools at the same level-up.
The developers have also confirmed that resetting stats is completely free. Although attribute respec does not reset talent picks on its own, the fact that stats can always be rebuilt to match the new weapon means a talent pick made in the early game has a generous safety net. A character who takes Agile (Fencer Tier 0) expecting to wield a saber but later finds a halberd can at least shift the attributes to Strength without paying the full respec cost. The talent still leans toward dash-heavy play, which the two-handed sword or halberd can still exploit for stamina-efficient movement between swings.
The developer-featured sample loadout pairs a two-handed sword with a blunderbussboth scaling with Agility. On this loadout, the community-tested opening talent order overlaps cleanly with what the developers hinted at in their tips video:
Level 1: Marathon Runner (Toughguy Tier 0). A larger stamina pool pays off on every dash, every heavy swing, and every blunderbuss reload step.
Level 2: Agile (Fencer Tier 0). Cheaper dashes and jumps let the two-handed sword user reposition between heavy swings without draining the bar.
Level 3: Deep Cuts (Fencer Tier 0). Adds flat Slash damage, which both the two-handed sword and the blunderbuss benefit from on this build.
Level 4: Temporal Health Gain (Toughguy Tier 0). Increases the recoverable portion of the health bar, which turns the two-handed sword's aggressive playstyle into a sustainable one.
Level 5 onwards: Commit to one branch to reach Tier 1 and Tier 2 payoff talents, then top up with Toughguy Tier 0 picks as survivability demands.
This opening costs five talent points and can be adjusted if the character picks up an off-scaling weapon before level six. Because levels are quest-gated, the cadence of these five picks roughly matches the cadence of the first island's main quest line.
Quick Strikes is the Fencer branch's flat one-handed weapon damage talent. It is separate from Deep Cuts, which scales with the Slash damage type rather than the weapon size category. Where Deep Cuts benefits any Slash weapon (including greatswords and two-handed blades), Quick Strikes benefits only one-handed weapons regardless of their damage type, which makes it the cleanest damage multiplier for a pure saber or rapier build.
Rank progression: Rank 1 adds +4% one-handed damage, Rank 2 adds +6%, and Rank 3 adds +8%. The jump from Rank 1 to Rank 3 is only four percentage points, so unlike talents that scale more aggressively per rank, Quick Strikes pays its largest dividend at the first point spent.
Pairing: Quick Strikes stacks additively with Deep Cuts for Slash builds (saber, cutlass) and with Surgical Cuts on crit-heavy setups. On a Razor plus Privateer's Regalia build it is common to take Quick Strikes alongside Deep Cuts and Perfect Counter for a front-loaded one-handed damage profile. On the rapier side, Quick Strikes stacks with the Fencer Pierce-damage pick to push the Rapier of a Thousand Cuts Bleed pipeline without relying on Crit chance alone.
Talent points do more than sharpen combat. Because tools in Windrose deal a specific damage type against resource nodes, the same talents that raise that damage type also speed up how fast a pickaxe or wood axe can break a node. This is a subtle but meaningful payoff that most early-game players miss when they pour their first picks purely into survival talents.
Pickaxes and wood axes deal Crude damage. Against copper, iron, and sulfur ore nodes, as well as against trees, the tool's damage type is Crude. The node has a hidden health bar that absorbs Crude damage until it breaks. Anything that raises Crude damage output therefore shortens the swing-per-node count, which compounds over a long farming run.
Bonecrusher (Crusher Tier 0) doubles as a gathering talent. Bonecrusher grants +3% / +6% / +9% Crude damage across its three ranks. In combat this translates to stronger club and halberd swings. Out of combat, the same bonus applies when a pickaxe or wood axe hits an ore vein or tree trunk. With three points invested, a Stone Pickaxe chips away at a copper vein about 9% faster than an unbuffed pickaxe, and a Copper Axe clears a jungle tree in visibly fewer swings.
Quick Strikes speeds one-handed tool use. Although the pickaxe and wood axe are one-handed implements in terms of the equipment slot, the Quick Strikes talent's damage boost stacks on top of their Crude damage output the same way Bonecrusher does. Combining Bonecrusher (Crude) and Quick Strikes (one-handed) on the same character therefore yields the fastest tool swing profile the talent tree offers in the early game. A pure Fencer character without any Crusher points cannot match it on tool speed, and a pure Crusher character without Quick Strikes leaves a small gathering multiplier on the table.
Practical early build for gathering-heavy play: Level 1 Marathon Runner (Toughguy Tier 0) for the stamina floor that every tool swing and dash relies on. Level 2 Bonecrusher Rank 1 (Crusher Tier 0) for the first +3% Crude damage, applied to both combat clubs and the wood axe. Level 3 Agile (Fencer Tier 0) so dashes between nodes cost less stamina. Level 4 and 5 top up Bonecrusher to Rank 3 for the full +9% Crude bonus, completing the gathering core before branching into weapon-specific picks like Deep Cuts or Quick Strikes.
Tool tier still beats talents. The talent-based gathering boost is a multiplier on top of tool tier, not a substitute for it. Upgrading from a Stone Pickaxe (3 Wood + 3 Stone) to a Copper Pickaxe is a much bigger single-step improvement than any talent can provide, because higher-tier tools unlock the ability to mine higher-tier nodes in the first place. The combined best case is the highest tool tier the biome allows plus full Bonecrusher and Quick Strikes investment, which is how speedrun-minded players chain mining sessions with minimal downtime.
Two Toughguy talents are easy to miss in the early branching because their names do not obviously describe their effects. Both are useful in situations that happen constantly in the early biomes, so budgeting one or two points for each pays off quickly:
Talent | Branch | Effect Summary |
|---|---|---|
Outnumbered | Toughguy | Grants additional melee damage when two or more hostile enemies are within close range; rewards aggressive centering in multi-enemy fights rather than peeling off one at a time |
Flawless Defence | Toughguy | Reduces the Posture (guard-meter) cost of each incoming hit while blocking; stretches defensive trades before guard breaks |
Pairing guidance: Flawless Defence stacks functionally with Marathon Runner and Agile because all three extend the duration of engagements by reducing resource drain on defensive actions. Outnumbered is the counterpart to "pull enemies one at a time" conventional wisdom: once the Toughguy has enough Posture and stamina to actually survive multi-target aggression, the talent rewards the aggressive approach with flat damage gains that the solo pull pattern cannot match.
A complete catalog of the four talent branches and every perk the planner currently exposes, pulled from the 2026-04-14 talent-tree export. Each entry lists the tier it unlocks at, the perk name as shown in the planner tooltip, and the bonus at each of the three rank tiers. Max-rank values are the third entry in the "Rank 1 / 2 / 3" column.
Total: 4 branches, 35 talent nodes, and 37 distinct perks. Every node costs one point per rank and caps at three ranks, so a fully ranked perk is a three-point investment.
Fencer is the one-handed melee and dueling branch, focused on slash damage, critical hits, and stamina-efficient mobility. The branch holds 10 perks across three tiers; each perk can be ranked up to three times (1 point per rank).
Tier | Perk | Effect (Rank 1 / 2 / 3) |
|---|---|---|
T1 | Deep Cuts | Increases Slash Damage by 3% / 6% / 9%. |
T1 | Agile | Dash and Jump actions consume 15% / 27.5% / 40% less Stamina. |
T1 | Surgical Cuts | Increases Critical Hit Chance with one-handed melee weapons by 3% / 6% / 9%. |
T2 | Quick Strikes | Increases one-handed weapon Damage by 4% / 6% / 8%. |
T2 | Perfect Counter | After a Perfect Block, your Critical Hit Chance is increased by 5% / 8.8% / 12% for 12s. |
T2 | Duelist | When only one enemy is within 10m, your melee attacks deal 6% / 9% / 12% bonus Damage. |
T3 | Executioner's Grace | On enemy kill, you gain an effect for 20 seconds, restoring 10 / 15 / 20 Health per tick. |
T3 | Disciplined Fencer | Perfect Blocks restore 15% / 25% / 35% of your current Passive Gun Reload progress. |
T3 | Evasive Fencer | Perfect Dashes restore 25% / 40% / 55% of your current Passive Gun Reload progress. |
T3 | Deadly Finale | Each consecutive hit increases your Damage by 3% / 4% / 5%, capped after 5 hits. |
Crusher is the two-handed and crude-damage branch, focused on heavy weapons, posture pressure, and melee snowball effects. The branch holds 8 perks across three tiers; each perk can be ranked up to three times (1 point per rank).
Tier | Perk | Effect (Rank 1 / 2 / 3) |
|---|---|---|
T1 | Bonecrusher | Increases Crude Damage by 3% / 6% / 9%. |
T1 | Retribution | Your attacks are 40% / 70% / 100% more effective in converting Temporal Health into Health. |
T2 | Massive | Increases two-handed weapon Damage by 5% / 7.5% / 10%. |
T2 | Perfected Form | Two-handed weapon attacks consume 10% / 17.5% / 25% less Stamina per attack. |
T2 | Executioner's Aim | Increases Critical Hit Chance with two-handed melee weapons by 4% / 8% / 12%. |
T3 | Berserk | For every 15% Health lost you gain an effect stack granting you 3% / 5% / 7% bonus Damage. |
T3 | Dominating Presence | When an enemy dies within 8m, you gain 6% / 12% / 18% Melee Damage bonus for 60s. |
T3 | Momentum | For hitting 2 or more enemies you gain an effect stack granting you 5% / 7% / 9% additional Damage. Every attack that hits fewer than 2 enemies removes an effect stack. Capped at 3 stacks. |
Marksman is the ranged branch, focused on pierce damage, firearm reload, and headshot critical damage. The branch holds 11 perks across three tiers; each perk can be ranked up to three times (1 point per rank).
Tier | Perk | Effect (Rank 1 / 2 / 3) |
|---|---|---|
T1 | Planning Ahead | Improves Passive Gun Reload Speed by 5% / 15% / 25%. |
T1 | Deep Impact | Increases Pierce Damage by 3% / 6% / 9%. |
T1 | Bull's Eye | Hitting a critical spot deals 5% / 12.5% / 20% bonus Damage. |
T2 | Firearm Training | Increases Ranged Damage by 5% / 7.5% / 10%. |
T2 | Quick Hand | Improves Active Reload Speed by 10% / 17.5% / 25%. |
T2 | Muzzle Reach | Shots deal 4% / 12% / 20% bonus Damage at close range (below 10m). |
T2 | Extended Reach | Shots deal 1% / 2% / 3% bonus Damage per 10m between you and the target. |
T3 | Bulletstorm | Consecutive ranged hits without missing grant a stacking 5% / 7% / 9% Damage bonus to your next shot, capped after 4 hits. |
T3 | Sniper's Focus | While aiming, you gain 3% / 5% / 7% bonus Damage every 2s, capped after 4 stacks. |
T3 | Deadly Hunter | Killing an enemy has a 15% / 25% / 35% chance to instantly reload your weapon. |
T3 | Overpenetration | Shots penetrate enemies. After penetrating enemies bullets deal 50% / 35% / 20% less damage. |
Toughguy is the survival branch, focused on damage resistance, stamina and health pools, and clutch save mechanics. The branch holds 8 perks across three tiers; each perk can be ranked up to three times (1 point per rank).
Tier | Perk | Effect (Rank 1 / 2 / 3) |
|---|---|---|
T1 | Stitches and Rum | You gain 10% / 17.5% / 25% increased effect from Healing. |
T1 | You Will Answer for This | Increases Temporal Health gain when taking damage by 25% / 50% / 75%. |
T1 | Marathon Runner | Grants 20 / 35 / 50 additional Stamina. |
T2 | Just a Flesh Wound | Increases melee Damage Resistance by 6% / 9% / 12%. |
T2 | Flawless Defence | Blocks consume 15% / 25% / 35% less Posture. |
T2 | Outnumbered | When you are close to two enemies or more, you gain 4% / 7% / 10% Melee Damage bonus. |
T3 | Too Angry to Die | When you receive a killing blow, instantly restore 30% / 50% / 70% Health. Cooldown: 16 min / 13 min / 10 min min. |
T3 | Stout Frame | Increases maximum Health by 120 / 180 / 240. |
For a closer look at each branch including recommended openers, weapon synergies, and build notes, see the dedicated branch articles:
Fencer Talents
Crusher Talents
Marksman Talents
Toughguy Talents
Data-driven breakdown of the Early Access leveling curve, pulled from the v0.10.0 export. The cap is Level 15; reaching the cap awards a total of 45 Stat Points and 12 Talent Points. Stat Points and Talent Points are not awarded uniformly: early levels grant more Stat Points (four per level from Level 2 through 5), and a handful of levels (2, 10, 12, 14) grant no Talent Points at all.
Level | XP | Stat Points | Total Stat | Talent Points | Total Talent |
|---|---|---|---|---|---|
1 | 0 | 0 | 0 | 0 | 0 |
2 | 600 | +4 | 4 | 0 | 0 |
3 | 1,200 | +4 | 8 | +2 | 2 |
4 | 1,800 | +4 | 12 | +2 | 4 |
5 | 2,400 | +4 | 16 | +1 | 5 |
6 | 3,200 | +3 | 19 | +1 | 6 |
7 | 4,000 | +3 | 22 | +1 | 7 |
8 | 4,800 | +3 | 25 | +1 | 8 |
9 | 5,600 | +3 | 28 | +1 | 9 |
10 | 6,400 | +3 | 31 | 0 | 9 |
11 | 7,400 | +3 | 34 | +1 | 10 |
12 | 8,400 | +3 | 37 | 0 | 10 |
13 | 9,400 | +3 | 40 | +1 | 11 |
14 | 10,400 | +3 | 43 | 0 | 11 |
15 | 11,400 | +2 | 45 | +1 | 12 |
For a full breakdown including per-level XP delta, XP sources, recommended leveling route, and tips, see the dedicated Hero Progression article.