Ship customization is a central system in Windrose. Your ship is both your primary means of travel between islands and your weapon in naval combat. The game features multiple ship classes with distinct characteristics, and players can upgrade their vessels through crafting stations built at their base. The Steam store page describes the system: "Equip and customize your ship to suit your playstyle, from nimble ketch to versatile brig and monstrous frigate."
Ship Classes
Windrose includes several ship classes, each with different strengths. Ships vary in speed, durability, maneuverability, cargo capacity, and the number of cannons they can mount. Choosing the right ship for the task matters: a fast ketch is better for exploration, while a heavily armed frigate is built for prolonged naval engagements.
Image | Ship Class | Speed | Durability | Cannon Slots | Role |
|---|---|---|---|---|---|
| High | Low | 3 (all 12-pound) | Fast scout and exploration vessel | |
| Moderate | Moderate | 6 (stock: 12-pound; Blackbeard: 12 or 24-pound) | Versatile all-rounder | |
| Low | High | 12 main + 6 secondary (stock and Brethren: 24-pound main, 12-pound secondary; Blackbeard: 24 or 36-pound main, 12 or 24-pound secondary) | Heavy combat warship |

The developer roadmap mentions that visual customization of ships, including sails and cosmetic elements, along with crew management features, are planned but were not fully implemented in the demo build.
Summoning and Recalling Your Ship
Your starter boat can be summoned instantly to your location by pressing K. This works from any shoreline and avoids the need to walk back to where you last docked. If your combat ship is destroyed, you can rebuild it at the Wharf for a small fee of 20 Wood using the Repair/Salvage option, then press K to respawn it.
The Wharf
The Wharf is a shore-based crafting structure that is your ship dock and upgrade station. It costs 10 Wood and 10 Coarse Fabric to build. The Wharf becomes available after completing the Seafarer quest, which requires crafting your first set of cannons. The Wharf must be placed on a shoreline.
From the Wharf, you can equip cannons onto your ship, repair damaged vessels, salvage wrecked ships, and access upgrade options. It is the central hub for all ship-related modifications.
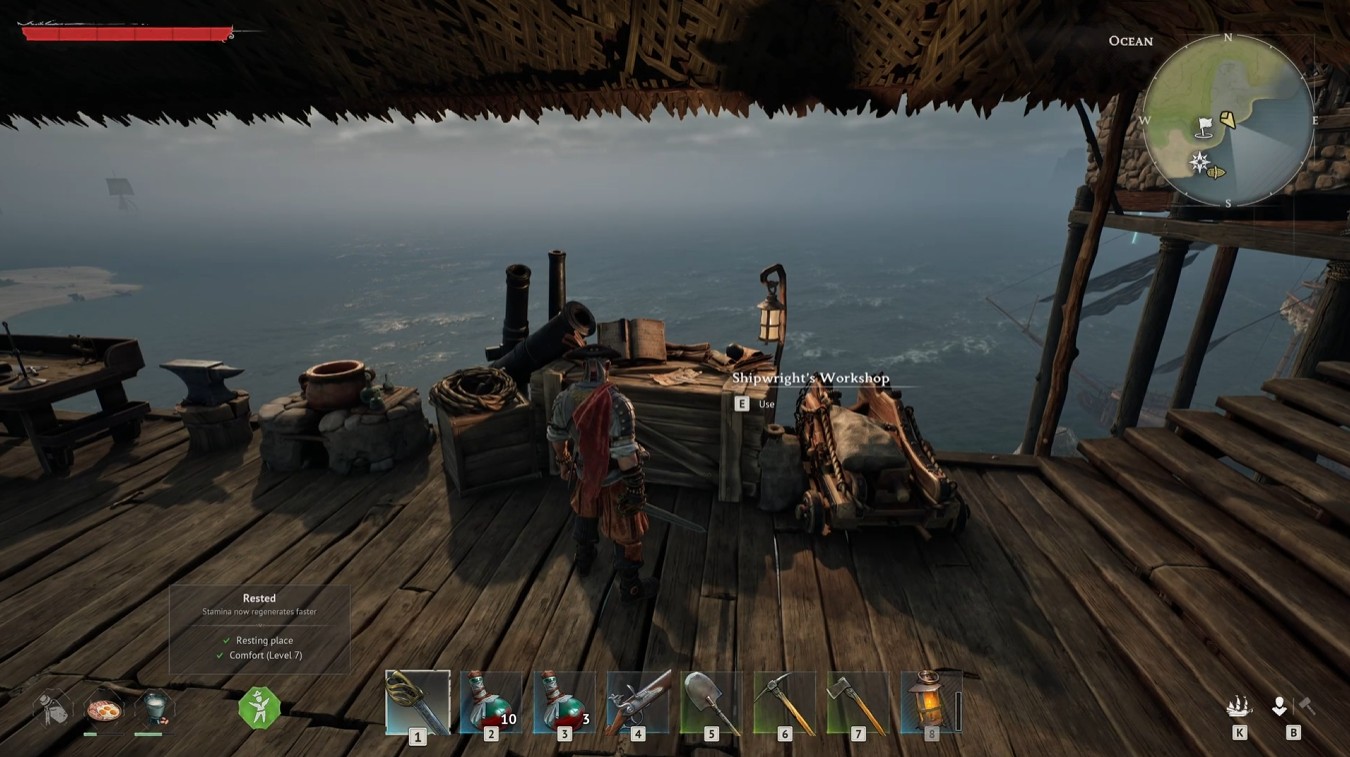
The Shipwright's Workshop
The Shipwright's Workshop is the crafting station where you build ship components. This is where you craft 12-Pounder Cannons, hull bracing, and boarding gear before equipping them at the Wharf. Building the Shipwright's Workshop requires resources including wood and copper ingots.
Ship Upgrades
Several upgrade categories are available for your ships:
Upgrade | Crafted At | Materials | Effect |
|---|---|---|---|
Ship Cannons | 10 Copper Ingots, 10 Wood | Equips ship cannons for naval combat. Windrose ships carry 12-pound, 24-pound, and 36-pound calibers with Tempered, Devastating, and Perfectly Ordered modifier lines at Rare and Epic. | |
Copper Ingots, Planks | Increases ship durability and hull strength | ||
Boarding Gear | Enables boarding enemy vessels |
Upgrading your ship's hull and cannons before sailing to new islands is strongly recommended. Enemy ships in later areas hit harder and take more punishment. Going underequipped into naval combat often results in a sunk ship and a long swim back to shore.
Naval Combat Role
Your ship's loadout directly determines your effectiveness in naval encounters. Combat at sea involves broadside cannon exchanges, maneuvering for positioning, and eventually closing in for boarding actions. A fully upgraded frigate with reinforced hull and maximum cannons can tank significant damage while dealing it in return. A lightly equipped ketch relies on speed and hit-and-run tactics.
The demo included ship-to-ship combat, coastal fort bombardment, and boarding sequences. In co-op, one player can steer while others man the cannons or prepare for boarding, adding a layer of teamwork to naval engagements.
Tips for Ship Management
Always carry 20 spare Wood so you can repair your ship immediately if it sinks.
Build the Wharf close to where you spend the most time sailing to reduce travel between your base and the coast.
Upgrade hull bracing before cannons if you are struggling to survive naval encounters. Staying afloat matters more than dealing damage.
In co-op, assign one player to prioritize ship upgrades while others focus on land-based progression.
Press K to recall your boat rather than running across an entire island to reach the coast.
Per-Cannon Upgrade Flow
A Ketch with 3 cannons requires 3 separate upgrade actions; a Brig with 6 takes 6; a Frigate with 12 main-battery cannons plus 6 secondary slots takes 18. Each upgrade consumes Copper Ingots and Wooden Planks, with costs climbing at each tier. Players routinely miss this screen entirely because the Upgrade tab is a separate sub-menu from the crafting and buying tabs.

The fastest way to afford a full broadside of upgraded cannons is to run a wood-and-barrel loop: summon the starter boat at the shoreline, use it to knock down trees at the waterline by ramming, then sail a set route between Tortuga and your base, scooping every white, blue, and yellow bounty barrel along the way. One full circuit easily nets 100 to 200 wood plus spare copper, nails, and piastres.
Hire Jasper Crowe, the Tailor and Armorer NPC sold in Tortuga for 500 piastres, and assign him to the Armor and Clothing Workshop. His Thrifty Tailor perk grants a 30% chance to refund materials on every upgrade. The refund covers armor upgrades most reliably, but with cannon upgrades costing heavy copper, even a partial refund rate meaningfully stretches the budget.
Faction Variant Cannons
Beyond raw damage upgrades, faction provisioners sell variant cannons that change the cannon's behavior entirely. The Buccaneers' provisioner sells the Perfectly Ordered 12-Pounders at reputation rank 2. Its effect: hitting an enemy ship within 4 seconds of a reload grants +30% reload speed for 22 seconds. A disciplined gunner can keep this buff rolling across most of a fight, producing a noticeable rate-of-fire advantage over unmodded 12-pounders.
Higher-reputation provisioners also sell armor sets whose bonuses feed straight back into naval combat. The Flibustier set, for example, reduces stamina cost of attacks by 20%, which matters during boarding actions where melee stamina runs low. A complete armor set costs roughly 200 piastres per piece, so budget accordingly before committing to a set.
Naval Tactics Slot
Ships also carry a Naval Tactics slot, unlocked by reaching reputation rank 3 with the Smugglers of Port Royal. Tactics are passive combat modifiers slotted into the ship like equipment. Once installed, they trigger automatically based on combat state (in combat, out of combat, on hit, and so on). Options confirmed from launch-week community reporting include chip-health regen out of combat, a debuffing hit tactic called Broken Rhythm, and a sleeper-volley tactic that adds +130% damage after two minutes without taking or dealing damage.
Tactics are expensive by Early Access standards (high hundreds to low thousands of piastres) so weigh your playstyle before buying. The Broken Rhythm tactic fits brawlers; the +130% sleeper volley rewards cautious snipers; the chip-health regen suits long chase fights against multiple escorts.
Customization Priorities
If forced to rank upgrade categories in a fresh Early Access playthrough, the community consensus is: boarding party first, hull bracing second, cannons third, and hold capacity fourth. Boarding party wins because dying during a boarding fight resets the whole naval encounter, with no ship respawn. Hull bracing keeps you alive long enough to finish the fight in the first place. Cannons only shorten fights rather than change their outcome. Hold capacity matters last because cargo only matters if you survive to sell it.
See Also
Cannon Types for the full weight-class and variant breakdown
Naval Combat for fleet strategy
Boarding for crew-side upgrade priorities
NPC Crew for Jasper Crowe and other base workers
Shipwright's Workshop for the crafting station
High-Value Rare Ship Mods
Image | Mod | Why Players Prioritize It |
|---|---|---|
| Perfectly Ordered 12-Pounders | Strong general-use cannon plan for sustained fights. Creator testing describes it as a reload-speed snowball that rewards quick follow-up hits after each reload. |
Tempered 12-Pounders | Best for players who line up deliberate stern shots. Transcript-tested behavior gives the opening volley extra bite if you wait between shots. | |
| A repair-focused hull mod that makes repair-kit windows more reliable, which is why it is widely recommended before riskier offensive upgrades. | |
A naval tactic that creator testing describes as applying Broken Rhythm for 30 seconds, cutting enemy reload speed and damage by 20 percent after a hit. |

These upgrades matter because they change how the ship fights, not just how much raw damage it deals. The cannon pair changes the pace of your volleys, the hull mod changes how safely you can recover, and the tactic changes how dangerous the enemy ship remains once contact is made.
Instant Wharf Repair
Any Wharf can fully repair your current ship for 20 Wood, regardless of how damaged it is. This is faster than waiting on repair kits between fights and is the cleanest reset after a bad boarding run or a long resource loop.
If you are near shore and the fight is already over, use the wharf repair first and save repair kits for the moments when you are still under pressure.
Variants
A complete list of Ship Customization variants in Windrose is shown below, with thumbnail, build cost, and comfort bonus for each entry. Click any name to open its dedicated page.
Image | Variant | Build Cost | Comfort |
|---|---|---|---|
| - | - | |
| - | - | |
| - | - | |
| - | - | |
| - | - | |
| - | - | |
| - | - | |
- | - | - | |
| - | - | |
| - | - | |
| - | - | |
| - | - | |
| - | - | |
| - | - | |
| - | - | |
| - | - | |
| - | - | |
| - | - | |
| - | - | |
| - | - | |
| - | - | |
| - | - |