
Overview
The Sage's Peak is a mountain range located at the northernmost tip of Hernand, where it borders Pailune's Silver Wolf Mountain. It is the transition zone between the temperate Hernand region and the cold northern territory of Pailune, rising from the forested lowlands into a cluster of sheer, wind-battered peaks. Earlier route notes in Crimson Desert discuss its lore and recommend mid-game farming for Iron Ore and Abyss materials from rock-like creatures. The ranking, guaranteed yields and current reset behavior of that recommendation are not independently established here.
Location and Geography
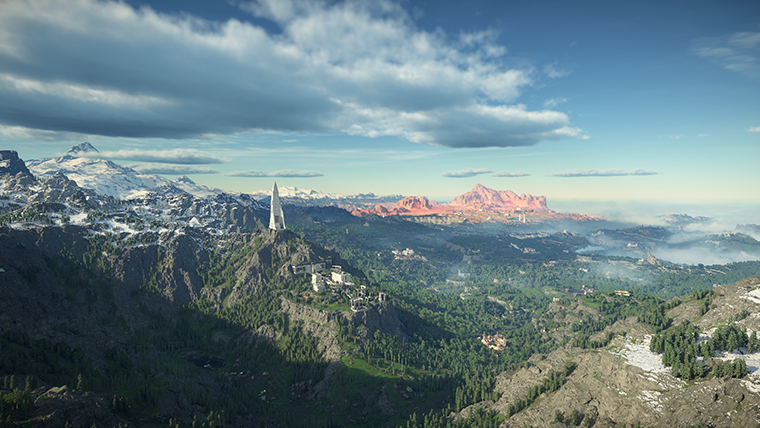
Sage's Peak sits at the northern frontier of Hernand, reached by traveling north out of Hernand city, past Three Saints' Falls and continuing beyond Hook Rapids along the river. The mountain range is marked clearly on the world map by The Sage's Peak label. The terrain rises steeply from forest and river valleys into bare rock, and the peaks themselves form a natural wall separating the green hills of House Celeste's territory from the snowbound reaches of Silver Wolf Mountain in Pailune.
Lore: The Ancient Sage's Warning
According to legend, an ancient sage of Hernand warned his descendants never to cross those peaks, saying the lands beyond were nothing but cold and barren wastes. This warning shaped the settlement pattern of northern Hernand for generations: travelers would approach the peaks to trade, to hunt, or to test themselves against the mountain, but crossing them was considered taboo. Over time the warning was vindicated by harsh experience, as the lands beyond proved to be Pailune's Silver Wolf Mountain, a frozen territory ruled by dire wolves and winter storms.
Waypoints and Landmarks
Landmark | Description |
|---|---|
Waypoint on the approach to Sage's Peak | |
Waypoint on the route into the peaks | |
Found along the road and river northwest of River Breeze Hearth and Trovak Camp | |
Abyss Nexus (Sage's Peak) | Fast travel point near the top of the peak |
Giant Sky Fan | A massive fan built into the mountain top, aimed at the sky and surrounded by scattered wires; the centerpiece of the Ancient Sealed Gate puzzle |
Ancient Sealed Gate | Earlier route: eastern chamber and cogwheel bearings remain unverified. The separate Sealed Ancient Gate guide describes an alignment-pillar puzzle and wind device. |
River landmark south of Sage's Peak, used as a navigation reference | |
Howling Hollow | Cave located just north of The Sage's Peak, home to the legendary dire wolf Silver Fang |
Roothold Connection
Roothold is a mountain fort built around the Eldertree that originally began as a small camp for travelers bound for The Sage's Peak. Over time it grew from that waystation into a formidable stronghold, eventually coming under the jurisdiction of House Celeste. By the events of the game the fort has been occupied by Wolf Trackers, and liberating it from them is the objective of the Frozen Eldertree questline. Roothold's origin as a Sage's Peak waystation reflects how central the peaks were to early Hernandian travel.
Enemies
The slopes around the giant fan and the Abyss Nexus are populated by rock-like Abyss creatures, similar to those found near the Witchwoods. These stone-bodied enemies can be climbed over the peak to engage, and one variant carries green moss, grass, and leaves growing from its back. Farther north in Howling Hollow, the legendary dire wolf Silver Fang commands a pack of smaller wolves and only spawns after Black Fang has been defeated as part of the House Celeste faction questline.
Earlier Iron Ore and Abyss farming notes
The older account ranks this among farming locations and describes Iron Ore, Abyss Cells and Abyss Cores from rock-like creatures near the fan. Its best-location ranking and exact drop guarantees for upgrading weapons and armor remain unverified; the ordered route below is retained as an earlier account.
Farming method: (earlier unverified route)
Fast-travel to the Abyss Nexus at The Sage's Peak in northern Hernand.
From the Nexus, climb the nearby mountain toward the giant fan.
Engage and destroy the stone-bodied Abyss creatures along the slope.
Loot Iron Ore, Abyss Cells, and (less frequently) Abyss Cores from their remains.
The earlier infinite-respawn account leaves a large rock creature alive, specifically the moss-, grass- and leaf-backed variant, then allows it to defeat the player before a checkpoint respawn. Its repeated-reset guarantee and claimed permanent loss after clearing all creatures are not independently tested or established here. Keep the old save-file warning as an unverified observation rather than a confirmed irreversible lockout rule.
Connection to the Twisted Thicketway
The earlier Sage's Peak route associates an eastern cogwheel chamber with the Ancient Sealed Gate and giant fan. The dedicated Sealed Ancient Gate guide instead documents the alignment-pillar sequence and approaches described below; it does not independently settle those old bearings. The powered wind device leads toward Twisted Thicketway, while the Abyss Kutum guide places that fight after a series of puzzles, not automatically at the instant of arrival. Kliff's broader Abyss challenge route should be kept separate from a guaranteed immediate boss trigger.
For the documented Sealed Ancient Gate route, solve Skyloop Bridge to use its teleporter, or approach Root's End Ruins in Pailune directly. In the chamber, activate the elevator and use the Axiom Bracelet on the alignment device. Fit the pillar into all three sockets, turning it until each produces a gas-like hiss. Once the central light activates, insert the pillar into the middle socket to open the portal; return to the surface and activate the wind device with Force Palm to glide toward Twisted Thicketway. These are the gate guide's steps, not a new assertion that every old Sage's Peak landmark has those exact coordinates.
The Abyss Kutum guide's normal strategy is to shoot the eye with a bow to build Stagger, then close for melee damage once it falls. Its laser-charge cue gives an opportunity for Focused Shot at mid-range; when it burrows and emerges for Lightning Slam, keep distance and dodge sideways. The same guide reports a Nature's Grasp tree shortcut, but this review does not establish a guaranteed current one-hit kill.
The separate Legionary's Gladius Smith route uses seven Iron Ore and two Copper Ore after learning One-Handed Weapons of the World, Vol.II. That crafting alternative and the two-candle statue puzzle are specific references; the older farming yields, lore, Silver Fang trigger and waypoint bearings remain separate inherited notes rather than newly verified runtime conditions.
Tips
Reach Sage's Peak in the mid game once basic climbing gear and stamina upgrades are available, as the peak requires several long climbs.
Check the actual equipment durability field before farming. Only some weapons have durability, including some makeshift items, and an Irreparable tag means they cannot be repaired. The older repair-supplies recommendation is not a universal rule for ordinary swords and spears.
The earlier mossy-backed-creature respawn recommendation is unverified; it does not establish an infinite loop or a permanent failure state.
The Abyss Nexus here is a convenient re-entry point if the loop is broken.
Do not engage Silver Fang in Howling Hollow until Black Fang has been defeated, otherwise the encounter will not trigger.
The Legionary's Gladius guide identifies a Three Saints' Falls statue chest opened by lighting both candles. Do not automatically equate that puzzle with a different Silver Ore waterfall chest or the exact older approach bearings.
Prepare cold protection before attempting to cross into Pailune proper; the older warm-weather recommendation contradicted the cold conditions described here.
Related Articles
Hernand, Pailune, Silver Fang, Abyss Skybridge Gates.