Esper Cycle System
The core elemental combat system in Neverness to Everness. Six elements form a wheel; only adjacent pairs trigger duo reactions, and any three consecutive form a trio. Covers the Esper Cycle Meter, Cycle Rate stat, character ability kit, off-field passive stacking, and the full duo and trio reaction catalogue.
On This Page
Overview
The Esper Cycle is the core elemental combat system in Neverness to Everness. Six elements are arranged in a circular wheel, and only adjacent pairs on that wheel can trigger elemental reactions. This constraint shapes every aspect of team building, because picking characters from opposite sides of the wheel means forfeiting reaction synergy. Understanding the Esper Cycle is essential for clearing high-difficulty content, where raw stats alone are not enough.
The Six Elements
Each element has an associated color and thematic identity. All playable Espers belong to exactly one element, which determines their reaction compatibility.
Image | Element | Color | Theme |
|---|---|---|---|
| White | Light, order, celestial energy | |
| Teal | Nature, life force, organic growth | |
| Pink | Magic, ritual, arcane power | |
| Purple | Entropy, dark energy, destruction | |
| Blue | Mind, cognition, mental force | |
| Yellow | Form, physicality, structural power |
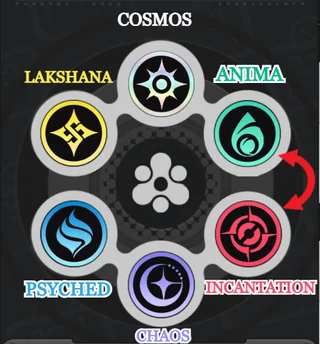
The elements form a continuous ring: Cosmos, Anima, Incantation, Chaos, Psyche, Lakshana, and then back to Cosmos. Only neighboring pairs on this ring can produce duo reactions. Elements that are two or more steps apart on the wheel do not interact at all.
Esper Wheel Layout
The element ring runs in fixed clockwise order: Cosmos, Anima, Incantation, Chaos, Psyche, Lakshana, and back to Cosmos. Only neighboring pairs on this ring can produce duo reactions, and any three consecutive elements form the contiguous arc that powers a trio reaction.
Adjacency is the gate that decides whether two characters can produce a reaction together. If an Esper on your squad uses an element that is two or more steps away from every other squad member on the wheel, nothing lights up when you swap into them. Picking at least two adjacent elements is the minimum bar for reliable reaction coverage, and extending to three adjacent elements opens the door to trio reactions on top of the duo list.
Element coverage and wheel adjacency, not raw damage numbers, are the first consideration when locking in a squad for the combat system. Characters pulled from the same adjacent pair also stack their individual contributions on top of the shared reaction, which is covered under Character Passives and Off-Field Stacking below.
Esper Cycle Meter
Each character has a personal Esper Cycle Meter displayed near their portrait during combat. The meter charges through three main actions: dealing damage with normal attacks, activating skills, and successfully executing parries (see the Parry System article for details).
When the meter fills completely, the character's portrait begins to glow, signaling that they are ready for a powerful Esper Cycle swap. An Esper Cycle swap is not just a tag-in. When you swap to a character whose meter is full, they enter the field with an enhanced entrance attack and immediately trigger any applicable elemental reaction with the element last applied by the previous character. This makes meter management the central rhythm of NTE's combat: attack, fill the meter, swap, trigger a reaction, repeat.
Reading the Cycle Gauge
The cycle gauge is the small element-shaped icon next to each character's HP bar. It fills in real time as the active character lands attacks, casts skills, and parries. Two visual cues confirm a swap is ready:
Active gauge fills to 100. When the icon is full, the active character has built enough Cycle Rate to enter the swap window. The gauge resets to zero after a successful swap.
Adjacent allies glow. Bench portraits on the right side of the screen only glow when their element is adjacent to the active character on the wheel. Tapping a glowing portrait performs the Esper Cycle swap and triggers the duo reaction. Dark portraits are off-element and cannot complete a reaction.
If a portrait stays dark while the active gauge is full, the bench character is on a non-adjacent element. The active character can still tag out manually (no reaction triggers) or wait for an adjacent ally. Players who consistently see dark portraits should rebuild the squad around two or three adjacent elements on the wheel.
Esper Cycle Swap Step by Step
Executing a swap follows a fixed sequence:
Step | What Happens |
|---|---|
1. Tap the glowing portrait | Outgoing character's gauge resets to zero. Incoming character is now on field. |
2. Intro attack lands | Incoming character enters with a unique entrance attack that deals burst damage and applies their element. |
3. Esper Cycle reaction triggers | The duo reaction tied to the two elements fires on every enemy hit. Squad passive stacking, Cycle Enhancements, and off-field bonuses all apply at this moment. |
4. Active control passes | Incoming character becomes controllable. They start filling their own cycle gauge from zero on each new attack. |
The four steps run as a single fluid animation. The reaction in step 3 fires once per swap, so triggering a second reaction requires filling the new active character's gauge or letting an off-field passive (such as a Vita Bud or Hexed window) keep its effect rolling.
Cycle Rate
Cycle Rate is a stat that governs how quickly the Esper Cycle Meter fills. A higher Cycle Rate means faster meter gain per action, allowing more frequent swaps and reactions. Most characters have a moderate base Cycle Rate, but some (notably Esper Zero, the protagonist, and Fadia) have skills tagged at 100 Cycle Rate that fill the meter in a single cast. These characters serve as instant-swap enablers for rapid reaction chains.
Cycle Rate can also be boosted through the KongMu equipment system. Certain Disk set effects and Drive Block substats provide Cycle Rate bonuses, and stacking this stat is a viable build path for characters whose primary role is to enable reactions rather than deal direct damage.
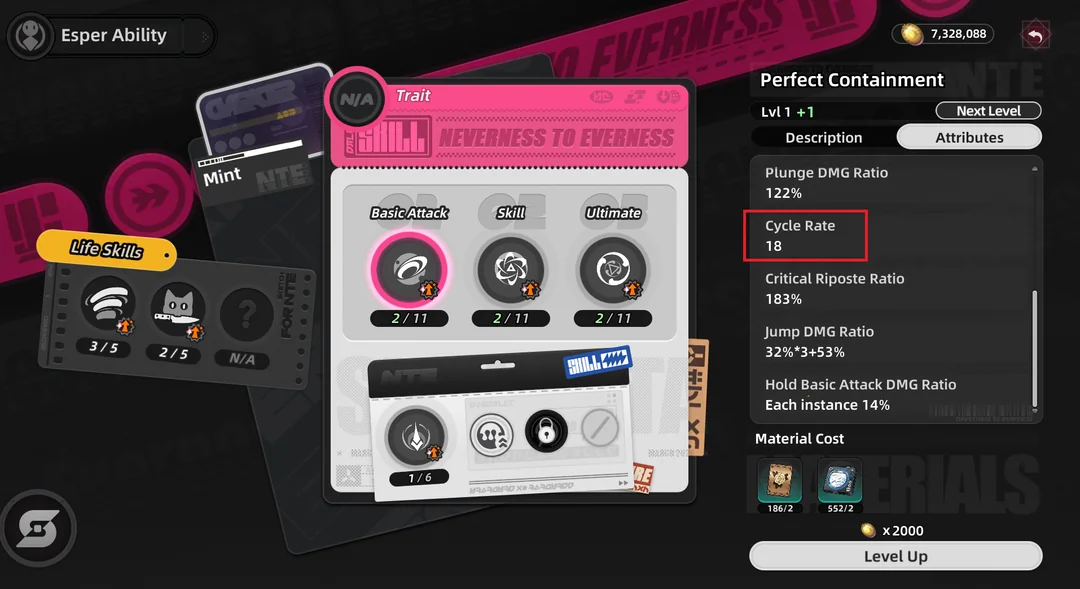
Cycle Rate on the Stat Card
Each character's basic combo and active skill display a Cycle Rate value in the in-game stat card. The number represents how many points of cycle gauge that action contributes when it lands cleanly. A few rules of thumb apply across the roster:
100 Cycle Rate fills the gauge in one cast. A skill or Esper Ability listed at exactly 100 Cycle Rate is a one-button gauge enabler, no basic-attack ramp required.
Full basic combos beat partial combos. The Cycle Rate listed for a basic attack assumes the full chain finishes. Cancelling the combo halfway gives only a fraction of the listed gain.
Held basic versus tapped basic differ. Some characters have separate Cycle Rate values for tap and hold variants. The basic with the higher Cycle Rate fills the gauge faster even if its damage per second is slightly lower.
Instant Cycle Enablers
Two characters carry 100 Cycle Rate skills and serve as universal cycle enablers in any squad whose other members share their adjacency:
Character | Source | Use Case |
|---|---|---|
Skill (100 Cycle Rate) | The protagonist. Skill flat-fills the gauge, making Zero the fastest reaction enabler and the default cycle battery for any team with a Cosmos-adjacent ally. | |
Esper Ability (100 Cycle Rate) | Chaos enabler. Pairs into Nova-focused teams where rapid cycling between Chaos and Psyche or Incantation matters more than personal damage. |
Character Ability Kit
Every playable character in Neverness to Everness has a standardized ability kit composed of four distinct abilities. Understanding these four components is essential for mastering the combat system and building effective teams around the Esper Cycle.
Ability | Description | Role in Esper Cycle |
|---|---|---|
Basic Attack | Standard attack combo string. Each character has a unique attack chain with different hit counts, speed, and range. | Builds Esper Cycle Meter steadily through continuous hits. Faster attack strings fill the meter more quickly. |
Skill | Active ability on a cooldown timer. Skills deal significant damage and often apply the character's element in a burst. | Provides a large chunk of meter charge per use. Skills are the most efficient way to fill the meter quickly. |
Ultimate | Powerful burst ability that requires Ultimate Energy to activate. Deals heavy damage or provides major team support. | Does not directly charge the Esper Cycle Meter, but the Charge trio reaction generates Ultimate Energy through Vita Pistil hits. |
Esper Ability | Unique ability specific to each character. Esper Abilities range from special movement skills to transformation states. | Varies by character. Some Esper Abilities have 100 Cycle Rate values that instantly fill the meter (Esper Zero, Fadia). |
The interplay between these four abilities defines each character's playstyle. DPS characters typically focus on weaving basic attacks between skills to maximize both damage and meter generation. Support characters may rely more heavily on skills and Esper Abilities to enable reactions for teammates. Characters with high Cycle Rate on their Esper Ability, like Esper Zero and Fadia, can serve as rapid swap enablers, filling their meter almost instantly and cycling through reactions at a faster pace than other characters.
Esper Cycle Passives
Every character possesses a unique Esper Cycle Passive ability. These passives enhance the character's contribution to elemental reactions and remain active for the entire fight as long as that Esper is in the squad, even when they are sitting in the reserves. For example, a passive might increase the damage of a specific reaction type, extend a reaction's duration, or apply a debuff to enemies affected by the character's element.
Because Esper Cycle Passives work from the bench, they add a hidden layer of depth to team composition. A character who seems underwhelming on the field might be extremely valuable as an off-field reaction amplifier. Always read a character's passive description before dismissing them.
Character Passives and Off-Field Stacking
Every character carries a unique Esper Cycle passive tied to the reactions their element can participate in, and that passive is active for as long as the character is a member of the squad. This is the key off-field rule: the passive still fires while the character is sitting on the bench, not just while they are the active on-field fighter.
Because of this, two or three characters drawn from the same adjacent pair stack their separate passive effects on top of the same shared reaction. A squad with two Cosmos plus Anima characters, for example, will see both passive enhancements applied to every Blossom it triggers, regardless of who is swapped in when the reaction goes off. The same stacking logic applies to any other adjacent pair on the wheel: pair Incantation with Chaos for stacked Scorch passives, pair Psyche with Lakshana for stacked Stain passives, and so on. Element coverage and wheel adjacency therefore directly drive how much passive value your squad is getting from each reaction.
Blossom Reaction Example Passives
Blossom, produced by the Cosmos and Anima pair, spawns a Vita Bud near the target. The Vita Bud blossoms into Vita Pistils, which fly toward enemies in range and explode every two seconds for area damage. Up to three Vita Buds can exist on the field at once. Several Cosmos and Anima characters have observed Esper Cycle passives that modify exactly this behaviour. The examples below illustrate how different passives stack when these characters share a squad.
Image | Character | Passive | Effect on Blossom |
|---|---|---|---|
| More Than Passionate | Fires 10 Vita Pistils per Vita Bud and reduces the interval between each shot to 1 second. | |
| Transform! Super Mint! | Expands the damage area of each Vita Pistil on hit, letting a single shot reach more enemies clustered around the target. |


Running both at once stacks both passives onto the same Blossom turret. The same stacking principle applies to the other five reactions on the wheel, each with its own roster of element-matched passives. When planning a squad around a specific reaction, check each candidate's Esper Cycle passive on their character page to see exactly what effect they stack onto that reaction while they are in the squad.
Cycle Enhancements Per Character
Beyond the Esper Cycle Passive, individual characters unlock a Cycle Enhancement on a specific reaction at certain skill or awakening levels. A Cycle Enhancement modifies how the underlying duo or trio reaction behaves while that character is in the squad: it can add hits, change damage type, layer extra debuffs, or refresh the reaction on already-affected targets.
Character | Element | Reaction | Cycle Enhancement Effect |
|---|---|---|---|
Scorch | Re-applies Scorch to a target that is already Scorched, refreshing the DoT timer. | ||
Scorch | Increases the damage of each Scorch tick. Stacks into Baicang's refresh for compounding DoT pressure. | ||
Scorch | Replaces the default Scorch DoT with a randomly rolled debuff: ATK reduction, Esper Resistance reduction, or extra Break damage. | ||
Chaos | Discord | Forces the enemy to lose extra Break bar each Discord trigger. The largest Break-pressure modifier at launch. | |
Remora | +10% Crit Rate against enemies under Remora slow. Stacks with Crit Rate sub-stats. | ||
Charge | +4 Ultimate Energy on top of the base 10 per Vita Bud hit, taking the per-hit return to 14. | ||
Blossom | Doubles the number of Vita Buds spawned per Blossom proc. Largest Blossom DPS multiplier in the game. | ||
Blossom | Doubles Vita Pistil fire rate (1s instead of 2s) and adds 5 extra hits per Vita Bud (10 total). | ||
Chaos | Nova | Drains HP and ATK from the target on Nova detonation; drained ATK is redistributed as a team buff. | |
Nova / Stain | Drains ATK from Psyche-reaction hits and feeds it back to allies, stacking with her skill, ultimate, and signature arc buffs. | ||
Nova | Adds extra delayed hits after Nova detonation ends, extending the AoE damage window. |
Cycle Enhancements unlock at specific skill or awakening tiers, so a character at base investment may not yet have the listed effect active. Always check the Cycle Enhancement entry on the character's skill tree before slotting them into a reaction-focused team.
How Enhancements Stack
When two or more characters in the squad carry Cycle Enhancements on the same reaction, the effects stack additively. A team with Baicang plus Sakiri runs Scorch refresh on already-Scorched targets and higher Scorch tick damage simultaneously, multiplying DoT output. A Blossom team with Jiuyuan plus Nanally fires twice as many Vita Buds firing twice as many Vita Pistils each: a 4x multiplier on Blossom hit count.
Duo Reactions
Duo reactions occur when two adjacent elements on the wheel are applied to the same target. Each adjacent pair produces a unique reaction with distinct combat effects. The table below lists all six duo reactions; Duo Reactions covers each in depth.
Reaction | Elements | Effect |
|---|---|---|
Remora | Slows movement and attack speed for 5s. Decays over time and shortens with repeated application. | |
Blossom | Spawns a Vita Bud that releases 5 Vita Pistils. Pistils explode every 2s for area damage. Up to 3 Buds on the field at once. | |
Hexed | Adds a follow-up hit equal to 20% of all Anima and Incantation damage taken in the last 12s. | |
Scorch | Incantation + Chaos | Inflicts a damage-over-time burn effect for 15 seconds. |
Nova | Chaos + Psyche | Marks the target. After 5 seconds, the mark detonates for a large burst of Mental damage. |
Stain | Target takes 50% more Psyche and Lakshana damage for 12 seconds. |
Trio Reactions
Trio reactions are advanced combos that require specific duo reactions to overlap on the same target. They are harder to set up but deliver exceptionally powerful effects. Currently, two trio reactions have been confirmed.
Reaction | Trigger | Effect |
|---|---|---|
Vita Pistil from Blossom hits a target affected by Remora | Each Vita Pistil hit on a Remora-marked target grants the active character 10 additional Ultimate Energy. | |
Nova and Scorch are simultaneously active on the same target | Reduces a percentage of the target's break meter, providing the fastest path to a stagger state. |
Trio Reaction Enhancement Notes
Both confirmed trios get noticeably stronger when the squad includes the matching enhancement carrier:
Trio | Base Effect | Enhancement Carrier | Enhanced Effect |
|---|---|---|---|
Vita Bud hit on a Remora-marked enemy returns 10 Ultimate Energy. | Returns 14 Ultimate Energy per Vita Bud hit. Combined with Jiuyuan and Nanally's Blossom enhancements, a single rotation can refund a full Ultimate. | ||
Reduces Break bar when Nova and Scorch overlap on the same target. | Reduces a much larger chunk of Break bar per Discord trigger, effectively doubling Break pressure on the target. |
Both trios are time-window-bounded: the underlying duos must be active simultaneously on the same target, and the trio fires only while that overlap holds.
Resonance Effect (Esper Zero Awakening)
The protagonist's last Awakening node unlocks a passive called Resonance Effect that integrates directly with the Esper Cycle system. Whenever Esper Zero participates in an Esper Cycle (either initiating the swap or receiving it), the entire team receives a temporary ATK buff. A reaction that fires while Zero is on the bench does not trigger Resonance.
The buff stacks with arc-based ATK boosts (such as Haniel's signature) and with cartridge or module ATK% sub-stats. Resonance Effect is unlocked through the main story rather than a paid banner; see the
Awakening System article for the full unlock path. Combined with the 100 Cycle Rate skill, Resonance makes Zero a near-mandatory pick for high-difficulty content, especially the endgame.
Beyond the Rails Endgame
The endgame mode requires two complete team comps. Each comp clears its own arena, so the player effectively builds two squads that share no overlapping Esper. This forces the roster to cover at least two non-overlapping reaction lanes on the wheel: for example, a Blossom plus Hexed lane (Cosmos, Anima, Incantation) on one team and a Scorch plus Nova plus Discord lane (Incantation, Chaos, Psyche) on the other. See
Beyond the Rails: Prime Circle for the full ruleset. The two-team rule is the strongest argument against narrow elemental investment: even a player pushing one DPS will eventually need a backup team that uses whatever elements remain.
Building Around the Cycle
The most effective team compositions focus on two or three adjacent elements, creating a reaction lane along the wheel. Picking three adjacent elements gives access to two duo reactions and potentially one trio reaction, which is usually sufficient for any content in the game. The fourth team slot can be filled with a character from any element based on what the team needs.
Some players use the flex slot for a dedicated healer or shielder regardless of element. Others slot in a fourth character that extends the reaction lane to four elements, unlocking additional duo reaction coverage at the cost of less focused damage. There is no single correct approach; it depends on the encounter and your roster. For a deeper look at team composition strategies, see the Team Building Guide. For information on how elemental reactions interact with the break mechanic, see the Stagger System article.
Team-Building Rules of Thumb
Players who want consistent reaction coverage without memorising every adjacency should follow these heuristics when assembling a four-character squad:
Element Coverage
Pick two adjacent elements minimum. A squad with all four characters on non-adjacent elements triggers no duo reactions at all.
Three adjacent elements unlocks trio reactions. Three consecutive elements (Cosmos plus Anima plus Incantation, etc.) unlock two duo reactions plus the off-field passive stacking from all three element groups.
Avoid elements with no adjacent teammate. A character whose element is not adjacent to any squadmate cannot participate in any reaction. The notable exception is Haniel: her ATK stack from skill, ultimate, and signature arc is large enough that she earns a roster spot even without a Psyche partner.
Role Distribution
Even a perfectly-adjacent squad struggles if every slot is a damage dealer. The standard split is one main DPS, one or two sub-DPS or burst characters, and one universal support that batteries cycle gauges or buffs ATK.
Main DPS: Stays on field longest. Picks the element that anchors the reaction lane (Anima for Blossom, Incantation for Scorch, etc.).
Sub-DPS or burst: Quick swap in, dump skill and ultimate, swap out. Carries a Cycle Enhancement that buffs the team's primary reaction.
Cycle battery: Esper Zero or Fadia. Provides the 100 Cycle Rate quick-fill so reactions trigger on demand instead of waiting for basic-attack ramp.
Universal support: Sakiri (grouping plus ATK and DEF shred), Haniel (ATK stacking), or Jiuyuan (Blossom doubler plus grouping). Slots into nearly any reaction lane.
Reaction Lane Quick Reference
Each reaction lane has a canonical squad shape that performs well across most content:
Lane | Elements | Anchor Reactions | Reference Squad |
|---|---|---|---|
Incantation + Chaos (+ Anima for Hexed) | Scorch DoT + optional Hexed and Discord | ||
Blossom + Remora + Charge | Chiz + Hathor + Jiuyuan + Esper Zero or Haniel | ||
Nova + optional Stain | |||
Stain + Charge or Remora | Hathor + Haniel + Esper Zero + Jiuyuan | ||
Incantation + Chaos + Psyche | Scorch + Nova + Discord |
These archetypes are not exhaustive; the wheel also allows Hexed-focused Anima plus Incantation comps and Blossom-focused Cosmos plus Anima comps, and the launch roster will keep growing as new Espers release.
Common Beginner Mistakes
Stacking only main DPS units. Without a cycle battery, most reactions trigger only after a long basic-attack ramp.
Ignoring the Esper Cycle Passive. Some characters look weak on-field but amplify the squad's primary reaction from the bench.
Skipping parries for gauge. A successful parry adds Cycle Rate on top of the damage avoided.
Skipping support skill upgrades. Cycle Enhancements unlock at specific skill or awakening tiers, so a support at base investment may not yet have their reaction-modifying enhancement active.