Loading...
Loading...
Electricity and Power
March 25, 2026 at 05:09 AM
Add wikilinks to table cells (10 new links)
The electricity and power system is a core gameplay mechanic in Pokemon Pokopia, especially in Bleak Beach. Since Pokopia is set in a post-apocalyptic Kanto where human infrastructure has crumbled, the player must rebuild the electrical grid from scratch to light up settlements, power machines, and restore functionality to the world. Power can be generated through Pokemon abilities, player-built structures, or a combination of both, then distributed across the settlement using utility poles. The system ties directly into the plumbing system, since waterwheels rely on gravity-driven water flow to generate electricity.
There are four main methods of generating electricity in Pokopia: using Pokemon with the Generate specialty, building windmills, constructing waterwheels, or running furnace generators. Each method has different material costs, output levels, and trade-offs.

Pokemon with the Generate specialty can temporarily power nearby lights and machines marked with lightning icons. They supply electricity when placed near objects or when following the player. A single Raichu can power a surprisingly large area on its own. However, the charge from Generate Pokemon is temporary; connecting devices to a steady power source like a windmill or waterwheel is more reliable for permanent power. Generate Pokemon output ranges from approximately 5 to 15 units depending on the species and their comfort level. Higher comfort means better power output.
There are 28 Pokemon with the Generate specialty in Pokopia:
Pokemon | Type | Additional Specialties |
|---|---|---|
Electric | None | |
Electric | None | |
Electric | Hype | |
Electric | None | |
Electric | None | |
Electric/Steel | None | |
Electric/Steel | None | |
Electric/Steel | Recycle | |
Electric | None | |
Electric | None | |
Electric | None | |
Electric | None | |
Electric | None | |
Electric | None | |
Electric | None | |
Electric | None | |
Electric | None | |
Electric | None | |
Electric/Fighting | None | |
Electric/Fighting | None | |
Electric/Poison | None | |
Toxtricity (Amped) | Electric/Poison | None |
Toxtricity (Low Key) | Electric/Poison | None |
Bug/Electric | None | |
Bug/Electric | None | |
Electric/Flying | None | |
Electric/Flying | None | |
Electric | None |
Note that Peakychu (the special Pikachu NPC) has the Illuminate specialty instead of Generate. Peakychu lost the ability to generate her own electricity after sharing too much with sick friends during Bleak Beach's backstory.
Players can build permanent power-generating structures that do not require a Pokemon stationed nearby. These are crafted through the building system and provide steady, reliable electricity.
The Windmill turns wind energy into electricity. It produces 10 units of power and operates passively without needing fuel or Pokemon assistance.
Attribute | Details |
|---|---|
Power Output | 10 units |
Crafting Cost | |
Build Requirements | 2 Pokemon with Build specialty |
Build Time | 1 hour |
Placement | Open areas; hilltops recommended for optimal generation |
The Water Wheel uses flowing water to produce power. It requires routing water flow onto the wheel using gravity, which ties into the plumbing system. Break blocks marked with water droplets near a hill to let water flow downward onto the wheel.
Attribute | Details |
|---|---|
Power Output | Varies based on water flow |
Crafting Cost | |
Build Requirements | 2 Pokemon with Build specialty |
Build Time | 1 hour |
Placement | Near water sources; must have gravity-driven water flow |
If your Water Wheel is not generating power, check that water is actually flowing onto it. The most common issue is that the water source is at the same elevation or below the wheel. Water must flow downward onto the wheel. Iron pipes found in factories can be used for vertical liquid routing.
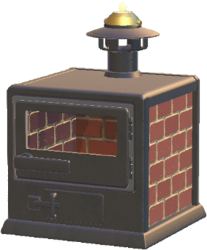
The Furnace Generator burns fuel to produce electricity. It generates the most power of any structure (approximately 15 to 25 units), but requires a steady supply of fuel. Lumber is the most efficient fuel source.
Attribute | Details |
|---|---|
Power Output | 15 to 25 units |
Crafting Cost | 15 Iron Ore + 5 Sea Glass Fragments |
Build Requirements | 2 Pokemon with Build specialty |
Build Time | 1 hour |
Fuel | Wood, coal, lumber, or other burnable resources |
The Abandoned Power Plant is a late-game structure that doubles as a habitat for Zapdos. It requires significant resources and multiple Pokemon specialties to construct.
Attribute | Details |
|---|---|
Crafting Cost | 50 Sea Glass Fragments + 50 Bricks + 50 Copper Ingots + 50 Iron Ingots + 10 Pokemetal |
Build Requirements | 15 Pokemon with Build, Fly, Crush, and Generate specialties |
Build Time | Approximately one in-game day |
Location | Southern island near Palette Town |
Method | Output | Fuel Needed? | Pokemon Needed? |
|---|---|---|---|
Generate Pokemon | 5 to 15 units (temporary) | No | Yes (stationed or following) |
Windmill | 10 units (steady) | No | No |
Water Wheel | Varies (steady) | No | No (needs water flow) |
Furnace Generator | 15 to 25 units (steady) | Yes (wood, coal, lumber) | No |
Abandoned Power Plant | High (steady) | No | No (once built) |
Once electricity is being generated, it must be distributed to buildings and devices through utility poles. Utility poles are craftable infrastructure items that relay electricity from power sources to anything that needs it.
Utility poles are among the most frequently used infrastructure items in the game. The blueprint for crafting them is found inside a Golden Poke Ball on a small island off the southwest coast of Bleak Beach, near the local Pokemon Center.
Attribute | Details |
|---|---|
Crafting Cost | |
Blueprint Location | Golden Poke Ball, small island southwest of Bleak Beach |
Place the first pole directly adjacent to a power generator.
Chain additional poles in a connected line toward the buildings and machines you want to power.
A pole lights up when it is successfully receiving power from the grid.
There is a maximum distance between poles. A gap that is even slightly too wide will silently break the connection without any visual warning.
For large machines and structures, ensure poles reach at least one side of the building.
In quest areas, blocks with darker circular dots indicate where original poles once stood, making placement intuitive during story progression.
Utility poles do not require line of sight after they are connected. This means they can be buried underground or concealed within structures and still relay electricity. Many players build underground tunnels to hide their entire power grid, creating a much cleaner surface appearance with no visible wires or poles cluttering the landscape.
Surface-level utility poles and their connecting wires can quickly become an eyesore, especially in larger settlements with dozens of powered buildings. Underground routing solves this by moving all electrical infrastructure below the terrain. The result is a build where only the structures, lighting, and decorations are visible on the surface, while the entire power network runs silently beneath the ground.
The following seven-step process covers how to route your power grid underground from a generator to any surface building or device.
Identify the surface infrastructure you want to hide. Walk along existing roads, pathways, or areas where visible power poles currently run. Note which poles connect your generators to your buildings and devices.
Dig an underground tunnel or cave. Create a tunnel beneath the road or terrain that is large enough to place utility poles inside. You only need to dig about three blocks below the surface level; four blocks also works. If you have the Rock Smash power-up unlocked from Rocky Ridges, digging goes much faster, though it is not strictly required for shallow tunnels.
Place utility poles inside the tunnel. Install poles within the underground space, making sure each pole is spaced correctly so the wires can connect. The same maximum distance rules apply underground as they do on the surface: if the gap between two poles is even slightly too wide, the connection breaks silently.
Connect wires between underground poles. Attach electrical wires between the poles using the standard connection method. The difference is that all cables now run beneath the terrain instead of across visible structures.
Route from the power generator. Run the underground wire network from your generator (such as a Windmill, Water Wheel, or Furnace Generator) toward the structures and lamps that need power. A waterwheel positioned in water slightly away from the main base area works especially well since it provides unlimited, fuel-free electricity.
Seal the tunnel. Cover or close the tunnel entrance with floor blocks or terrain to make the wiring system completely invisible from the surface. Many players leave a small maintenance access point (a hidden trapdoor or recessed stairway) for future adjustments and expansions.
Build on the surface above. Place lamps, machines, buildings, or any powered device on the surface directly above the hidden cable network. They receive power normally from the underground poles below, with no visible wires anywhere.
Smaller houses can conceal a single utility pole underground beneath the foundation. Bigger buildings may need an exposed pole that can be covered with roof tiles or decorative blocks.
For a fully hidden grid across an entire settlement, dig a trench one block below surface level, place poles inside, then cover the trench with floor blocks.
Repaving the surface is easier if you have the end-game transformation power-up (unlocked from the Magnemite behind the mysterious tower in the Withered Wasteland).
Underground routing works well next to waterwheels since they provide unlimited electricity, so you can run long underground chains from a single waterwheel without worrying about fuel.
This process is time-consuming for large areas. Consider routing underground only for your main settlement roads and high-visibility zones, and using Wireless Power Transmitters (unlocked from Porygon) for the rest of your grid.
The Wireless Power Transmitter is an alternative to utility poles that relays electricity without visible wires. It functions identically to a utility pole in terms of reach and power delivery, but produces a much cleaner look since there are no cables cluttering the landscape. Wireless transmitters can be buried underground or placed inside structures just like utility poles, making them the ideal late-game replacement once your settlement's power grid becomes sprawling and visually messy.
The Wireless Power Transmitter recipe is unlocked by befriending Porygon in the Sparkling Skylands. Porygon will not appear until you build its habitat, and the required items are only available once you reach Sparkling Skylands and Rocky Ridges. This makes the Wireless Power Transmitter effectively a mid- to late-game unlock.
To attract Porygon, you need to build the Researcher's Desk habitat, which requires the following items placed together:
2 Tables
1 Computer (found under Sabrina's gym in the Sparkling Skylands; must be connected to electricity via the preconstructed poles on the island)
1 Science Experiment (found at the old Pewter museum in the right-most room in Rocky Ridges)
Once the habitat is set up and Porygon arrives, it will ask you to play music. You need a CD Player and a CD. If your Environment Level in Rocky Ridges is at least 4, you can buy a kit to craft a CD Player there. Place the CD Player near Porygon's habitat, insert a CD, and let it play. Porygon will then teach you the Wireless Power Transmitter recipe and the Wireless Power Transmitter Switch recipe.
Item | Crafting Cost | Function |
|---|---|---|
Wireless Power Transmitter | Relays electricity wirelessly, replacing utility poles | |
Wireless Power Transmitter Switch | Allows remote on/off control of connected appliances |
Both recipes require Pokemetal, which is a relatively accessible material by the time you reach the Sparkling Skylands. The low crafting cost (1 Pokemetal each) makes it practical to replace your entire utility pole network with wireless transmitters once you have the recipe.
Wireless Power Transmitters work just like utility poles: place the first one adjacent to a power generator, then chain additional transmitters toward the buildings and devices you want to power. The transmitter lights up when it is successfully receiving power, just like a standard utility pole.
The key advantage is aesthetics. Since there are no cables, wireless transmitters integrate cleanly into any settlement design. You can bury them one block below the surface and cover them with floor blocks for a completely hidden power grid. The Wireless Power Transmitter Switch adds another layer of convenience by letting you toggle appliances on and off from a distance, as long as the appliance is within range of a placed switch.
Feature | Utility Pole | Wireless Power Transmitter |
|---|---|---|
Crafting Cost | 1 Pokemetal (makes 1) | |
Unlock | Golden Poke Ball in Bleak Beach | Befriend Porygon in Sparkling Skylands |
Visible Wires | Yes | No |
Can Be Buried | Yes | Yes |
Remote On/Off Switch | No | Yes (with Transmitter Switch) |
Availability | Early game | Mid to late game |
Both methods still require a power source nearby (a Windmill, Water Wheel, Furnace Generator, or Generate specialty Pokemon). Wireless transmitters replace only the distribution method, not the generation.
Several types of objects and features in Pokopia require electricity to function:
Category | Examples |
|---|---|
Lighting | Streetlights, Shell Lamps, Harbor Streetlights, interior lights, decorative lighting |
Crafting Stations | Smelting Furnaces (no power = no smelting), advanced crafting stations |
Appliances | Vending machines (dispense one random drink per day when powered) |
Infrastructure | Pokemon Center facilities, charging stations in town centers |
Machines | Any object or device marked with a lightning bolt icon |
Vending machines are a useful powered device. When connected to electricity, they dispense one random drink per day: Fresh Water, Soda Pop, Moomoo Milk Coffee, Roserade Tea, or Chili Sauce.
The plumbing and power grid systems are interconnected in Pokopia. The most direct connection is the Water Wheel, which requires gravity-driven water flow to generate electricity. The typical infrastructure setup follows this pattern:
Water source (river, waterfall, or broken droplet-marked blocks near a hill)
Gravity flow carries water downward through natural channels or iron pipes
Water Wheel converts the flowing water into electricity
Utility poles distribute the generated power to buildings and devices
Iron pipes found in factories can be repurposed for vertical liquid routing, allowing you to direct water from elevated sources down to waterwheels placed at lower elevations. The same water routing principles used for the power grid also apply to fountains, mud cleanup, and other plumbing needs throughout your settlements.
The electricity system is most prominent in Bleak Beach, where the entire area starts shrouded in darkness. The area's main quest, "Brighten Things Up," revolves around restoring light and power to the darkened settlement.
Build power-generating structures (windmills and waterwheels)
Set up utility poles to distribute electricity to streetlights and buildings
Befriend Generate-specialty Pokemon (Pawmi and Pawmo are available early in the area)
Work with Peakychu and her Illuminate specialty to absorb enough electricity to awaken Mosslax
Reach 100 Bloom Points to complete the restoration
Completing the power restoration is required to raise the area's Environment Level and unlock new habitats, shop items, and story progression. After fully restoring power, Raikou appears at the top of the area's highest point. Raikou's Generate specialty lets it power nearby machines and lights. As a legendary Pokemon with high comfort potential, Raikou is one of the most powerful electricity generators in the game.
Pokemon | Specialty | Ability |
|---|---|---|
PeakychuIlluminateAbsorbs electricity from external sources and lights up entire areas. Cannot generate her own electricity. | ||
Generate | Powers nearby machines and lights. As a legendary Pokemon, Raikou has extremely high Generate output when its comfort level is maxed. | |
ZapdosFlyAttracted to the Abandoned Power Plant. Prefers Bright habitats and likes electronics, breezes, and glass items. |
Set up power infrastructure early. Mid-game and late-game crafting (smelting, advanced stations) requires electricity.
Use Generate Pokemon as temporary power before building a permanent grid. An Electric-type following you can activate devices on the fly.
Combine multiple generator types for reliability: windmills for passive power, waterwheels for steady output, furnaces for high-demand zones.
Position generators near high-demand zones to minimize the number of utility pole chains needed.
Craft utility poles in bulk. At 2 Iron Ore + 2 Stone for 5 poles, they are cheap and you will need many of them.
Check pole connections carefully. A small gap between poles can silently break power flow without any visual indication.
Bury utility poles underground for cleaner aesthetics. They work without line of sight once connected.
Use habitats to boost Generate Pokemon comfort, which increases their power output.
In Bleak Beach, prioritize building electrical infrastructure early, as many other activities depend on having functional lighting.
Once you unlock the Wireless Power Transmitter from Porygon in the Sparkling Skylands, consider replacing your utility pole network. Wireless transmitters cost only 1 Pokemetal each and eliminate cable clutter entirely.
Use Wireless Power Transmitter Switches to remotely toggle appliances on and off. This is especially useful for Furnace Generators that burn fuel, letting you shut them down when power is not needed.
For large settlements, route power underground along main roads and save Wireless Power Transmitters for outlying areas. This hybrid approach balances aesthetics and material costs.
When digging tunnels for underground wire routing, three blocks below surface level is sufficient. Going deeper wastes effort without any benefit.