
Loading...
Loading...
Myurdin
May 23, 2026 at 02:28 PM
Added wikilinks to table cells (13 new internal links)
Myurdin is the leader of the Black Bears and the central antagonist of Crimson Desert. He is a ruthless warlord who holds a single conviction: "Only the powerful deserve everything." Following the fall of the Greymane leader Jian, Myurdin led a devastating night ambush that scattered the Greymanes and left Kliff critically wounded and presumed dead. This act sets the entire story of Crimson Desert into motion, as Kliff's primary motivation throughout the game is to reunite his scattered comrades and confront Myurdin for what the Black Bears did.
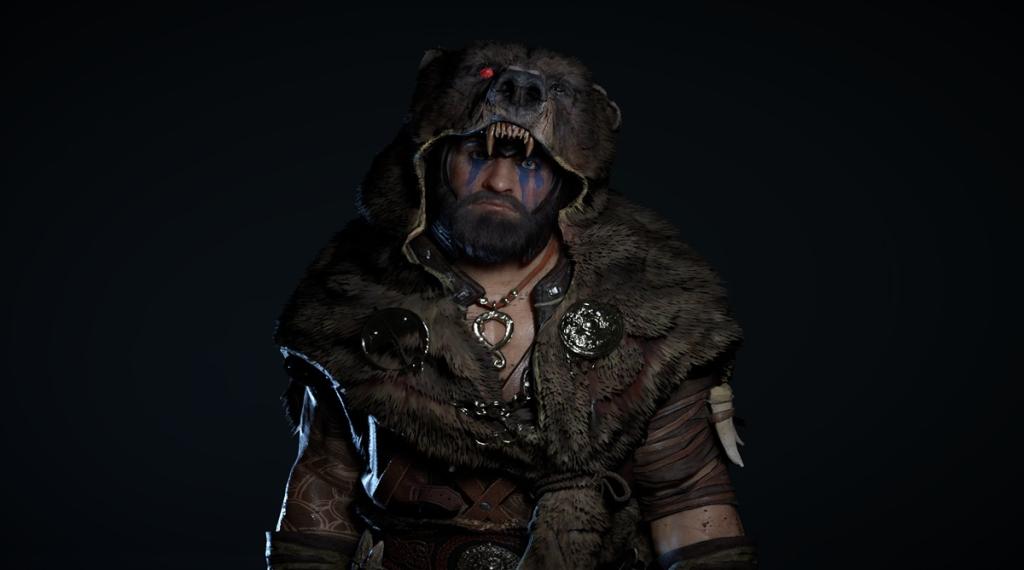
Myurdin is the personal antagonist for Kliff across the entire narrative, appearing repeatedly from the Prologue through Chapter 12. His power grows throughout the story, and his connection to the Abyss corruption becomes increasingly apparent with each encounter. The repeated confrontations with Myurdin are the backbone of Crimson Desert's main storyline, driving the narrative forward even as Kliff deals with other threats across Pywel.
Myurdin appears as a boss in three separate encounters throughout the game, each escalating in difficulty and narrative weight. These repeated battles create a sense of ongoing rivalry that few other bosses in the game can match.
Encounter | Chapter | Location | Quest | Notes |
|---|---|---|---|---|
Prologue Fight | Scripted loss. Tutorial fight that cannot be won. Establishes Myurdin as the primary threat. | |||
Ashclaw Keep | Two-phase boss fight (Standard + Lava Myurdin). Beatable. Main Mission #100. | |||
Avatar of Umbra | The Void (Abyss) | Myurdin Avatar of Umbra. Final transformation powered by the Abyss. Precedes the Umbra fight. |
The following stats apply to Myurdin's Chapter 7 encounter at Ashclaw Keep. His Prologue version uses a simplified stat set, and his Chapter 12 Avatar of Umbra form has significantly higher values.
Stat | Value |
|---|---|
Name | Myurdin |
Type | World Boss |
Weapon | One-Hand Sword |
HP | 1,408 |
Attack | 124 |
100 | |
100 | |
Knockout | 750 |
Passive Skill | Boss Large Human |
There are many rumors about Myurdin's origins and bloodline, but nothing is known for certain. What is clear is that he rose to become the undisputed leader of the Black Bears, one of the most feared factions on the continent of Pywel. Under his command, the Black Bears launched the devastating night ambush that destroyed the Greymanes and scattered their survivors across the land.
During that fateful attack, Kliff fought Myurdin directly in a desperate struggle. Myurdin critically wounded Kliff and threw him into a river, where the Greymane was presumed dead. This act became the defining moment of the game's opening conflict and the catalyst for Kliff's journey. Everything that Kliff does throughout Crimson Desert, from rebuilding his warband to forging new alliances, ultimately leads back to the confrontation with Myurdin.
Myurdin's philosophy of "Only the powerful deserve everything" is not mere cruelty; it is the core principle around which the Black Bears organize themselves. Under Myurdin's leadership, the Black Bears grew from a raiding band into a military force capable of toppling established factions like the Greymanes in a single night. His personal combat prowess is matched by his tactical cunning, as demonstrated by the night ambush that opened the game. Rather than meeting the Greymanes in open battle, Myurdin struck at their most vulnerable moment, destroying their camp and scattering their survivors before they could mount a defense.
As the story progresses, it becomes clear that Myurdin's power is not purely his own. His connection to the Abyss corruption becomes increasingly apparent with each encounter. The transformation into Lava Myurdin at Ashclaw Keep hints at supernatural forces augmenting his already formidable strength. By Chapter 12, this connection is fully revealed when he becomes the Avatar of Umbra, serving as the vessel through which the Abyss entity exerts its will on the physical world.
This progression mirrors the broader narrative arc of Crimson Desert, where personal conflicts gradually reveal a larger, cosmic threat. What begins as a vendetta between two faction leaders becomes a struggle against the corruption that threatens all of Pywel. Myurdin's willingness to embrace the Abyss for power is the ultimate expression of his belief that strength justifies everything.
The repeated encounters with Myurdin serve as narrative milestones that mark Kliff's growth. In the Prologue, Kliff is powerless against Myurdin and suffers a humiliating defeat. By Chapter 7, Kliff has grown strong enough to face Myurdin on equal terms and overcome him. In Chapter 12, the stakes transcend personal vengeance entirely, as Myurdin has become something more than human. The Decisive Battle at Silver Wolf Mountain represents the culmination of Kliff's quest for vengeance, while the Avatar of Umbra encounter forces Kliff to look beyond personal grudges toward the survival of the entire continent.
Myurdin enters battle wearing a full set of personalized armor and wielding a one-handed sword paired with a shield. His equipment reflects his status as a powerful warlord.
Item | Slot |
|---|---|
Myurdin's One-Hand Sword | One-Hand Sword |
Myurdin's Shield | Shield |
Myurdin's Iron Helm | Helm |
Myurdin Cloth Armor | Upperbody |
Myurdin's Shoulder Guard | Cloak |
Myurdin's Iron Gauntlets | Hand |
Myurdin Cloth Boots | Foot |
Myurdin's main boss fight takes place at Ashclaw Keep, located in the northern area of the Pailune region. The encounter is part of the main quest "Battle at the Silver Wolf Mountain," which falls under the Decisive Battle sub-chapter of Chapter 7. This is the 100th main mission in Crimson Desert, making the Myurdin showdown a milestone encounter.
The Prologue encounter takes place at the Hills of No Return in the Hernand region during the quest "In Ashes." This fight is purely a narrative device and cannot be won.
The first time players encounter Myurdin is during the Prologue of Crimson Desert, in the sequence known as "Dead of Night." In this scripted sequence, Kliff and his allies are ambushed by the Black Bears in a devastating night raid on the Greymane camp. Myurdin personally destroys the camp and confronts Kliff directly.
The encounter is a tutorial that introduces basic combat mechanics, but it is designed as a narrative loss. Even if you manage to reduce Myurdin's health bar significantly, a cutscene will trigger automatically once his HP drops to roughly 10%. The story proceeds identically whether you fight well or poorly. No rewards are given for performing well in this encounter, and no experience or items are earned.
During the Prologue, Myurdin's attack repertoire is simpler than his Chapter 7 version. He uses three primary moves: Slash and Stab (two sword slashes followed by a stab, which can be blocked with your shield), Charge and Slam (a bear-like charge ending in a ground pound that causes knockdown), and Spin and Slash (a spinning charge with an overhead slash). He also periodically summons three types of barbarians: Melee, Superior, and Ranged. Prioritize eliminating the Ranged Barbarians first, as they interrupt your attacks.
This tutorial fight serves a crucial narrative purpose: it establishes Myurdin as an overwhelming force that Kliff cannot yet overcome. The defeat here is what sends Kliff into the river, presumed dead, and sets the stage for his journey of rebuilding and growth across the rest of the game.
The real boss fight at Ashclaw Keep begins with Phase 1, where Myurdin fights in his standard human form. He is significantly more aggressive and dangerous than his Prologue version. Phase 1 Myurdin moves quickly, chains attacks together with minimal recovery windows, and can kill unprepared players in short order.
Attack | Description | How to Counter |
|---|---|---|
Two quick slashes followed by a sword stab. His most common melee combo. | Block with your shield to absorb the full combo, then counter with a heavy attack during recovery. | |
Leap and Slash | Leaps toward you from a distance and slashes upon landing, closing the gap instantly. | Dodge sideways the moment he leaves the ground. Do not try to block. |
Three Slash Combo | A rapid three-hit sword sequence that deals heavy cumulative damage. | Parry the first hit for maximum punishment, or dodge backward after the second slash. |
Ground Slam | Raises both arms with a long wind-up, then slams the ground to create an AoE shockwave. | Dodge sideways and punish with a combo during his recovery animation. |
Bear Tackle | Crouches on all fours and charges directly at you, ending with a powerful body slam. | Sidestep to either side. Do not attempt to block. Dash in for a counterattack after the charge ends. |
Slams the ground and releases three waves of charging spirit bears in a linear direction. | Jump or move to the side. Staying in the air is the most reliable way to dodge. | |
Crouch Phase | Drops to all fours and becomes extremely fast and erratic. | Do not engage. Focus entirely on dodging and blocking until he returns to his upright stance. |
Phase 1 Myurdin is aggressive but readable once you learn his patterns. The key is to focus on parrying his melee combos and using heavy attacks during his recovery windows. Never engage during his crouch phase.
After depleting Myurdin's first health bar, a cutscene plays where he falls off a cliff into magma. He then rises from the ashes, engulfed in flames, and transforms into Lava Myurdin. This second phase is dramatically harder than the first. Myurdin gains fire-based attacks, moves faster, and can burn anything he comes into contact with. The arena also becomes more hazardous, with lava springs appearing on the ground that deal massive damage over time.
When Myurdin falls into the magma and rises again as Lava Myurdin, it demonstrates the extreme lengths to which this warlord will go to maintain his grip on power. His transformation into a creature of fire and molten rock is the final obstacle standing between Kliff and the restoration of the Greymanes. For full details on Phase 2 attacks, strategy, and mechanics, see the dedicated Lava Myurdin article.
In Chapter 12: The Abyss, Myurdin reappears in his most powerful form yet. Having fully embraced the Abyss corruption, he transforms into the Myurdin Avatar of Umbra, a monstrous fusion of the warlord's physical form and the dark entity's supernatural power. This encounter takes place in the Void during the quest "A Shadow in the Void."
The Avatar of Umbra fight is distinct from the Chapter 7 encounter in several ways. Myurdin's attacks now carry Abyss corruption, his speed and strength have increased dramatically, and his appearance has shifted from a human warlord to something barely recognizable. This fight is the penultimate challenge before the true final boss, Umbra, and represents the last personal confrontation between Kliff and his longtime rival.
Defeating the Avatar of Umbra is both a narrative and mechanical climax. It resolves the personal vendetta that has driven Kliff since the Prologue, while simultaneously serving as the gateway to the cosmic threat that Umbra represents. The transition from Myurdin Avatar of Umbra to the Umbra encounter itself is one of the most dramatic moments in the game.
Preparation is critical for the Chapter 7 fight. The following loadout is recommended based on what is available by that point.
Slot | Recommended Item | Notes |
|---|---|---|
Weapon | Tier 5 sword dropped from the Crowcaller boss. Its special ability, Crow's Pursuit (R2), fires an explosive crow projectile. | |
Head | Canta Plate Helm (Tier 4) | Provides solid damage reduction for heavy-hitting attacks. |
Upperbody | Canta Plate Armor (Tier 4) | Pair with the Canta helm. Heat Resistant Armor is an alternative for Phase 2. |
Cloak | Hernandian Noble Cloak (Tier 4) | Good all-around defensive cloak available in Chapter 7. |
Hands | Sunset Reed Gloves (Tier 4) | Solid defensive option for the hands slot. |
Feet | Odecka's Plate Shoes (Tier 4) | Provides good physical protection. |
Ranged | Grey Wolf Bow (Tier 3) | Useful for chip damage when Myurdin is in his crouch phase. |
Three Abyss Cores are recommended for your sword:
Crow's Pursuit: Fires an explosive crow projectile with R2, providing reliable ranged damage when melee is unsafe.
Crimson Rose of Sin: Adds extra damage potential to your sword combos.
Wind Slash: Provides a fast, sweeping ranged attack that complements Crow's Pursuit for hit-and-run tactics.
Two skills form the backbone of the entire Myurdin fight. Without them, the encounter becomes significantly harder.
Skill | Skill Tree | Description |
|---|---|---|
Green Skill Tree (automatic) | Press L3+R3 to slow time and generate Spirit. Your primary Spirit-building tool. | |
Blue Skill Tree | Activated with L1+R1 during Focus. Deals moderate damage and stuns Myurdin briefly. | |
Blue Skill Tree | Press R2 during Blinding Flash for a rapid flurry of strikes. Your primary damage tool. | |
Skill Tree | A stagger move that creates openings. Especially useful in Phase 2 when Blinding Flash is harder to land. |
The core strategy revolves around building Spirit with Focus, activating Blinding Flash with L1+R1, then immediately following with R2 to trigger the Blinding Flash Finisher. This loop deals massive damage and keeps Myurdin stun-locked. In Phase 2, swap to Force Palm when Blinding Flash becomes too difficult to land cleanly.
Stocking up on healing items before this fight is essential. Aim to have at least 140 inventory slots dedicated to consumables.
Item | Effect | How to Obtain |
|---|---|---|
Reliable healing over time | Purchase from Ronnie at the Greymane Camp. Stock replenishes daily. | |
Affordable healing | Available from Butcher vendors in various towns. | |
Moderate healing | Available from Butcher vendors. A solid backup healing option. | |
Instant revival at 30% health | Craft at an alchemy station. Save these for Phase 2. |
Phase 1 is about patience and learning Myurdin's attack windows. Focus on parrying his melee combos, particularly the Slash and Stab, and punishing his recovery with heavy attacks from the Tauria Curved Sword. When he enters his crouch phase on all fours, do not engage. Instead, maintain distance, dodge any incoming charges, and wait for him to return to his normal stance.
The ideal damage loop in Phase 1 is to build Spirit with Focus, then chain Blinding Flash into the Blinding Flash Finisher (L1+R1 followed by R2). This combo deals enormous damage and keeps Myurdin staggered. Repeat this loop whenever your Spirit gauge is full.
Warning: Explosive barrels are scattered around the arena. If you are standing near one when Myurdin attacks, the barrel detonates and deals massive damage that can kill you instantly. Always be aware of your surroundings and fight in open areas of the arena.
After Myurdin transforms into Lava Myurdin, the fight becomes significantly harder. He gains fire-based attacks, lava springs erupt across the arena, and his overall pace increases dramatically. The arena also has lava edges; if Myurdin knocks you into them, it is an instant kill. Stay near the center of the arena at all times.
Dodge-focused gameplay is critical in Phase 2. Never let your stamina fully deplete, because you always need enough to dodge his flame charges and slam combos. Blinding Flash becomes harder to land because Lava Myurdin is faster and more erratic. Switch to Force Palm for staggers and follow up with heavy attacks.
When the screen darkens, Lava Myurdin will glow red and begin a sequence of repeated jump-slams targeting your position. Keep rolling sideways through this entire sequence until it ends. His Lava Shockwave attack (a ground slash that sends a linear wave of erupting lava) cannot be blocked, so always dodge sideways when you see him slam his sword into the ground.
Save your Palmar Pills for the final stretch of Phase 2 when Myurdin's health is low. Dying and having to redo Phase 1 is the worst outcome, so use your revival items aggressively once you are close to finishing him off.
Defeating Myurdin (both phases) during the Decisive Battle quest rewards the following:
Reward | Details |
|---|---|
A unique one-handed sword with 17 Attack, Attack Speed Level 2, 3 Abyss Gear Slots, and the abilities Groundsurge, Destruction I, and Gale I. Received after the post-battle cutscene when you take control of Oongka. | |
+3,000 EXP toward your Pailune region reputation. |
Complete all sword-related abilities in Kliff's skill tree before attempting this fight. Every damage boost and defensive option counts.
Maximize your Health and Stamina stats through equipment and skill points. Both resources are tested constantly throughout the two-phase encounter.
Visit Ronnie at the Greymane Camp daily in the days leading up to Chapter 7 to stockpile Chewy Rice Cakes.
The Crow's Pursuit Abyss Core on the Tauria Curved Sword gives you a safe ranged option. Use it during Myurdin's crouch phase when melee is too risky.
Explosive barrels in the arena function as wipe mechanics. One barrel detonation during a Myurdin attack combo is often enough to kill you outright.
In Phase 2, stay near the center of the arena. Lava Myurdin actively tries to knock you toward the lava edges, and falling in is an instant kill.
If you are struggling, try equipping dual one-handed weapons for rapid damage bursts rather than the Tauria Curved Sword's heavier swings.
Save Palmar Pills for Phase 2. Dying to Phase 1 is recoverable, but dying in Phase 2 and restarting from Phase 1 is extremely frustrating.
The Prologue encounter with Myurdin can technically be "won" by reducing his health to near zero, but the same defeat cutscene plays regardless. It is a scripted loss with no rewards.
Myurdin's bear-themed attacks (Bear Tackle, Spirit Bear Wave, crouch phase on all fours) reflect the Black Bears faction's animal motif.
The reward weapon, Melted Ambition, has a sell price of only 14.32 Silver despite being a unique weapon. Its real value lies in its three Abyss Gear Slots and built-in abilities.
"Battle at the Silver Wolf Mountain" is the 100th main mission in Crimson Desert, making the Myurdin showdown a milestone encounter in the game's story progression.
Myurdin is one of only three bosses in Crimson Desert who appears in multiple chapters, alongside Hexe Marie (who reappears through Draven's connections) and Umbra (who manifests through Myurdin before the final fight).
From the Axiom Archive's point of view, the raid on Pailune was not the first time the guardians had run that cycle. In cycle 26 the present version of Kliff had been folded into the Greymanes long enough that life with Jian in Pailune had grown comfortable. He was settled, his comings and goings were ordinary, and he was indifferent to the larger crisis brewing in demeniss. The guardians needed an event severe enough to break that comfort and put Kliff on the road. The death of Jian and the destruction of Pailune was the event they kept arriving at as the only thing that worked.
Myurdin's place in that plan was as the blade that delivered the blow. The guardians did not orchestrate his cruelty; they only made sure that the conditions in which his cruelty could play out aligned with the cycle they needed. In an earlier loop they actually tried the opposite, pushing Kliff toward Myurdin's side rather than against him, and recorded the result as a bitter mistake that sank Kliff into uncontrollable darkness. By the present cycle that experiment was abandoned and Myurdin was once again the personal enemy whose existence forces Kliff to keep walking forward.
Myurdin commands the Black Bears, but the Black Bears do not act on their own initiative when it matters. The political conspiracy that opens the game was designed in demeniss by Grand General Bastier, House Byron, and Marcel, with Duke Gabriel Caliburn sitting at the head of the table. Their plan had three steps: secure Pailune by killing Jian and letting the Black Bears traffic Pailune slaves, sow chaos in Hernand by corrupting Walter Lanford into forming the Bleed Bandits, then seize Calphade Castle by turning Cassius Morton. Myurdin's role was the first step. He was hired (and given the false promise of Pailune as his prize) to do what the conspirators could not be seen doing themselves.
The other side of the deal was the Jackals. Draven the Crowcaller's mother hexe marie later weaponizes other Caliburn lieutenants in a similar way, and Bastier's design treats the Black Bears and the Jackals the same way: useful instruments that will eventually destroy each other once the larger conquest is complete. Myurdin almost certainly never understood that he was a piece on someone else's board. He believed the doctrine he kept repeating, that the powerful deserve everything, and that doctrine was exactly what made him predictable enough to use.
Myurdin's transformation into Lava Myurdin during the Ashclaw Keep fight is not just a difficulty escalation. It is the moment his connection to the abyss becomes visible to the player. Like most strong individuals in the present cycle, Myurdin came into possession of an abyss artifact and channeled its power for his own ends. The lava-tinted second phase is the same kind of artifact-driven augmentation that Kaylock the Hornsplitter, Fortin the Cursed Knight, and (later) one-armed Ludwig all rely on. The artifact does not make Myurdin a different person; it amplifies the warlord he already is.
The fight ends with Myurdin falling into a lava pit after Kliff lands the same throat-cut combination that Myurdin himself used in the prologue. The symmetry is deliberate, and the script lets Kliff close the personal account before the larger one opens. What looks like a final death is actually the start of Myurdin's next phase.
After the Ashclaw fall, Myurdin is assimilated into Umbra and held in reserve. Umbra normally fights through Gabriel Caliburn, the duke it picked as its primary avatar in cycle 72. In the present cycle's finale, after Caliburn's avatar form is broken, Umbra simply switches bodies. Myurdin's stored form is brought out as a second, more personal avatar so that Kliff has to defeat the man who began his story before defeating the entity at the heart of it.
The Avatar of Umbra fight is therefore the closing parenthesis on the rivalry that opens the game. Kliff is not fighting Myurdin alone here; he is fighting the part of Umbra that wears Myurdin's face. Umbra confirms this when Kliff asks who is speaking through the body, answering only that it is itself, everyone, and everything. Once that avatar falls too, Umbra abandons mortal flesh entirely and takes its archangel form for the final encounter.
Cycle | Myurdin's Role |
|---|---|
Cycles before 26 | Myurdin exists as the warlord of the Black Bears. The guardians experiment with leaving Pailune unraided and pushing Kliff toward Myurdin's side rather than against him; both approaches fail. |
Cycle 26 | Jian's death and the raid on Pailune become the only reliable way to break Kliff out of his settled life. From this cycle on, Myurdin's prologue raid is locked in as the inciting event. |
Cycle 72 | Umbra targets Gabriel Caliburn as its primary avatar. The Black Bears, already in league with Demeniss through Bastier's design, become part of that larger plan. |
Cycle 108 (present) | Myurdin carries out the prologue raid, fights Kliff at Ashclaw Keep in his Lava form, falls into the pit, is assimilated into Umbra, and returns as the Avatar of Umbra in the final chapter. |
