Greymane Camp
The Greymane Camp at Howling Hill is the player's expandable home base in Crimson Desert, featuring farming, ranching, cooking, companion dispatch, workshops, trading, cosmetic customization, private storage, daily vendor refreshes, liberation rewards, item recovery, and faction quest skill point progression.
On This Page
Overview
The Greymane Camp is the player's home base in Crimson Desert, located at Howling Hill in the Hernand region. After surviving the ambush by the Black Bears, Kliff and the remaining Greymanes regroup here to rebuild their mercenary company. The camp starts as a humble settlement and grows over time as players invest resources, recruit companions, and construct new facilities.
Camp upgrades are not done through a simple menu. Instead, players complete Camp Expansion missions, which are large-scale projects that require a minimum number of recruited comrades, stockpiled resources, and in-game time. Sleeping at campfires or the camp bed advances the timer. The camp evolves from a scattered collection of tents into a fortified settlement that reflects the player's progress through the story.
The expansion system becomes available after Kliff meets Marius at Howling Hill during Chapter 3: Howling Hill. Marius, a surviving Greymane elder, manages the Grounds of the Sunrisefaction quests that drive each expansion tier forward. From that point on, the camp is the central hub for crafting, cooking, trading, dispatching companions, customizing appearance, and managing the Greymane mercenary company.
Resting and Passing Time
Players can sleep in any bed at camp to advance in-game time. This is not limited to Kliff's personal bed; sleeping in any companion's bed works the same way, allowing you to skip forward by several in-game hours whenever needed. Sleeping is the primary method for advancing the timers on dispatch missions, crop growth, and camp expansion projects.

Campfires offer an alternative way to pass time without sleeping. Sit at any campfire in the camp and use the focus light action (LB on controller, Control on keyboard) to meditate and advance the clock. This is useful when you want to pass a few hours without triggering a full rest cycle. Both methods are interchangeable for the purpose of advancing dispatch timers and waiting for crops to finish growing.
Camp Facilities
The Greymane Camp contains a variety of facilities that unlock as the player progresses through expansion tiers and completes faction quests. Each facility serves a distinct gameplay function.
Facility | Operator | Function | Key Details |
|---|---|---|---|
Bed | None | Rest and time skip | Sleep to advance in-game time for dispatch missions and crop growth. Cannot rest consecutively. |
Cooking Pot | Cook NPC | Meal preparation and purchasing | Cook meals that restore Health, Spirit, and Stamina with temporary buffs. The cook also sells prepared meals, raw ingredients, and recipes with daily stock limits. |
Weapon and armor crafting | Buy and sell gear, purchase ammunition and refinement items. Upgradeable to unlock higher-tier weapon and armor enhancements. Also sells grindstone and anvil supplies. | ||
Alchemy Lab | Unlocked via quest | Potion, medicine, and dye crafting | Create combat-enhancing potions, healing medicines, and dyes using plants and insects. Unlocked through the second camp expansion. Can be expanded for better recipes. |
Farm | Player-managed | Crop cultivation | Grow ingredients for cooking and crafting. Crops grow passively while adventuring. Expandable to increase crop variety and yield per harvest cycle. |
Ranch | Player-managed | Animal husbandry | Raise livestock including cows, pigs, goats, and chickens. Animals produce ingredients over time and can be butchered for meat, hides, and fleece. |
Barber Shop | Appearance customization | Change hairstyles, hair color, beards, eyebrows, face tattoos, and body tattoos for all three playable characters. Unlocked by completing "A Rumor at the Inksworth Bindery." | |
Dyehouse | Equipment and mount coloring | Recolor armor, weapons, horse tack, and mechs. Supports multiple dyeable layers per piece. Unlocked alongside the Barber Shop. | |
Accessories Shop | Connor | Accessory sales | Sells accessories and cosmetic items. Arrives at camp alongside Eric and Oliver after the Inksworth Bindery quest. |
Trading Center | Item exchange and provisions | Convert provisions into packaged trade goods. Monitor price fluctuations across settlements to maximize profit. Carl also manages donations and lost item recovery. | |
Food Shop | Food purchasing and selling | Buy prepared meals and raw ingredients for quick restocking. Inventory grows as the camp expands. | |
Resting House | Player-owned | Player housing | Build and furnish a personal living space. Arrange furniture and use as a resting point. Purely cosmetic with no combat stat effects. |
In Cliff's tent | Item storage | Store up to 240 items in the camp chest. Originally added in Patch 1.00.03 behind Carl's tent. As of Patch 1.01, the Private Storage chest has been moved to Cliff's main tent for easier access. Consumables stack up to 50 per slot. | |
Automated | Loot collection | Collects completed dispatch mission loot and items produced within the settlement. Missed loot from exploration is also sent here automatically as a safety net. |
Daily Vendor Stock Refresh
All camp vendors refresh their inventory every 24 in-game hours. This applies to every merchant in the settlement, including Ronnie's food shop, Tranan's blacksmith stock, Connor's accessories, and any other vendor who sells consumables or materials.
Players should make it a habit to buy out useful vendor stock once per in-game day. Meat, ore, gems, cloth, and other crafting materials sold by camp vendors are available on this daily cooldown. Purchasing these supplies regularly builds up a stockpile of crafting and cooking ingredients that would otherwise require time-consuming gathering trips. Since sleeping at camp advances the in-game clock, a quick rest followed by a vendor run is one of the most efficient daily routines for resource accumulation.
Barber Shop
The barber shop, operated by Eric, allows cosmetic customization for all three playable characters. Available options include multiple hairstyle selections with different lengths and styles, hair color changes from a range of color options, beard and eyebrow adjustments (for Kliff), and face and body tattoos. The barber shop is unlocked by completing "A Rumor at the Inksworth Bindery" as part of the second expansion tier.
Dyehouse
The Dyehouse, operated by Oliver, extends cosmetic customization to equipment and mounts. Key features include separate dye options for different armor parts, material-based customization that affects texture appearance, and horse tack and mount equipment recoloring with multiple dyeable layers. War robots and mech mounts are also dyeable. Dyes are obtained through world exploration or crafted at the alchemy lab.
Workshops
In addition to the core camp facilities, several specialized workshops unlock through expansion missions and specific faction quests. These workshops provide access to unique crafting systems and transportation options.
Workshop | Function | Unlock Requirement |
|---|---|---|
Build trade wagons for transporting packaged goods to distant trading posts. Enables the Royal Trading system for passive income. | Third camp expansion. Requires at least one Freesword with the Engineer skill. | |
Craft Cloudcarts (rideable hot air balloons) for aerial transportation across the map. | Later expansion tier. Workshop located in the Hernand Highlands south of Howling Hill. | |
Klinden Workshop | Produce Kuku Pots used for storing puzzle pieces and machinery parts related to research projects. | Unlocked through expansion progression. |
Camp Expansion Tiers
Camp expansion is unlocked during Chapter 3: Howling Hill, when Kliff arrives at Howling Hill and meets Marius. Each expansion tier requires a minimum number of recruited Greymane comrades along with food, silver, and construction materials. To start an expansion, open the world map, switch to the Factions filter, hover over the camp icon, and select the expansion mission. Assign the required number of comrades and pay the resource cost. The expansion then runs on an in-game timer that can be advanced by sleeping.
Assigning more comrades than the minimum requirement generates bonus rewards upon completion. Each completed expansion unlocks new recruitment quests from Marius, creating a positive feedback loop where more recruits enable further expansions.
Expansion | Recruits | Resources Required | Duration | Key Unlocks |
|---|---|---|---|---|
First | 2 | 100 Food, 250 Silver | 18 in-game hours | Dispatch system, Farm, Ranch, basic crafting stations, additional recruitment quests |
Second | 4 | ~18 in-game hours | Alchemy Lab, Dyehouse, Barber Shop (unlocked via "A Rumor at the Inksworth Bindery") | |
Third | 6+ | ~18 in-game hours | Trading Center, Timberturner Wainwright, Royal Trading access | |
Fourth | 10 | 1,500 Armaments, 2,500 Stone, 2,500 Timber, 4,000 Food, 100,000 Silver | ~18 in-game hours | Emberwind Workshop, advanced dispatch missions, Cloudcart crafting |
The third expansion introduces armaments as a resource requirement for the first time. Plan ahead by running armament-producing dispatch missions throughout the mid-game so you have enough stockpiled when the third and fourth expansions become available.
The expansion quest chain follows a specific sequence through the Grounds of the Sunrise faction tab. It begins with Gathered Will, which unlocks the ranch and field. This leads into Solid Foundations, where you must gather more Greymanes, investigate a rumor, travel to the indicated location, bring the new recruit back to camp, and then complete a specific dispatch mission to advance. Each step in the chain feeds the next expansion tier, culminating in the 4th and final camp expansion that unlocks the dyer, barber, and all remaining shops.
Camp expansions are managed through the Grounds of the Sunrise faction quest tab. Marius assigns expansion objectives as you progress through the story and recruit survivors. Each expansion requires a minimum number of recruits plus resource donations. After submitting the resources, the expansion completes after a set amount of in-game time (typically 18 in-game hours).
Expansion | Recruits Required | Resources | Unlocks |
|---|---|---|---|
1st (Howling Hill) | 2 | 100 Food, 250 Silver | Basic facilities: Farm, Ranch, Cooking Area. New recruitment quests. |
2nd | 4 | Alchemy Lab, Dyehouse, Barber Shop. | |
3rd | 7 | 1,000 Armaments, 1,500 Stone, 1,500 Timber, 2,500 Food, 50,000 Silver | Trading Center, Timberturner Wainwright, expanded Farm. |
4th | 10 | 1,500 Armaments, 2,500 Stone, 2,500 Timber, 4,000 Food, 100,000 Silver | Emberwind Workshop, Klinden Workshop, full facility roster. |
After Chapter 7, the Pailune reconstruction storyline unlocks. This introduces the Pailune Council and Pailune Institute, expanding the camp concept into a full settlement with additional facilities and governance mechanics.
Camp Service NPCs
Several named NPCs operate dedicated service stations within the Greymane Camp. Each NPC manages a specific aspect of camp logistics. As the camp expands through successive tiers, new service NPCs become available and existing vendors grow their inventories.
NPC | Role | Details |
|---|---|---|
Camp Elder and Quest Giver | Surviving Greymane elder who manages Grounds of the Sunrisefaction quests. Opens new recruitment quests after each expansion tier. | |
Freesword Management Office | Oversees dispatch missions and companion assignments. Displays Freesword skills and available missions. | |
Provisions and Trading | Manages camp provisions, accepts resource donations in five categories, handles packaged trade goods, and retrieves dropped/lost items. | |
Quartermaster and Blacksmith | Distributes equipment and oversees camp inventory of arms and supplies. Buys and sells gear, ammunition, and refinement items. | |
Food Shop Operator | Sells prepared meals and raw ingredients for quick restocking. Inventory expands as the camp grows. | |
Wagon Management Office | Manages the camp's wagons used for transporting goods and resources between settlements. | |
Barber | Offers hairstyle, hair color, beard, eyebrow, and tattoo changes for all three playable characters. Located in a tent near the general store. | |
Dyehouse Operator | Handles equipment and mount recoloring with multiple dyeable layers per piece. | |
Connor | Dye and Accessories Vendor | Sells dyes and accessories. Arrives alongside Eric and Oliver after the Inksworth Bindery quest. |
Side Quest Giver | The Greymanes' lookout and master archer. Her side quests unlock pets and color dyes for Kliff. | |
Royal Trading Quest Giver | The political mind behind the Greymanes' survival. His quests introduce the Royal Trading system. | |
Faction Quest Provider | One of Kliff's closest companions. Provides faction quests from the Scattered Embers quest chain. | |
Ranch Manager | Manages the ranch. Handles livestock operations including animal breeding, feeding, and butchering. Recruited through the Grounds of the Sunrisefaction quests. | |
Farm Manager | Manages the farm. Sells a limited supply of seeds (expanded through trust with external seed vendors). Handles crop planting and harvesting operations. | |
Dedrich | Tailor | Sells armor and outfits. Found at the Red FoxTrading Post in Delesyia. Recruitment requires defeating the Queen Stoneback Crab. Unlocked late in the game through the 'A Familiar Voice at the Red Fox Trading Post' faction quest. Most likely the final Greymane you recruit. His recruitment quest does not appear under the standard Greymane faction tab, making him easily missable. Players who want a complete camp roster should check the Red Fox Trading Post after finishing the main Greymane recruitment chain. |
Greymane Recruitment and Camp Shops
Recruiting new Greymanes is the primary driver of camp expansion. More recruits means more dispatch slots, and certain recruits bring specialized skills that unlock entirely new facilities at camp. The recruitment system is spread across the three faction quest tabs.
Quest Tab | Key Outcomes | |
|---|---|---|
Side stories with named Greymanes | Character development for companions like Yan and Naira. Unlocks pets and color dyes. | |
Main recruitment and expansion chain | Follows the Embers of Return, Gathered Will, and Reuniting with Comrades arcs. Finding survivors triggers camp expansions. | |
Requests from rescued Greymanes | 27 commissions total. Each completed commission rewards a Medium Bag (+3 inventory slots). |
Non-combat Greymanes are just as important as fighters because they open up camp shops. As you rescue specific survivors through the Grounds of the Sunrise quests, their personal trade skills become available at camp. By the time you have completed most of the recruitment chain, the camp will have every shop type: blacksmith, food vendor, refiner, general shop, horse gear, dye shop, and barber.
Keep in mind that if a Greymane is currently assigned to a dispatch mission, they are physically absent from camp. You cannot interact with them for personal requests or commissions until the mission ends. If you need to talk to a specific comrade, cancel their mission first, complete the conversation, then reassign them.
Farming and Ranching
The camp includes dedicated farming and ranching areas that tie into the game's cooking and crafting systems. Both facilities unlock after the first camp expansion and grow more productive as the camp levels up.
The farm unlocks through the A Rumor at the Goldleaf Trading Post quest in the Grounds of the Sunrise faction chain. Completing this quest recruits Kamu, who becomes the farm manager at camp. After recruitment, Kamu requests an apple-picking dispatch mission at Glenbright Farm (roughly 16 in-game hours). Once that finishes, a second dispatch mission builds the actual farm at Howling Hill (roughly 18 in-game hours). Only after both missions complete do the planting plots become available.
The farm starts with 16 planting plots. To plant, walk up to an empty plot and select Plant Seed, then choose a crop. Seeds come from four sources: purchasing from Kamu's seed shop, finding them while exploring the world, harvesting seeds from existing mature crops, and opening Abyss Cells in your inventory. Abyss Cells found during exploration and dungeon runs break apart into a selection of seeds when opened, tying the camp's agricultural system into the broader Abyss progression loop.
The ranch unlocks alongside the farm through the same Goldleaf Trading Post quest chain, which recruits Ben as the ranch manager. After Ben arrives at camp, a dispatch mission constructs the ranch facilities.
Unlocking the Farm and Ranch
To unlock the farm and ranch, progress the main story until the Howling Hillfaction quest chain becomes available. Open your Journal and navigate to Faction Quest. The farm and ranch require reaching the Grounds of the Sunrise questline, specifically the second quest in the chain: Embers of Return, then Gathered Will, then Solid Foundation.
Camp upgrades are managed through a special menu. Hover over the camp on the map and select the fourth tab to access the camp expansion options. The camp has five expansion tiers total, with the fifth level being the maximum. The third tier is the critical milestone because it unlocks both the farm and the ranch.
Once the third expansion completes, Kamu becomes the farm master and Ben becomes the ranch master. Their stations sit right across from each other in the camp. Each of them gives a short introductory side quest that involves sending a dispatch mission to a location marked on the map. Complete these dispatch quests to fully activate the farm and ranch facilities.
Ranch Capacity and Upgrades
The ranch starts with a capacity of 20 to 25 animals and has a maximum cap of 35. This cap increases as the camp expansion level rises, so upgrading the camp is the only way to house more livestock. Always keep male and female pairs of each species so you can breed replacements without needing to purchase new animals.
Mecha Workers
Mecha workers are automated laborers that can be produced to multiply the camp's workforce. To unlock them, complete the Shaya Research at Doohaven Keep, which enables dispatch missions to craft Mecha Workers at the Marne Steel Armory. Each crafting mission takes roughly 3 hours of in-game time and costs 5,000 weapons, 1,000 wood, 2,000 provisions, and 10,000 silver. A single mission yields 1 to 3 workers. For larger-scale production, complete the Gorthk Iron Works Tower Research to unlock large-scale dispatch missions.
Acquiring Animals
There are two ways to stock the ranch. The first is catching wild animals in the open world. Wild goats spawn in large herds east of Howling Hill near the Dragon's Stone Chamber, and picking them up is not considered stealing. Chickens and other livestock can also be found in fields and farms throughout Hernand. Carry the animal back to camp and register it at the ranch through Ben's management menu.
The second method is purchasing livestock directly from vendors. Building NPC trust with specific characters unlocks purchase options:
NPC | Trust Requirement | Animal Unlocked |
|---|---|---|
100% Trust | Pigs | |
100% Trust | Sheep | |
100% Trust | Cows |
Chickens can be purchased from Ben without any trust requirement, making them the easiest livestock to start with.
Feeding and Leveling
Animals must be fed daily to produce resources and gain levels. The most efficient feeding method is to drop food directly on the ground inside the ranch, as animals will rush over and eat immediately. This is much faster than using the feedbox. Effective foods include barley (reliable for most animals), beetroot and apples (good general options), sweet potatoes (particularly good for chickens), and carrots (effective for chickens, goats, and sheep).
Note that animals only gain quality levels when you are present to witness them eating. Leaving food in the feedbox and sleeping will empty it, but the livestock will not actually improve unless you are nearby during feeding. For fastest leveling, hand-feed animals by dropping food at their feet and watching them eat.
Breeding and Butchering
Breed surplus animals by keeping males and females of the same species together in the ranch. Once you have more livestock than needed, select an adult animal through Ben's Manage Ranch menu and choose the Slaughter option. Butchered animals yield meat, hides, bones, horns, and other materials depending on the species. A practical strategy is to level animals to their maximum, breed a replacement, then butcher the maxed-out animal for resources.
Farm
The farm allows players to plant seedlings and grow a variety of crops used as cooking ingredients and crafting components. Instead of relying entirely on gathering herbs and plants from the open world, players can cultivate what they need at camp. Crops grow passively over time while the player is out adventuring, providing a steady source of materials. Farm expansion tiers increase the number of planting plots and unlock new crop varieties.
Seeds for the camp farm can also be obtained by opening Abyss cells in your inventory. Abyss cells are collectible items found throughout Pywel during exploration and dungeon runs. When you open a cell from the inventory menu, it breaks apart and yields a selection of seeds that can be planted at the farm plots. This provides an additional source of planting material beyond purchasing seedlings from vendors, and it ties the camp's agricultural system into the broader Abyss progression loop. Crops planted from Abyss cell seeds take a few in-game days to fully grow, so plant them early and let them mature while you are out adventuring.
Planting is straightforward: interact with an empty plot, select a seed, and place it. Seeds come from three sources: buying them at camp shops, finding them while exploring the world, and harvesting them from existing mature crops. Each crop takes 3 to 4 in-game days to grow. Once mature, harvest the crop, then chop down the remaining plant stalk and replant.
Watering is manual in the early game. Walk up to each crop plot and use the interaction prompt to water it. Crops that are not watered regularly take longer to reach maturity. Later in the game, watering and fertilizing upgrades become available, which speed up growth and improve yield quality.
In the late game, the Magic Sickle becomes available as a harvesting tool. It lets you cut an entire row of crops in a single swing, dramatically reducing the time spent on harvest cycles. The Farm can also grow trees for rubber and other crafting resources, expanding its usefulness well beyond cooking ingredients.
Ranch
The ranch supports animal husbandry, letting players raise livestock for meat, hides, fleece, and other animal products. These materials feed into both cooking recipes and equipment crafting. Raising a diverse selection of animals ensures a steady supply of ingredients.
Animal | Products | Used For |
|---|---|---|
Cows | Milk, beef | Cooking recipes, meal preparation |
Pigs | Pork, leather | Cooking recipes, equipment crafting |
Goats | Milk, hides | Cooking recipes, crafting materials |
Chickens | Eggs | Cooking recipes |
Together, the farm and ranch reduce the grind of open-world gathering by providing a reliable supply chain at the player's home base. Livestock and crops both produce resources passively, so starting them early maximizes returns over time.
Animal | Daily Product | Butcher Yields | Notes |
|---|---|---|---|
Chickens | Eggs | Feathers, meat | Keep a ratio of roughly 4 hens per 1 rooster for best egg output. |
Horns, hides, meat | Females produce 4 pieces of meat when butchered; males produce 5. | ||
Hides, bones, meat | Larger yields per butcher but harder to catch in the wild. | ||
Sheep | Hides, meat | Wool is used in higher-tier crafting recipes. Worth adding as the ranch levels up. | |
Pigs | None (raised for meat) | Bones, hides, meat | Purely a meat source. Efficient for stocking cooking ingredients. |
Feed animals daily with barley, which you can buy from the camp shop each day. Unfed animals stop producing and will eventually die. Breed surplus animals by keeping males and females together, then butcher extras for horns, bones, hides, and meat. Eggs are particularly useful in the early and mid game because the Hearty Smoked Egg recipe heals 200 Health and requires only eggs as an ingredient.
Cooking
Meals prepared at the camp's cooking pot serve as an important combat resource. Cooked dishes provide three types of benefits: direct health regeneration, temporary combat buffs (increased damage, defense, stamina recovery), and passive bonuses that last for a set duration. Food can be consumed during combat to regain health in critical moments. Ingredients come from farming, ranching, hunting, and fishing. The Cook NPC at camp sells prepared meals and recipes with daily stock limits, so players who do not want to cook themselves can purchase ready-made food instead.
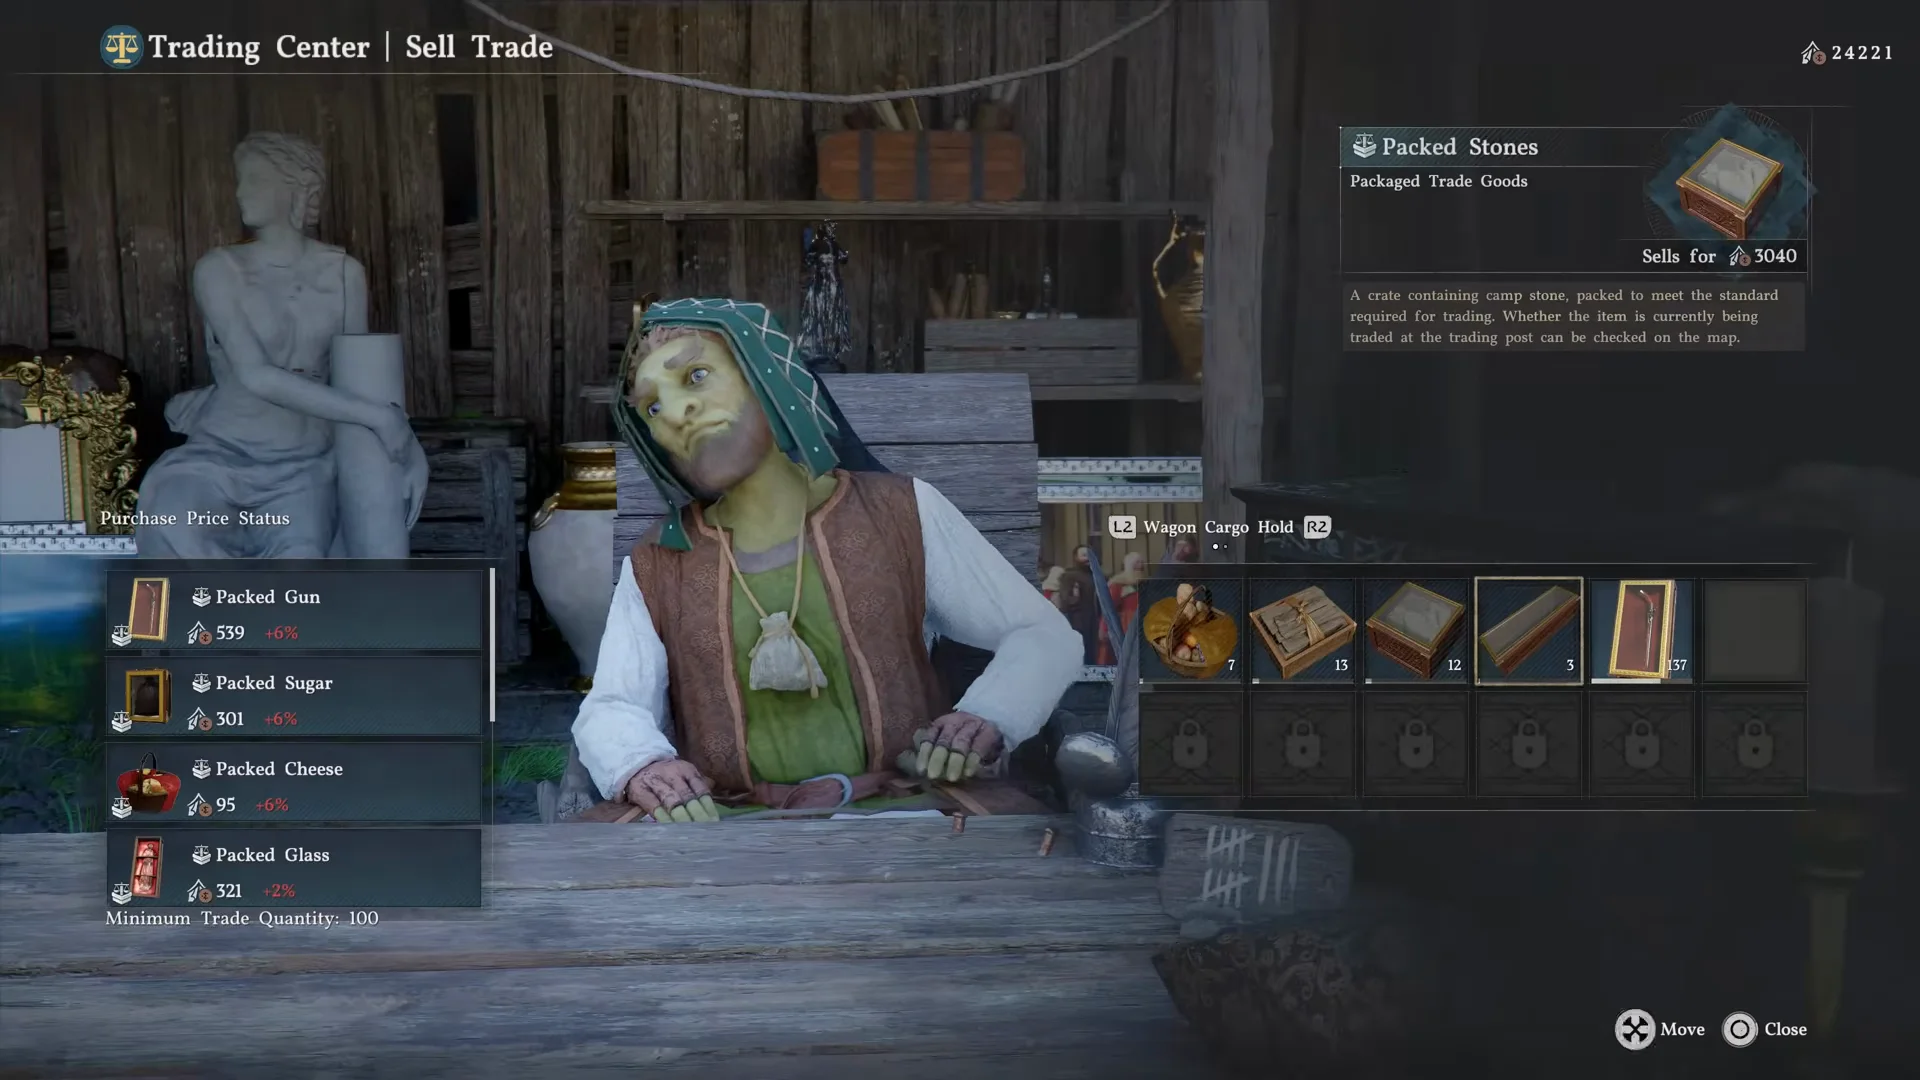
Resource Donation System
Players can donate unwanted items to Carl at the camp provisions station to build the camp's collective resource pools. Donated items convert into camp resources used for facility upgrades and expansion missions. Carl accepts donations across five categories:
Accepted Items | How to Obtain | |
|---|---|---|
Enemy drops, loot chests, vendor purchases | ||
Ore | Mining ore veins with a pickaxe, dispatch missions | |
Lumber | Timber, wood, logs | Chopping trees with an axe, dispatch missions |
Food | Meals, raw ingredients, alchemy materials | |
Coin | Money, jewelry, valuables | Quest rewards, selling goods, bounty hunting |

Donating unwanted gear to Carl is more efficient than selling it to vendors when camp upgrades are the priority. Equipment you have outgrown, duplicate drops, and surplus crafting materials all convert into useful expansion resources.
Carl manages the camp's provision system, which converts donated items and currency into camp resources. These resources fuel dispatch missions and camp expansions. To donate, speak with Carl and select "Manage Provisions," then choose "Camp Provisions" to view donatable items in your inventory.
Each donatable item displays a "Donation" value alongside its normal description. Different items contribute varying amounts to different resource pools. For example, a piece of cloth adds 2 points to Armaments, while Azurite ore adds 63 points to Stones. Donating is permanent, so always check whether you still need a material for crafting or cooking before committing it.
Provision Categories
The camp interface displays six resource icons in the upper right of the screen. Each icon tracks a different provision category:
Icon | Where Found | |
|---|---|---|
Helmet | Comrades | Number of available Greymane recruits at camp |
Tent + Armor | Armaments | Weapons, armor, accessories, upgrade materials (cloth, bones, unwanted gear) |
Tent + Rock | Stones | |
Tent + Logs | Timber and wood resources from logging | |
Tent + Bags | Food | Raw ingredients, cooked meals, herbs, animal products |
Tent + Coin | Money | Silver, valuable items (rings, necklaces), and direct fund donations |
A seventh counter tracks House Celestecontribution points, which are earned through separate activities rather than direct donations.
Donation Levels and Rewards
As you donate resources, your overall donation level increases. Higher donation levels unlock visual rewards in the form of new objects and decorations that appear around the camp. These are separate from mission-related resource pools. Think of donations as serving two purposes: fueling dispatch missions and expansion projects with the raw resources, and gradually improving the look and feel of the camp as your donation level rises.
Direct fund transfers are also available by scrolling to the "Donate Funds" option in Carl's menu. This lets you contribute silver without needing to sell valuables first.
Resource Generation Loop
The camp operates as a closed-loop resource ecosystem. Understanding the flow of resources in and out of the camp is critical for keeping expansions on schedule and dispatch missions running without interruption.
Input sources: Dispatch missions, farm harvests, ranch products, donations to Carl, and loot from the Supply Chest all feed into the camp's resource pools.
Output drains: Camp expansion projects, dispatch mission launch costs, cooking (which consumes food ingredients), and crafting at the Blacksmith all draw from camp resources.
The food bottleneck: Almost every dispatch mission type requires food as part of its launch cost. If food reserves run dry, the entire dispatch operation stalls. Keeping the farm and ranch active at all times is the best insurance against food shortages.
Armament scarcity: Armaments are the hardest resource to accumulate because they come from donating weapons, armor, and accessories. Run armament-producing dispatch missions (like Warspike Spearmaker in Hernand or Gorthak Ironworks in Delesyia) consistently throughout the mid game to stay ahead of the 3rd and 4th expansion requirements.
Passive income: Dispatch missions run in the background on in-game time. Never leave comrade slots idle. Even a low-priority mission is better than letting recruits sit at camp doing nothing.
Mission Counterbalancing Strategy
The most effective way to keep dispatch missions running indefinitely is to pair missions whose inputs and outputs cancel each other out. Every dispatch mission costs one type of resource and produces a different type. By selecting missions that produce what other missions consume, you create a self-sustaining loop that requires no further donations from the player.
Example setup: Run a farming mission that costs silver but produces food. Pair it with a security or escort mission that costs food but produces silver. The food from mission A funds mission B, and the silver from mission B funds mission A. Both missions auto-restart when completed, so once the loop is established, it runs continuously in the background while you adventure.
To get started with counterbalancing, configure two or three escort/security missions for steady silver income alongside two or three resource missions (lumber, mining, food) that spend silver. As your camp grows and more mission destinations unlock, add specialized missions for armaments, stone, and trade goods. The surplus from each cycle accumulates in your camp coffers, gradually building the stockpile needed for the 3rd and 4th camp expansions without any manual intervention.
Keep in mind that missions will auto-restart only as long as the required resource is available. If a mission exhausts its resource pool, it stops and waits. Check your provision totals periodically and adjust the mission mix if one resource is draining faster than another replenishes it.
Why Greymane Faction Quests Are Critical
The Greymane Camp does not grow on its own. Nearly every major camp upgrade, facility unlock, and new comrade is gated behind the Greymane faction quests found in the Journal. These quests are widely considered the single most important side content in Crimson Desert, and experienced players recommend completing them the moment they become available.
Grounds of the Sunrise
The Grounds of the Sunrise chain (38 quests) is the recruitment backbone of the entire camp system. Each quest sends Kliff to find a scattered Greymane survivor. When that survivor returns to camp, they either unlock a new facility (the cook, the quartermaster, the trading post, and other services) or join the comrade pool for dispatch missions. The more comrades you recruit, the more dispatch missions you can run simultaneously, and several camp expansion tiers have a minimum recruit count before they can be started.
Scattered Embers
The Scattered Embers chain (34 quests) focuses on daily camp life: raising morale, building community, and handling disputes between residents. Rewards include pets, crafting recipes, and Abyss Artifacts. While less structurally critical than Grounds of the Sunrise, these quests flesh out the camp experience and provide unique rewards that cannot be obtained elsewhere. Side quests from Naira, Yann, and Oongka fall under this chain.
Beyond their narrative role, the Scattered Embers quests function as a hidden tutorial system for many of the game's mechanics. Each quest introduces or teaches a specific gameplay system that may not be explained elsewhere. Players who skip these quests often reach the mid-game without understanding core features that were meant to be taught through the Scattered Embers chain. The following mechanics are introduced through specific Scattered Embers quests:
Quest | Mechanic Taught |
|---|---|
How to obtain and care for pets | |
Dye crafting and how to discover dye recipes organically | |
Wagon stealing: you can steal wagons and sell them for profit | |
Crafting and Harvesting tutorial quest | Crafting basics and the harvesting loop |
Horse racing tutorial quest | Horse racing mini-game and where to find races |
Wopotamus betting quest | The gambling and betting mini-game (Wopotamus arena) |
Bounty system tutorial quest | How the bounty system works and how to claim bounties |
Because these quests are side content, many players skip them entirely and then discover in the mid-game that they have missed mechanics that were always available. Starting the Scattered Embers chain early is one of the single best investments of time in the game.
Greymane Commissions
The Greymane Commissions (27 quests) are delivery requests from camp residents. Each completed commission rewards a Medium Bag that adds +3 inventory slots. Completing all 27 provides +81 total inventory slots, making commissions one of the most valuable side activities for inventory management. New commissions unlock as more comrades are recruited, so the recruitment and commission chains feed into each other.
Bottom line: Whenever new Greymane faction quests appear in the Journal after a story milestone, prioritize them above all other side content. The camp facilities, dispatch capabilities, and inventory space they unlock compound throughout the entire game. Delaying these quests is the most common progression mistake new players make.
Commissions are requests from rescued Greymanes who are already living in your camp. They typically ask for specific materials, weapons, or meals. Each completed commission rewards a Medium Bag that adds +3 inventory slots. There are 27 commissions in total, providing up to +81 inventory slots when all are completed. Commissions appear in the Greymane Commissions tab under Faction Quests.
Early Skill Points from Faction Quests
Greymane faction quests are one of the easiest early sources of skill points in the game. Quests like Embers of Return reward Abyss Artifacts at each step of the chain, and these artifacts translate directly into skill points for the player's progression trees. Completing just the opening set of Greymane faction quests yields roughly 10 skill points in about 30 minutes of gameplay.
Beyond skill points, completing these early faction quests also updates the camp roster with new arrivals. A quartermaster merchant and a chef join the settlement as direct results of faction quest progress. The chef is particularly useful because she sells food supplies that would otherwise require hunting, farming, or gathering to obtain. Players who rush the first batch of Greymane faction quests gain both a meaningful skill point head start and immediate access to camp services that make the rest of the early game smoother.
Faction Quest Tabs
Camp-related quests are organized into three tabs:
Tab | Content |
|---|---|
Side quests from supporting characters: Record of the Greymanes, The Greymane's New Fangs, Strongbox with Wheels. | |
Camp expansion projects and survivor location objectives: Embers of Return, Reuniting with Comrades, For a Better Tomorrow. | |
27 material/weapon requests from rescued members. Each rewards +3 inventory slots (Medium Bag). |
Quest Lines
The Greymane Camp is the starting point for multiple quest chains that drive the camp's rebuilding narrative. These quest lines unlock as the player progresses through the main story and completes specific prerequisites.
Scattered Embers Quests
The Scattered Embers quest line focuses on recovering lost Greymane resources and strengthening the camp's foundations. These quests involve tracking down supplies, securing new recruits, and establishing the camp's operational infrastructure.
Quest | Description |
|---|---|
Recover the historical records of the Greymanes. These documents chronicle the mercenary company's origins and are vital for rallying former members back to the cause. | |
The Greymane's New Fangs | Recruit new members to bolster the ranks of the Greymanes. After the ambush scattered the company, Kliff must seek out capable fighters willing to join the reformed mercenary band. |
Secure a mobile strongbox for the camp. This wagon-mounted vault provides safe storage for the camp's most valuable resources and currency during transit. |
Grounds of the Sunrise Quests
The Grounds of the Sunrise quest line centers on reuniting with scattered Greymane companions and laying the groundwork for the camp's long-term future. These quests carry a more personal tone, focusing on the bonds between Kliff and his former comrades.
Quest | Description |
|---|---|
Follow the trail of surviving Greymane members back to the Hernand region. This quest marks the beginning of the camp's revival as Kliff reconnects with allies who escaped the ambush. | |
Track down and reunite with specific Greymane companions who fled to different parts of the duchy. Each companion brings unique skills and personality to the growing camp. | |
Complete the final preparations needed to transform the camp from a temporary refuge into a permanent settlement. This quest culminates the Grounds of the Sunrise storyline and unlocks further camp expansion options. |
Companion Dispatch System
Reunited Greymane companions can be sent on dispatch missions from the camp through Ross at the Freesword Management Office. These missions operate on in-game time, meaning companions carry out tasks while the player continues adventuring. Players can sleep at the camp bed or any campfire to advance the timer.
Dispatch missions include resource-gathering operations (timber, ore, herbs, food), reconnaissance of hostile territories, and siege preparations against enemy-occupied fortresses. Some missions auto-restart after completion, eliminating the need for manual reassignment. Cancelled missions refund resource costs entirely.
Siege Dispatch
The siege dispatch mechanic is particularly impactful. Players can deploy Freeswords to fight in blockaded regions, which reduces enemy numbers in those areas. When the player later visits those locations, they encounter reduced resistance because the dispatched team has already weakened the defenses. This creates a strategic layer where camp management directly affects open-world difficulty.
Stronghold recapture missions display the hostile faction's combat power as a numerical value (for example, 5,180 for Wyvern's Cradle). Each comrade you assign contributes their own combat power to chip away at this total. Missions run on a timer (typically 16 hours in-game) and auto-restart, meaning your comrades will keep reducing the enemy's combat power cycle after cycle until the stronghold is weakened enough for you to assault it in person.
Stronghold missions accept up to 10 comrades but have no associated skill bonus. Instead, the key factor is raw combat power, which means you should assign as many comrades as you can spare. Be aware that stronghold missions are expensive, requiring significant armaments, food, and silver per cycle. Committing 10 comrades to a single stronghold also leaves very few available for other resource-generating missions. Plan your assault timing carefully: weaken the stronghold to roughly 50% combat power, then visit it in person to finish the job while reassigning your comrades to resource missions.
Freesword Worker Skills
Companions assigned to the Freesword Dispatch System possess individual worker skills that determine which tasks they excel at. Matching workers to missions that align with their skills improves output and reduces completion time. Each skill has multiple tiers that affect performance: Level 1 provides a 10% bonus, Level 2 provides a 30% bonus, and Level 3 provides a 60% bonus. A comrade with all three tiers of a single skill provides a combined 100% skill bonus.
Skill Type | Requirement | |
|---|---|---|
Efficiency Boosters | Escort, Farmer, Rancher, Fisherman, Smith, Logger, Miner | Optional. Matching these skills to relevant missions increases yield but is not required to start the mission. |
Required Skills | Craftsman, Jeweler, Engineer, Cook, Explorer, Painter, Weaver, Builder | At least one recruited comrade with the required skill must be assigned to start certain missions. |
For example, assigning Luke (who has Construction, Basic Ranching, and Ranching Mastery skills) to ranching dispatch missions yields significantly better returns than sending him on tasks outside his specialization. Similarly, Ronald excels at logging missions with his Basic Logging, Logging Mastery, and Expert Logging skills.
Mission Type | Rewards | Costs | Notes |
|---|---|---|---|
Escort | Money (Silver) | Food | Low risk, steady income. |
Harvesting / Farming | Food, trade goods | Money | Best for stocking the kitchen. |
Stone, ore | Money, food | Supplies blacksmith refinement materials. | |
Timber (all grades) | Money, food | Alternative to manual tree chopping. | |
Recapture Stronghold | Fewer enemies in region | Armaments, food, money | Clears enemy presence for safer exploration. |
Production | Crafted items | Armaments, food, money | Yields finished goods. |
Varies | Specialized missions for high-value outputs. | ||
Construction | Camp upgrades | Varies | Requires freeswords with the Builder skill. |
Skill Category | Best Missions | |
|---|---|---|
Efficiency Boosters | Escort, Farmer, Rancher, Fisherman, Smith, Logger, Miner | Matching resource-gathering missions. |
Required Skills | Craftsman, Jeweler, Engineer, Cook, Explorer, Painter, Weaver | Specialized production and crafting missions. |
Construction | Builder | Camp expansion construction missions (cannot be completed without this skill). |
Bonus Types
Bonus | How It Works | Maximum |
|---|---|---|
Comrade Bonus | Every dispatch mission has a minimum and maximum number of comrades. Sending more than the minimum grants +20% per extra comrade. | +40% (2 extra comrades above minimum) |
Skill Bonus | Matching a comrade's freesword skill to the mission type. Level 1 skill gives +10%, Level 2 gives +30%, Level 3 gives +60%. A single comrade with all 3 levels of a matching skill provides the full bonus. Multiple comrades with Level 1 do not stack beyond 10%. | +100% (one comrade with Level 1 + 2 + 3) |
Conversion Bonus | Donate silver to the church donation box in the region where the mission takes place. Each donation raises the region's Blessing level, granting +2% per level to all dispatch missions in that region permanently. | 100%+ (scales with total donations; roughly 110,000 silver in Hernand for 100%) |
Church Donations and Conversion Bonus
Every region in Pywel has a church with a donation box. Donating silver to the church raises the region's Blessing level, which grants a permanent +2% Conversion Bonus per level to all dispatch missions originating from that region. This bonus is shown in the dispatch UI and applies to every mission type: escort, farming, mining, logging, and production.
The Conversion Bonus stacks with Comrade Bonuses and Skill Bonuses. At full investment (roughly 110,000 silver donated to a single region's church), all dispatch missions in that region permanently double their rewards. Hernand is the best region to invest in first since most early missions originate there. Over time, investing in all regions eventually doubles every mission reward in the game.
Experienced players prioritize building silver income early and funneling surplus into church donations before spending on other upgrades. The compound returns from doubled mission yields far outweigh the initial silver investment, especially when combined with self-sustaining dispatch loops.
Contribution Workers
Once you progress far enough in the Flame Knights faction questline for House Azerian, you unlock the Seal of Devotion key item. This grants access to Contribution Workers, a supplementary workforce that fills dispatch slots without requiring your trained Greymane comrades.
Contribution Workers are anonymous civilians hired using regional Contribution points. They do not have individual profiles or skill bonuses, but they can occupy the required worker slots on any dispatch mission. This frees up your skilled comrades for missions where their specialization actually matters. For example, if a farming mission requires four workers but only one needs the Farmer skill for the bonus, you can assign one trained comrade and fill the remaining three slots with Contribution Workers instead of wasting skilled Greymanes on filler duty.
To hire Contribution Workers, open any dispatch mission's assignment screen. Workers available in the region where you have accumulated Contribution points will appear as assignable alongside your regular comrades. As your camp grows and you juggle dozens of active missions across the map, Contribution Workers become essential for keeping every mission slot filled without spreading your skilled comrades too thin.
Because Contribution Workers are hired from a shared regional pool rather than drawn from your finite Greymane roster, you can recruit an effectively unlimited number of workers as long as you have Contribution points to spend. This means you are no longer capped by your Greymane headcount when it comes to running simultaneous dispatch missions. With enough Contribution points stockpiled across multiple regions, you can fill every available mission slot and keep all of them running at once, turning the dispatch system into a fully automated resource engine.
To obtain the Seal of Devotion, travel to the Flame Knights Castle in the Demeniss region and complete the associated quest chain. Upon defeating Tristan, he drops the Seal of Devotion key item, which permanently unlocks Contribution Workers across all regions.
Contribution Workers are anonymous civilians without individual profiles, names, or skill specializations. They are hired using regional Contribution points accumulated through activities in each region. To assign them, open any dispatch mission's assignment screen and select available Contribution Workers alongside your regular Greymane comrades.
Optimal Dispatch Setup
Experienced players recommend the following dispatch destinations for maximum resource efficiency:
Arcosa for silver income (11,000 base yield, up to 22,000 with the Orion bonus)
Crimson Mountain Fortress for stones
Cacao Farm for provisions
Gorec Iron Works for weapons and armor
Sold Road Trading Post for extra armaments
Hellbart Hoery for wood
This combination covers all six provision categories and generates enough surplus to keep camp expansions and crafting on schedule. Adjust the mix based on which resources are bottlenecking your current expansion tier.
Item Storage and Inventory Management
Crimson Desert provides several storage options, though your personal inventory remains the primary all-purpose container. Managing storage effectively becomes increasingly important as crafting materials and equipment accumulate.
Storage Type | Capacity | Purpose | Details |
|---|---|---|---|
Personal Inventory | Expandable (up to 230 slots) | General item storage | Your primary all-purpose storage. Expandable through quest rewards and bag purchases. |
240 slots | Dedicated item stash | Added in Patch 1.00.03. Moved to Cliff's main tent in Patch 1.01 (previously behind Carl). Consumables stack up to 50 per slot. | |
Variable | Loot collection | Collects dispatch mission rewards and missed exploration loot. Functions as a safety net, not general storage. | |
Product Storage | Trade goods only | Trading system | Exists exclusively for items related to the Royal Trading system. Cannot store general equipment or consumables. |
Camp valuables | Unlocked through the Grounds of the Sunrise questline. A mobile vault for the camp's most valuable resources. |
Camp Follower Item Collection
Camp followers will automatically pick up items that players drop on the ground within the camp boundaries. If you drop loot, surplus gear, or other items on the ground at camp and then sleep or leave for roughly 12 in-game hours, returning companions will have collected the dropped items and placed them into the Supply Chest. This effectively turns the ground at camp into a secondary deposit zone. Most standard items transfer through this system, including equipment, crafting materials, and consumables.
This behavior is particularly useful when your personal inventory is full and you do not have time to sort items manually. Instead of discarding overflow loot in the field, return to camp, drop everything on the ground, and let the followers handle the rest. The items will be waiting in the Supply Chest the next time you check it. Keep in mind that the Supply Chest has its own capacity, so clear it out periodically to make sure nothing gets lost.
Carl's Recover Items
Carl at the provisions station has a Recover Items option that most players overlook. This feature shows cores and other items that the player has interacted with during exploration but walked away from without picking up. These items are flagged as "lost" in the system and can be purchased back through Carl's recovery menu.
Recovered items go straight into the Kuku Pot inventory rather than the player's main backpack. This is especially relevant for puzzle-related items and machinery parts that are easy to miss or accidentally leave behind during exploration. If you solve a puzzle or open a container in the field but forget to grab the reward, check Carl's Recover Items list before retracing your steps. The item is almost certainly waiting there.
Liberation Rewards in the Supply Chest
Every time the player liberates a location on the map (marked by red areas), the camp's Supply Chest receives an automatic update with free rewards. These liberation rewards include accessories like necklaces and rings, along with other gear that scales with the difficulty of the liberated zone.
There is no cost to collect these rewards. Simply open the Supply Chest after clearing a hostile area and the new items will be waiting. Players who liberate multiple zones in a single session should remember to return to camp and check the Supply Chest periodically, since the rewards stack and can pile up quickly. This passive loot stream makes liberation one of the most efficient ways to acquire accessories and supplementary equipment without spending silver or crafting materials.
Expanding Inventory Capacity
Inventory Expansion Tools: Obtained as quest rewards from both main and side quests. Each tool adds 3 inventory slots.
Small Bags: Purchasable from general goods vendors for 50 Copper each. Each bag adds 1 inventory slot. Buying several early on is a worthwhile investment.
Medium Bags: Rewarded for completing Greymane Commissions. Each adds +3 slots. All 27 commissions provide +81 total slots.
Additional Characters: Unlocking Damiane and Oongka through story progression provides access to their separate inventory pools.
Inventory Management Tips
Sell or discard quest documents after reading them. They take up inventory space and serve no purpose once viewed.
Speak with Carl at camp to donate unwanted gear. Donated items convert into camp resources used for facility upgrades.
Keep cooking ingredients and crafting materials in active rotation. If your inventory fills up, cook meals or craft items to consolidate loose materials into finished products.
Check Private Storage frequently to prevent exceeding the 240-slot capacity. Uncollected dispatch loot deposits into the Supply Chest automatically.
Player Housing
In addition to functional facilities, the player can build and furnish a personal house within the camp. Housing construction works like the other buildings: players gather materials and physically build the structure from the ground up. Once built, the house is a resting place and a show of the player's progress.
Furniture can be individually placed and arranged within the house. Players craft furniture from gathered materials or purchase pieces from vendors. The housing system is purely cosmetic and does not affect combat stats, but it provides another avenue for personalizing the camp experience.
The player's personal house is located southeast of the main camp, across a small ravine. It becomes available during Chapter 3 as part of the camp establishment at Howling Hill. The house starts as a modest structure with three rooms containing basic furnishings: a table and a bed.
To decorate, enter the house and open the house icon from the quick menu. This switches to a bird's-eye view with the roof removed, letting you freely position and arrange items. Only items marked with a house icon in your inventory (categorized as Collectibles or Decorations) are eligible for placement. These range from small objects like bowls, cups, and lanterns to larger pieces like tables, cabinets, and drawers.
Furniture sources include exploration drops found throughout Pywel, dedicated furniture vendors in towns (one specializing in smaller objects, another in larger pieces), and a camp merchant who sells home furnishings after sufficient camp expansion. The bed in your house functions the same as any camp bed, letting you pass time to advance dispatch timers and crop growth.
Companion Integration
Reunited Greymane companions populate the camp as they are found throughout the story. Some companions arrive on their own after hearing about the camp, while others must be actively recruited through reunion quests. Each companion adds to the camp's capabilities and can be:
Assigned to facilities to improve their output. A skilled cook at the kitchen produces better meals; a craftsman at the workshop unlocks additional equipment options.
Dispatched on missions through the Freesword System to gather resources, build structures, recapture blockaded forts, or weaken enemy fortresses.
Interacted with for personal conversations, shared experiences, and trust-building activities at the campfire.
Shared Horse Stables
The camp stable allows players to use horses that belong to other companions. By interacting with the stable and selecting Manage Horses, you can browse and ride any horse registered to a Greymane companion, including Damiane's mount and other companions' horses. This means you do not need to rely solely on your own horse collection. If a companion owns a faster or better-equipped horse, you can borrow it directly from the stable for your next ride.
Shared horses retain their owner's equipment and stats. Swapping between horses at the stable is instant and does not cost any resources. This feature is especially helpful early in the game when Kliff's personal horse selection is limited, because companion horses unlocked through recruitment quests provide immediate access to higher-quality mounts without requiring additional taming or purchasing.
Companion Trust
The Companion Trust system tracks the player's relationship with each companion. Spending time at camp, sharing meals, giving gifts, and completing companion-specific quests all contribute to deepening these bonds. High trust unlocks companion backstory missions (playable flashback missions that reveal how the Greymanes first formed and the tragedies they have endured) and improves companion performance on dispatch missions.
Vendor Trust and Trade Agreements
Every vendor in the world, both inside and outside the Greymane Camp, has a Trust level that ranges from 0 to 100. You build trust with vendors the same way you build trust with comrades: greet them daily, give them gifts, and complete their requests. It takes roughly 20 in-game days of consistent daily greetings to max out a vendor's trust to 100.
Reaching 100 Trust with a camp vendor expands their inventory, adding more items and increasing stock quantities. Reaching 100 Trust with an external vendor (one located outside the camp, in a town or settlement) triggers a Trade Agreement between that vendor and the corresponding camp vendor. Once a Trade Agreement is active, the external vendor's items become purchasable at the Greymane Camp directly. This means you no longer need to travel to that settlement to buy those goods.
If you systematically max out trust with vendors in Hernand, Demeniss, Delesyia, and other regions, the camp eventually becomes a one-stop shop where nearly every purchasable item in the game is available without leaving Howling Hill. Combined with camp facilities for crafting, cooking, dyeing, and trading, this transforms the camp into a self-sufficient hub that eliminates most return trips to distant settlements.
The in-game item that formalizes a Trade Agreement is called a Supply Contract. When you reach 100 Trust with any external shopkeeper, the option to purchase a Supply Contract appears in their shop interface. Buying the contract permanently adds that shopkeeper's stock to the equivalent merchant at your Greymane Camp. For example, the tailor in Pailune sells the Grey Wolf set, one of the most sought-after armor sets in the game. Once you purchase a Supply Contract from that tailor, the Grey Wolf set and all of their other inventory becomes available from Dedrich at camp. By collecting Supply Contracts from merchants across every region, you consolidate all purchasable goods into one centralized location and never need to make return trips to distant towns.
Supply Contracts
The in-game item that formalizes a Trade Agreement is called a Supply Contract. When you reach 100 Trust with any external shopkeeper, the option to purchase a Supply Contract appears in their shop interface. Buying the contract is done from the vendor's shop, and you activate it by selecting "Use" from your inventory. Once used, that merchant's stock permanently merges into the equivalent camp vendor's inventory.
For example, purchasing a Supply Contract from a provisioner in Demeniss expands Ronnie's food shop at camp with items like Pickled Vegetables, Braised Fish, and Pan-Fried Rice Cakes. Similarly, purchasing a Supply Contract from a tailor unlocks that tailor's armor sets at Dedrich's camp shop. By collecting Supply Contracts from merchants across every region, you consolidate all purchasable goods into one centralized location.
Supply Contracts exist for every vendor category: provisions, equipment, seeds, outfits, and food. Regional contracts are available from Hernand, Demeniss, Delesyia, Pailune, and other regions across Pywel. Each contract permanently adds its vendor's stock to the corresponding camp merchant.
Shared Experiences
The camp provides a space for shared experiences with companions. Cooking meals and eating with Greymane members at the campfire builds trust and can unlock companion backstory missions. Group meals cooked at the camp kitchen also contribute to overall Greymane morale, which affects companion behavior and dispatch mission outcomes.
Camp and the Wider World
The Greymane Camp is located at Howling Hill in Hernand but connects to the wider world through several systems. The Trading Center links the camp to commerce across Pywel. Dispatch missions send companions to locations throughout the continent, and their success can reduce hostile resistance in those areas before Kliff visits them in person.
The camp's growth also affects the player's Hernandian Contribution reputation. This reflects the Greymanes' positive impact on the surrounding region. Note that criminal actions in camp-adjacent towns (stealing, attacking NPCs) result in bounties through the crime system. Wanted players may face hostile NPCs or jail time, so maintaining good standing with local communities benefits the camp's supply lines and reputation.
Pailune Reconstruction
After completing Chapter 7: Homecoming, the faction questline "Reconstructing Pailune" unlocks. This expands Greymane operations northward into their ancestral homeland and introduces large-scale construction projects including the Pailune Council and Pailune Institute. The reconstruction represents the culmination of the camp growth system, transforming the Greymanes from a scrappy band of survivors into a regional power with multiple settlements.
Reconstructing Pailune is the most resource-intensive project in the entire game. The total cost of the reconstruction missions approaches 200,000 silver when all phases are combined, making it critical to maximize income generation throughout the mid-game. This is one of the primary reasons experienced players recommend setting up self-sustaining dispatch loops and church donation investments as early as possible. The resources required for Pailune reconstruction dwarf even the 4th camp expansion tier. Completing the full reconstruction unlocks post-story campaign content tied to the Greymanes' future in Pywel, rewarding players who invested in their camp throughout the journey.
Map Exploration and Mission Destinations
Every location you discover on the world map becomes a potential dispatch mission destination. This means that exploring the fog of war directly expands the number of available missions Ross can offer. The more destinations you unlock, the more variety and specialization you get in the dispatch system.
The fastest way to clear fog of war is to find and ring the eight bell towers scattered across Pywel. Climbing each tower and ringing its bell permanently reveals the surrounding region on your map. Completing all eight towers also finishes the Toll of Pywel questline for the Pororin Forest Guardians faction. Each tower only reveals a moderate area, so you will need most of them to see the full continent.
Beyond bell towers, simply traveling through new areas on foot or horseback also clears fog. Make a habit of detouring through unexplored territory on your way to quest objectives. Each new settlement, manor, or resource site you pass through becomes available for dispatch missions, which means your passive income potential grows every time you take the scenic route.
Camp Progression Timeline
The Greymane Camp first becomes available during Chapter 3 when Kliff and the surviving Greymanes settle in Howling Hill. At this stage, three core features are available: Carl (provisions and the Supply Chest), Ross (dispatch mission management), and the basic facility roster. Chapter 4 introduces the "Daily Life" quest arc, which walks you through farming, ranching, and cooking for the first time.
The best time to seriously invest in camp optimization is the start of Chapter 5. By this point you have enough recruited Greymanes to run multiple dispatch missions at once, the farm and ranch are both operational, and you have explored enough of the map to unlock a variety of mission destinations. Spending an hour or two here setting up a self-sustaining resource loop will pay dividends for the rest of the game, because the passive income keeps accumulating while you tackle story quests and side content.
Chapter | Camp Milestone | What Opens Up |
|---|---|---|
Chapter 3 | Camp established at Howling Hill | Carl (provisions), Ross (dispatch), Supply Chest. First expansion quest begins. |
Chapter 4 | Daily Life quest arc | Farm, Ranch, and Cooking tutorials. First animal catches and crop plantings. |
Chapter 5 | Enough recruits for multi-mission dispatch | Best time to set up the resource loop. Run security, lumber, mining, and food missions simultaneously. |
Chapter 7+ | Pailune reconstruction | Pailune Council and Institute unlock. Camp concept expands into a full settlement. |
Key NPCs
NPC | Role | Location / Notes |
|---|---|---|
Camp expansion leader | Assigns expansion objectives (Grounds of the Sunrisequests). Tracks camp level progression and recruits. | |
Supply manager / Provisions | Manages the Supply Chest. Accepts resource donations to boost camp growth. Retrieves lost items. | |
Freesword manager | Displays available dispatch missions. Shows each freesword's skills and mission assignments. | |
Dispatch coordinator | Handles dispatch mission assignments. Construction specialist with ranching bonuses. | |
Quartermaster / Blacksmith | Buys and sells gear with limited stock. Also sells ammunition and refinement items. | |
Food Shop operator | Sells meals and ingredients. Daily stock rotates. | |
Wagon manager | Handles wagon upgrades and trade route assignments. | |
Side quest giver | Offers quests that unlock pets and color dyes. | |
Trading system introduction | Introduces the Royal Trading system for inter-settlement commerce. | |
Kitchen operator | Sells ingredients, prepared dishes, and recipes. Unlocked by completing "A Rumor at Glenbright Farm." | |
Quartermaster | Gear provisions | Unlocked simultaneously with the Cook after "A Rumor at Glenbright Farm." |
Patch 1.02 Pailune Camp Improvements
Patch 1.02.00 delivered a substantial overhaul to the Greymane camp in Pailune, addressing the long-standing complaint that moving the camp from Howling Hill to Pailune was not worth the hassle. Before the patch, the Pailune layout spread key service NPCs across a wide area, the farm and ranch were smaller, and several vendors would be replaced by unrelated NPCs after certain story quests completed. The update tightens the layout to match the compact feel of the Hernand camp and fixes the vendor swap issue.
Condensed NPC Layout
Patch 1.02.00 moves the Pailune camp's service NPCs closer together so players no longer have to run long distances between a vendor, the blacksmith, the stable, and the seamstress. The new layout is tightly packed in a way similar to the Hernand camp, improving the overall convenience of visiting the camp for daily shop, repair, and crafting tasks. Accessibility of key NPCs has been improved across the board, and travelling between camp services now feels substantially faster.
Expanded Farm and Ranch
The farm and ranch areas at the Pailune Greymane camp have been doubled in size in Patch 1.02.00. This gives players more room for crops, livestock, and the mecha workers that handle the automated resource loop described in the Farming and Ranching section above. The expansion makes the Pailune camp a much more capable production base for food, textiles, and animal products than its pre-patch footprint allowed.
Vendor Replacement Fix
Before Patch 1.02.00, several service NPCs in the Pailune camp would be permanently replaced by different NPCs after completing certain quests, effectively removing their shops from the camp. The patch explicitly addresses an issue where Gunter the equipment vendor, Harry the blacksmith, Brontton the stable keeper, and Lola the seamstress in Pailune would be replaced by different NPCs after a certain quest. After the patch these four NPCs stay at their posts, so their services remain available regardless of story progression.
Is it Worth Moving to Pailune Now?
Prior to Patch 1.02.00, community guides commonly warned players not to upgrade to the Pailune camp, or at least to make a manual save before doing so, because the layout was inconvenient enough to regret the move. With the condensed NPC layout, the doubled-size farm and ranch, and the vendor swap fixed, that warning no longer applies. The move is now substantially more worthwhile for players who have reached the relevant point in the main story and want to relocate their base of operations.
Howling Hill Crafting Stations and Water Well
The camp at Howling Hill contains several small service stations that are easy to overlook but saved significant travel time, particularly once the player is deep into mid-game crafting. They have all been present since well before Patch 1.04, but the patch brought renewed attention to them because several farming methods and gear-improvement routines now assume they are being used.
Well behind the cook NPC. A water well sits directly behind the cook's kitchen station inside the main camp circle. The well is a functional water source and interacts with the infinite-water-farming method associated with Damiane. Players who have set up that method can top up water stacks at the well between other camp errands rather than traveling to a river or a town cistern.
Grindstone and anvil behind the player's sleeping tent. Directly behind Kliff's personal sleeping tent at Howling Hill are a functional Grindstone and an anvil. Both are fully usable without visiting the blacksmith counter: the grindstone sharpens and buffs weapons, and the anvil handles armor improvement. For routine upkeep between expeditions, these stations turn the camp into a self-contained gear maintenance hub without needing to queue at Tranan's vendor dialogue.
Because the well, grindstone, and anvil are map-placed rather than interactable vendor kiosks, they do not count against any shop-trust or inventory limits. They are part of the camp layout as soon as the first expansion completes and remain functional through every subsequent camp tier, including after the Pailune relocation where equivalent facilities appear in the new settlement.
Patch 1.04: Repeat Dispatch Button Split
Patch 1.04 reworked the dispatch confirmation prompt at Ross's Freesword Management Office. The single confirm button that previously sent comrades on a mission now splits into two explicit actions, so the choice between a one-time run and a self-repeating loop is made at the moment of dispatch rather than in a separate toggle menu.
Button | Action | Effect |
|---|---|---|
Square (PlayStation) / F (keyboard) | Dispatch (single run) | Sends the assigned comrades on the Dispatch Missions one time. They return with the reward and sit idle at the Greymane Camp until the slot is re-queued by hand. |
Triangle (PlayStation) / G (keyboard) | Mark for auto-repeat | Locks the assignment into repeat mode. The same comrades auto-re-queue the same mission after every return, drawing from the shared Contribution Points and camp-resource pools on each cycle until the slot is manually cleared or a resource pool empties. |
Default camp-resource missions, the baseline runs that feed camp food, camp funds, wood, and stone pools, are all repeat-eligible. Special-reward dispatches stay single-run: missions that award an Abyss Artifact or another rare bonus will not accept the Triangle or G prompt and continue to expire two to three in-game days after completion, the same as before the patch.
Known bug on camp-beer double-XP multiplier. During the Patch 1.04 build, the double-XP multiplier granted by the camp's beer / ale consumable only applies to the first manual run of a dispatch. Every subsequent cycle queued by the new auto-repeat toggle returns the base reward value only. The clearest in-game example observed at the camp is the Estate Security production dispatch: the first manual run returns roughly 30,000 camp funds with the buff active, while every auto-repeated cycle of the same mission returns roughly 15,000 camp funds. The buff status icon still reads as active, so the repeat cycle is specifically ignoring the multiplier rather than consuming the buff. Until this is patched, high-value dispatches where the multiplier matters should be run in single-run mode and re-queued by hand.
Full control-mapping details, the repeat-eligibility list, and workaround tables for the beer multiplier bug live on the Dispatch Missions article. The summary above covers only the camp-side implications so players do not need to leave the Greymane Camp page to understand how the split affects daily camp routines.
Patch 1.0402: Greymane Contribution Shop
Patch 1.0402 introduced a dedicated contribution-point storefront at the Greymane Camp. The camp provisioner, who also handles donations and lost-item recovery at the provisions station, now maintains a second tab of stock tied to the player's Greymane Contribution total. The new inventory uses contribution points rather than silver and is refunded at full value if the player changes their mind, so there is no risk to experimenting with the set pieces.
Unlike the regular camp vendor rotation, the contribution shop does not refresh on the daily 24 in-game hour vendor cycle. Stock is static per patch, and the items persist between visits until they are purchased. Contribution points required for the shop are earned the same way as other regional contribution currencies: by completing Greymane-linked side activities, faction quests, and dispatch assignments that specifically award contribution.
Current stock (Patch 1.0402). Only two pieces are available at launch of the contribution shop. The full outfit set is not yet complete, so players chasing a coordinated look should plan on partial use until further pieces are added.
Item | Cost (Contribution Points) | Resell Value |
|---|---|---|
Greymane Cloth Armor (chest piece) | 6 Contribution Points (sell-back matches the purchase price) | |
Greymane Cloak | 7 Contribution Points (sell-back matches the purchase price) |
Both pieces appear in the shop tab under the provisioner's dialogue after Patch 1.0402 has been applied. Maxing vendor trust with the provisioner does not unlock additional outfit pieces at this time, so the remaining slots (head, gloves, boots) are expected in a future content drop rather than as a hidden trust reward.
Because the sell-back price is identical to the purchase price, players can freely rotate the chest and cloak in and out of inventory without losing contribution value. This is useful when swapping between the Greymane outfit and a combat set for liberation runs, or when stocking Kuku inventory for travel.
Camp Pets Wandering
After the Patch 1.04 pet-system overhaul, tamed Pets that are not currently summoned no longer vanish into an inventory menu between uses. Any pet the player has reached full trust with will now passively wander around the Greymane Camp, picking positions on their own and slowly repositioning over time. The wandering applies regardless of species, so the camp at Howling Hill can easily have several cats, dogs, and birds visible on any given day once the player has built up a roster.
Pets keep whatever equipment they were last wearing. A Husky that was given armor during an earlier adventure will show up around the camp still wearing it, and any cosmetic collar or bandana applied through the pet shop remains visible. This makes the camp double as a living show for the player's full tamed-pet collection without needing to cycle through the pet menu to confirm a specific outfit is still assigned.
The wandering behavior reacts to weather. When rain starts, cats in particular will reposition to sheltered parts of the camp such as under tent flaps or against walls rather than staying out in the open. Dogs and larger pets are more tolerant of weather and tend to stay near pathways and the central fire pit regardless of conditions. Pets do not block doorways or interactables and will step aside if the player walks through their current spot.
This behavior is passive-only and does not replace the companion summoning menu. Pets still need to be actively summoned from the inventory pet tab to follow the player out of camp on expeditions, collect loot in combat, or benefit from their skill-based perks. The wandering is a visual and roleplay feature that complements the Companions system rather than replacing it.
Patch 1.0402: Furniture Persistence Through Camp Changes
Patch 1.0402 fixed the long-standing issue where expanding the Greymane Camp or relocating it to Pailune would wipe previously placed furniture out of the player's house. Decorations in the personal residence are now preserved through camp changes, so players can invest in furnishing the Howling Hill house early without losing that progress later in the story.
On camp expansion. When the Greymane Camp advances through an expansion tier, any furniture the player has already placed in the residence stays exactly where it was. Earlier versions of the game returned placed furniture to storage on every expansion completion, which discouraged decorating the house before the final expansion. That retrieval step is gone in Patch 1.0402, and placed items persist through every camp tier from the first expansion onward.
On housing-mode layout changes. If the player enters housing mode and alters the house layout itself (moving walls, changing room configurations, or switching between layout presets), furniture that no longer fits the new layout is moved to the house's placement storage rather than being deleted. Once the layout change is committed, the stored furniture remains available to re-place at any time. This applies only to furniture that conflicts with the new layout: items in unchanged rooms or unaffected surfaces stay where the player put them.
On Pailune relocation. When the storyline relocates the camp from Howling Hill to the rebuilt settlement at Pailune, furniture placed in the old house is now moved with the player to the new house rather than being dropped from the world. The exact position inside the new residence may change to fit the Pailune layout, but every piece is accounted for and ready to be re-placed or picked up from the new house's storage. Before this patch, players were commonly advised to manually collect and re-place everything prior to relocating, which is no longer necessary.
This furniture-persistence behavior applies only to the player's own house within the camp. Decorations tied to camp-wide donation rewards (the statues, banners, and structural improvements that appear as overall donation level rises) continue to update based on the camp's tier and do not sit in personal house storage.
See Also
Greymane Camp
Blacksmith
Crafting
Cooking
Commissions
Tips
Always have a dispatch mission active. Passive resource earning is free and accumulates while you do other things. Check back with Ross regularly to launch new missions as old ones complete.
Complete A Rumor at Glenbright Farm early. This unlocks both the Cook and Quartermaster NPCs simultaneously, giving you access to food purchases and prepared meals.
Prioritize recruiting Greymanes with the Builder skill. Construction missions cannot be completed without it, and Builder freeswords are needed for every camp expansion.
Donate resources to Carl's Supply Chest to accelerate camp growth. Surplus materials from dispatch missions can be donated directly.
Finish the Timberturner Wainwright missions to unlock and upgrade the Wagon, which enables profitable trade routes between settlements.
Save up Armaments for later expansions. The 3rd and 4th expansions require 1,000 and 1,500 Armaments respectively, which takes significant accumulation.
Keep wagons on roads. Wagons are extremely fragile and break if driven over rough or hilly terrain. If a wagon breaks, you must build a new one from scratch. Always stick to established roads when transporting trade goods.
Unlock Contribution Workers as soon as possible. Clearing the Flame Knights questline for House Azerian grants the Seal of Devotion, which lets you hire civilian workers to fill dispatch slots. This frees your skilled comrades for missions where their expertise provides meaningful bonuses.
Do not skip the Scattered Embers quests. These faction quests serve as the game's hidden tutorial system. Skipping them means missing explanations for core mechanics like dye crafting, horse racing, wagon stealing, gambling, and the bounty system. Starting them early saves you from confusion in the mid-game.
Run counterbalancing dispatch missions. Pair missions whose outputs fund each other's inputs. A food-producing mission paired with a silver-producing mission that costs food creates a self-sustaining loop that runs indefinitely without additional donations.
Build vendor trust early. Greet camp vendors and external merchants daily. Maxing trust to 100 with external vendors triggers Trade Agreements that make their goods available at camp, eventually turning Howling Hill into a one-stop shop for nearly every item in the game.
Set up the resource loop early. At the start of Chapter 5, configure two escort/security missions for income and three resource missions (lumber, mining, food) funded by that income. Let them auto-restart and collect from the Supply Chest periodically.
Invest in church donation boxes. Donating silver to the church in each region permanently boosts dispatch rewards there. Once you reach the 100% Conversion Bonus threshold (around 110,000 silver in total donations across Hernand), all dispatch missions originating from that region permanently double their rewards. This applies to every mission type: escort, farming, mining, logging, and production missions all yield twice the normal output. Hernand is the best region to invest in first since most early missions originate there. Investing in all regions eventually doubles every mission reward in the game, which is why experienced players prioritize building silver income early and funneling surplus into church donations before spending on other upgrades.
Build the Farm before the Ranch. Crops take 3 to 4 in-game days to grow. If you start the Farm construction first, your first harvest will be ready around the time the Ranch finishes building.
Keep a 4-to-1 hen-to-rooster ratio. This maximizes egg production at the Ranch. Eggs are cheap to cook into Hearty Smoked Eggs (200 Health heal), making them a reliable food source through the mid game.
Ring bell towers as you travel. Each tower clears fog of war, and every new location discovered on the map becomes a potential dispatch destination. More destinations means more mission variety and better resource options.
Level up comrade skills rather than spreading recruits thin. One comrade with a Level 3 matching skill gives +60% on dispatch missions. Three comrades with Level 1 still only give +10%. Focus skill training on your best dispatchers.