

World Map and Exploration
How exploration works outside Dagsion in Fire Emblem: Fortune's Weave, covering world map movement and its cost in turns, regions only some Heroes can reach, town visits, random Skirmishes, and the overworld functions unique to each of the four Heroes.
On This Page
Outside the walls of Dagsion, Fire Emblem: Fortune's Weave opens onto a world map covering areas across the continent of Dagda. Time passes every time you move, so expeditions have to be planned rather than wandered into. Towns sell local wares and hold information worth gathering, allies who travel with you get better at fighting, and enemies turn up on the map at random.
Movement and Its Cost
Every move spends time, which is what turns the map into a planning problem instead of free roaming. Nintendo's own instruction is to plan your expeditions carefully.
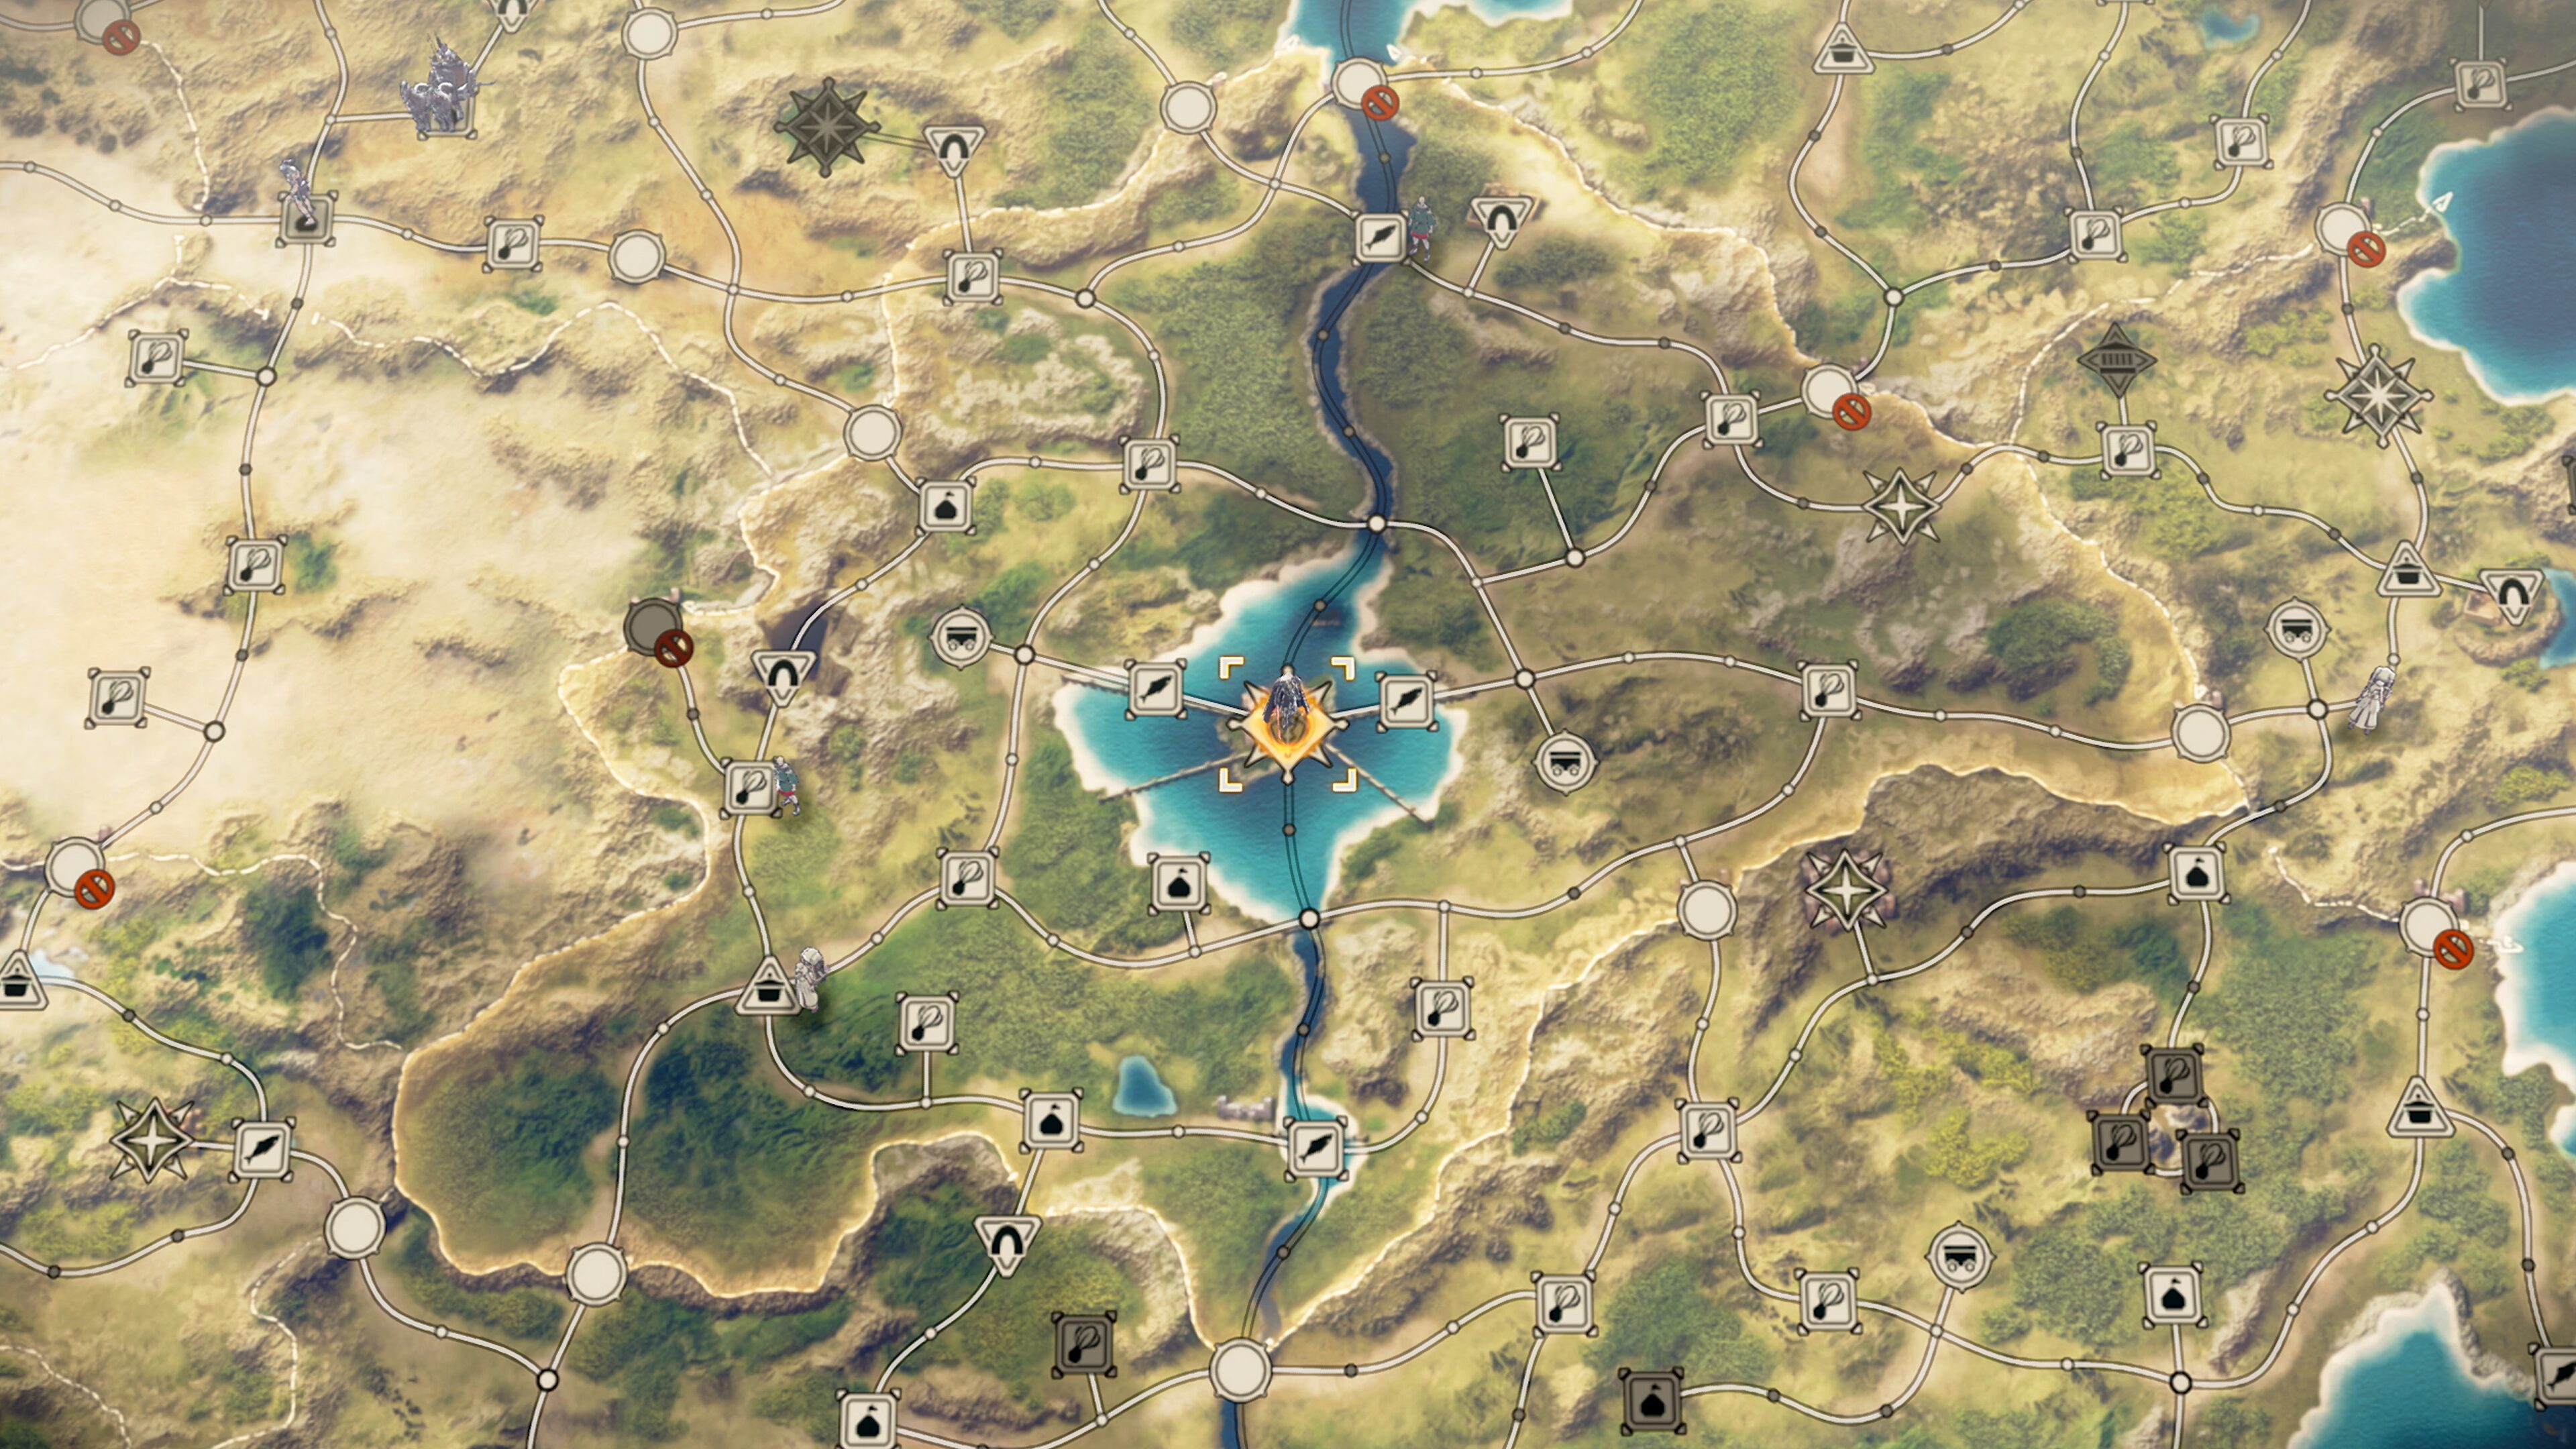
Guides and reviews written from the finished game give the numbers Nintendo's presentations left out. Each in-game day is split into four six-hour blocks, each one a turn, and a turn moves the party about three dots along the road network. The clock only advances when an action costs a turn. Roads open progressively, so early trips creep outward before the network widens sharply, and some checkpoints refuse passage while your Renown level is too low. Carriage stops, once reached, let you cross known ground in fewer turns. One pre-launch account framed a whole free period as roughly seventy in-game days, which is the scale the movement cost has to be weighed against.
Two things about that cost have been filled in since by writers working from the finished game. Desert ground is slower going than the rest of the map, so a route that crosses one costs more turns than its length on screen suggests. And the carriage network is not the only shortcut: the temples are linked to each other by portals, which gives a second way of covering ground already crossed. Carriage travel itself is bought at a posthouse, which is what the stops marked that way on the map are for.
The map also forgives a late departure. When a free stretch ends, the game carries the party to the next main mission from wherever it is, as long as that mission's location has been visited at least once; a green checkmark beside the deadline on screen confirms it. Most main missions take place in Dagsion itself.
Previews also describe the map surface itself carrying information: icons flagging gathering points for things like vegetables and fish, red markers where you cannot pass, and border crossings that can trigger a check by guards.
Towns
Visiting a town lets you purchase local wares or gather information that could prove useful on the road. Shops outside the capital carry their own stock, and previews describe towns as a source of rumors pointing toward quests and places worth the detour. Not every visitable location is out on the map. Anatolia keeps a fortune-telling shop inside the capital that the player can walk into, which belongs to the Dagsion hub rather than to the world map.
Travelling With Allies
Taking allies along improves everyone's abilities in battle, so a march across the map doubles as training for the units that come with you.
Skirmishes
Enemies appear on the world map at random. Touching one starts a Skirmish, which plays out with the tactical rules of an ordinary battle, and felling your foes earns experience points. Previews describe Skirmishes as marked by red enemy icons and as simpler affairs than assigned battles or main story fights, which makes them a convenient way to bring newer units up to level.
Travel as an Objective
Movement is not always something you choose. At least one objective from the pre-launch build reads "depart for the Isle of Sorrows", which makes crossing the map the task itself rather than the trip out to a fight. It sits in the month before a numbered qualifier, so the schedule of the Heroic Games and the travel clock are the same clock: time spent reaching the Isle is time not spent training or gathering.
The Isle of Sorrows is the first named destination tied to a travel objective. As of September 2026 this wiki has not documented what is there, so it is recorded here as an objective string and a place name.
Hero Commands
Each of the four Heroes can use abilities on the map that are unique to them. Nintendo detailed two of the four in its presentation, and guides written from the retail game have since described all four.
Hero | Overworld Command |
|---|---|
Answerer's Cry, named after the sword Answerer he carries, flushes out hidden enemies and summons skirmish battles on the map. Enemies in those battles drop Magic Echo Stones, which strengthen combat arts and pay for teaching them to others | |
Recruits soldiers in towns to form Battalions, then sends the assembled troops out to gather materials or deploys them in battle. Her ship also lets her sail waters the others cannot reach in Part I | |
Captures animals that eligible characters can ride, and picks up mounted abilities. His route's functions are the Stable, Farming and Lure | |
Stages performances in towns that pay out gold, items and Renown and build a repertoire of songs used to buff allies. Some Perform Quests also open up new locations on the map |
Which route you are on also changes what the map offers. Previews describe per-Hero quirks that open or close activities, and report Dietrich receiving challenge letters from named strong warriors, with a win teaching a special combat art he can then pass on to others.
Dungeons
Dungeons sit out on the map alongside towns and gathering points. They hold materials for strengthening weapons along with other treasures, and the fights inside them run on a different system from the tactical battles fought above ground. Dungeons and Clashes covers what happens once you step inside.
Gathering Points and Materials
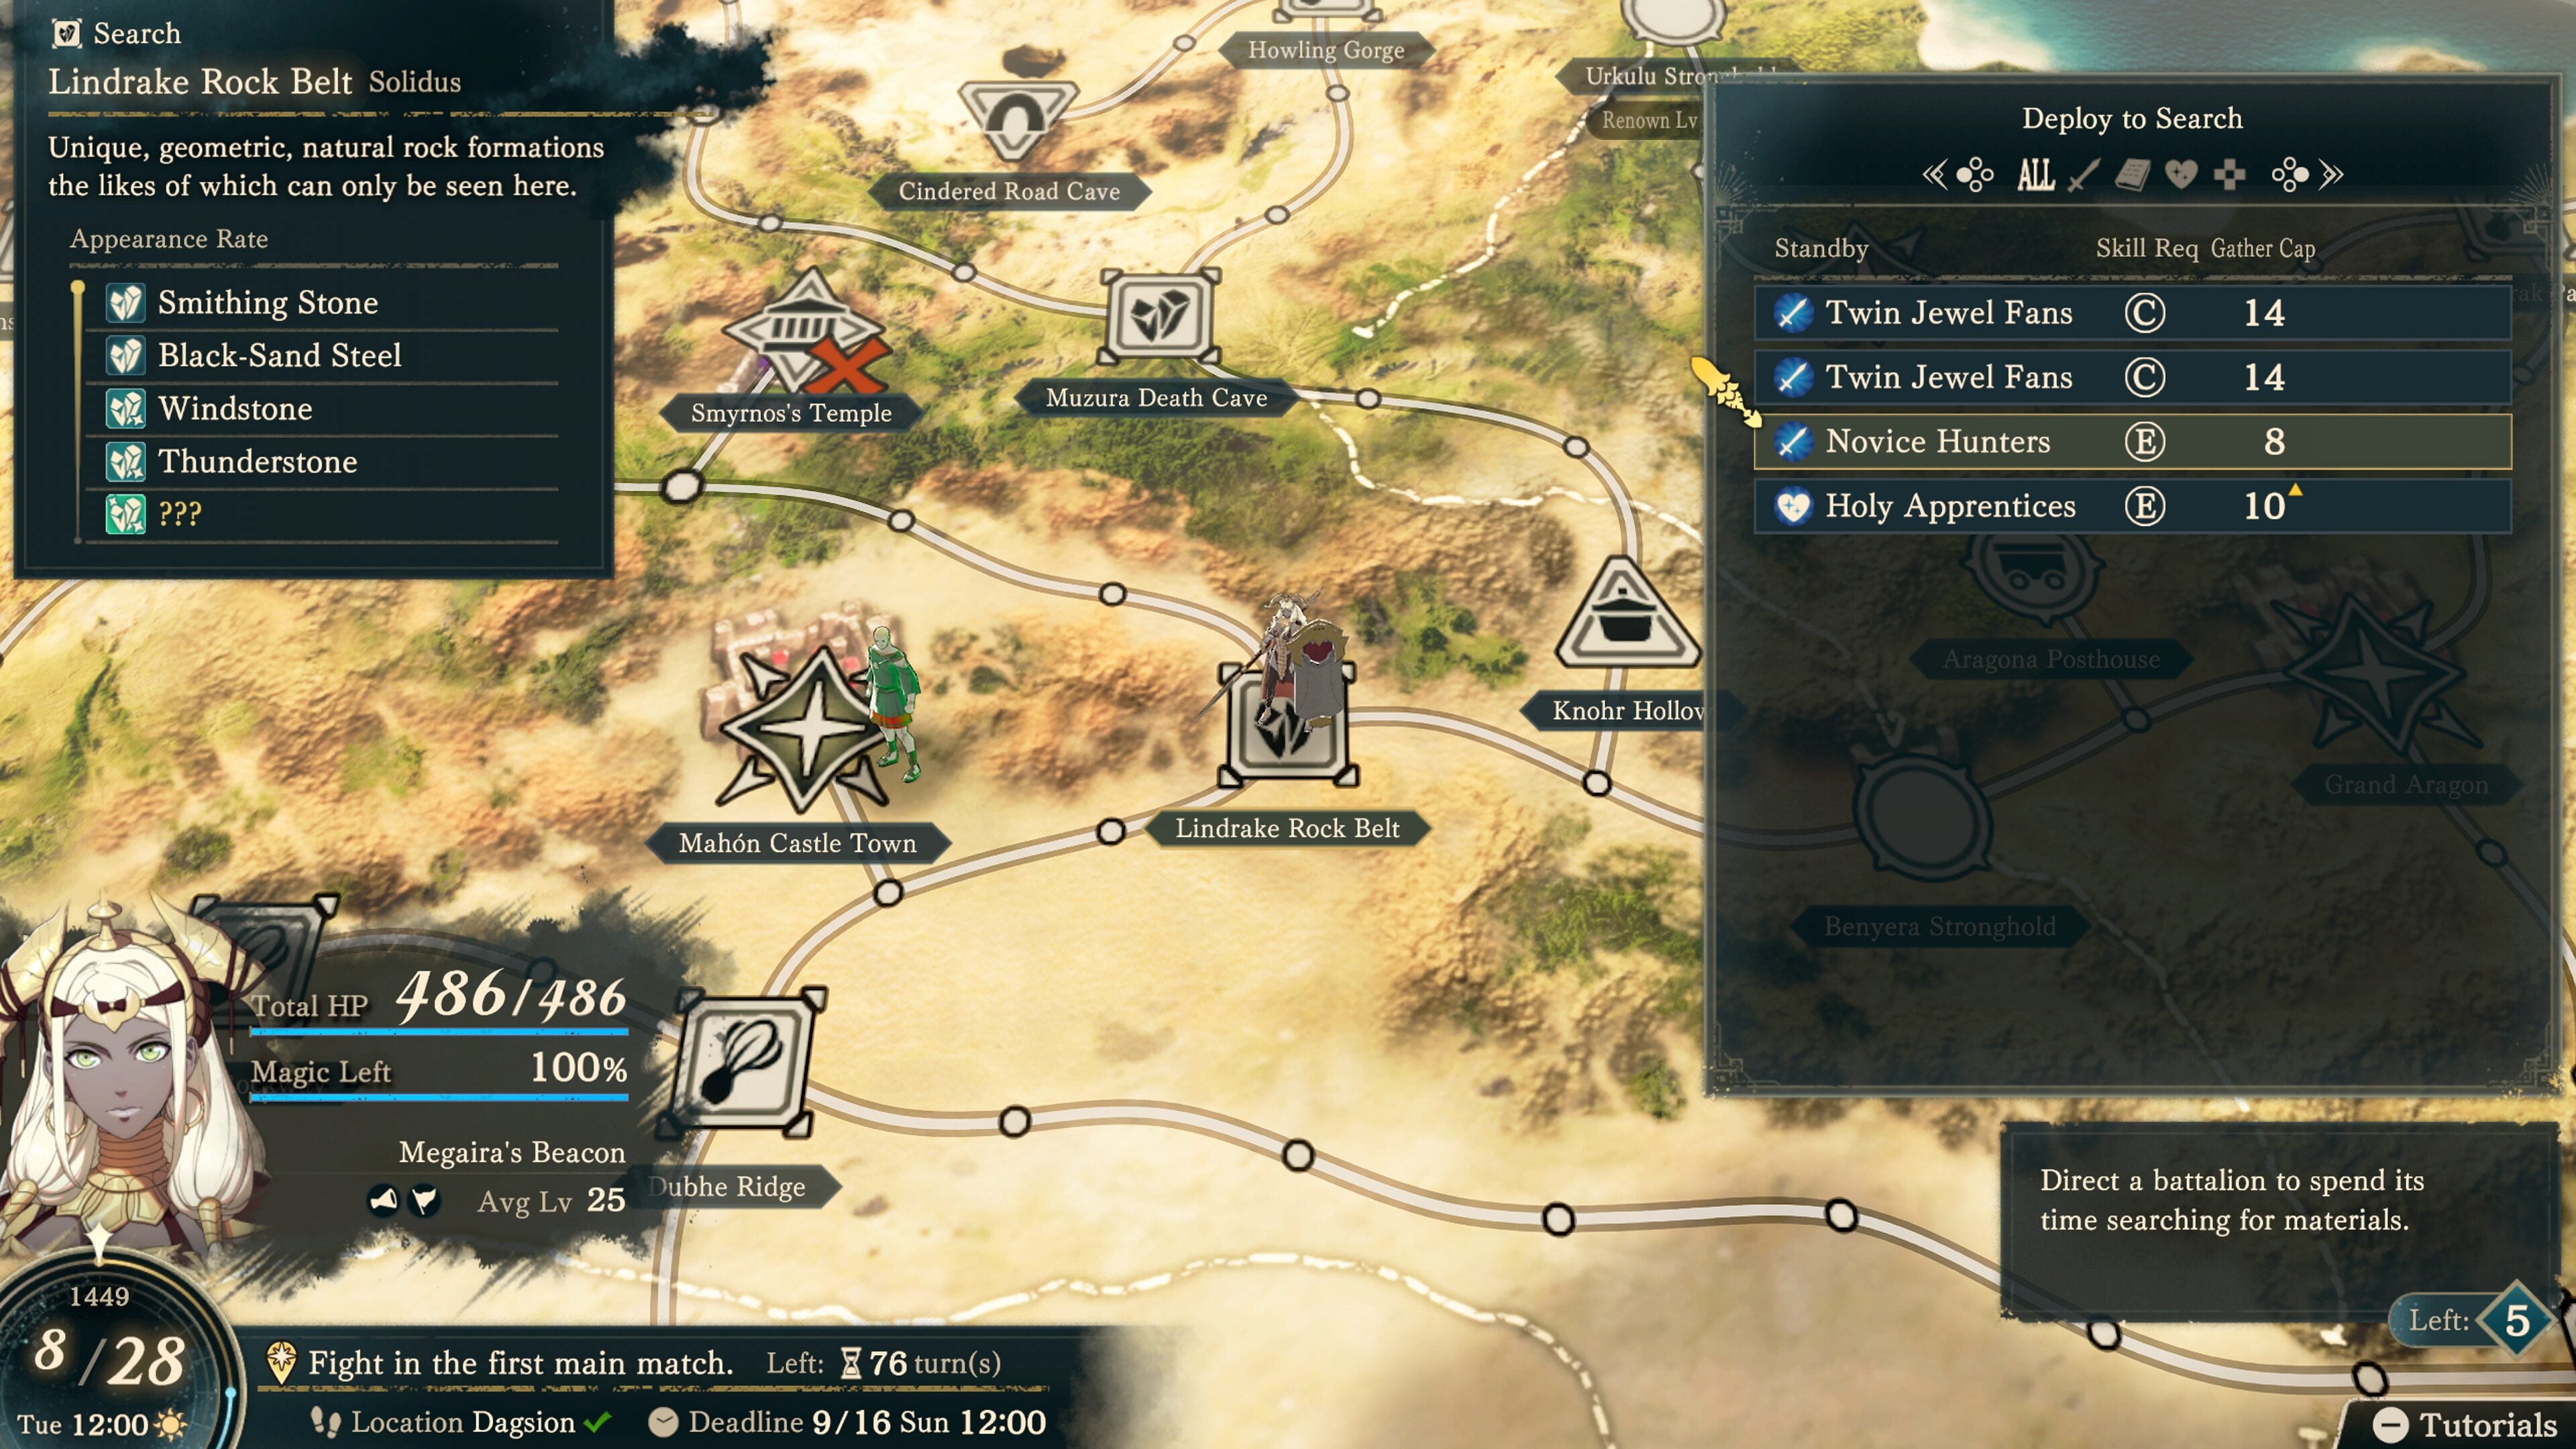
Selecting a gathering point opens a Search panel that names the site, gives it a short description and lists what it can yield with an Appearance Rate bar beside each entry. The Lindrake Rock Belt is the worked example from pre-launch footage. It is filed under Solidus and described as "Unique, geometric, natural rock formations the likes of which can only be seen here." Its list runs Smithing Stone, Black-Sand Steel, Windstone and Thunderstone, with a fifth entry still masked, so a site's rarest yield can stay hidden until you have worked it.
Material | Where It Has Been Shown |
|---|---|
Smithing Stone | Lindrake Rock Belt, highest appearance rate of the four named |
Black-Sand Steel | Lindrake Rock Belt |
Windstone | Lindrake Rock Belt |
Thunderstone | Lindrake Rock Belt |
Battalion Search Deployments
A battalion does not have to travel with the party. The Search screen carries a Deploy to Search panel that sends one out to gather on its own, under the instruction "Direct a battalion to spend its time searching for materials". Each battalion on standby lists a Skill Req letter grade and a Gather Cap number, and a filter row across the top narrows the standby list by type. A separate counter tracks how many deployments are left. The published figures are Novice Hunters at Skill Req E and Gather Cap 8, Twin Jewel Fans at C and 14, and Holy Apprentices at E and 10, the last of those shown boosted above its base value. Battalions themselves are covered on Combat System.
Named Places on the Map
These locations have been read off pre-launch map footage. They sit on the road network alongside the gathering points, carriage stops and blocked crossings described above.
Place | Type as Shown |
|---|---|
Mahón Castle Town | Settlement |
Grand Aragon | Settlement |
Lindrake Rock Belt | Gathering point |
Cindered Road Cave | Cave |
Muzura Death Cave | Cave |
Knohr Hollow | Cave |
Howling Gorge | Landmark |
Dubhe Ridge | Landmark |
Urkulu Stronghold | Stronghold, gated behind a Renown level |
Benyera Stronghold | Stronghold |
Aragona Posthouse | Carriage stop |
Smyrnos's Temple | Temple, marked closed in the footage |
The party readout in the corner of the map screen tracks the travelling group rather than a single unit. Megaira's Beacon appears there with a Total HP bar reading 486 of 486, a Magic Left percentage and an average level, which is how the map screen shows whether a party is fit to take a fight before you walk into one. The date, weekday, clock and objective deadline sit along the bottom edge on the Dagdan Calendar, with the remaining turn budget beside the objective.
Regions With Their Own Rules
Dungeon listings from the retail game place locations in regions including Saveilon, Amalthea, Nysiades, Thaleia, Idyia, Solidus, Lambath, Pasithea, Castalia, Elektra, Braxithea, Melias and Ogmios, with the Danann Sea and the Lir Sea offshore, and a separate guide covers the Solomon region. Not every Hero can reach every region in Part I, and Cai's route is the most restricted, with no access to the western desert or to the sea.
Region | Who Can Reach It in Part I | How Travel Works There |
|---|---|---|
Nysiades Desert (west) | Everyone except Cai | One-way red paths appear temporarily and move the party one or two nodes instead of the usual three. A permanent route links Gorbea Stronghold Ruins and North Zorto Stronghold from Tarvos North and South Road, and a green shortcut to Baina Oasis opens after the first crossing |
Lir Sea (north, western side near Niiza Port) | Theodora freely; Dietrich only in Chapter 8 | Theodora's ship can sail it at any time. Dietrich goes out only during Chapter 8, Cetus the Sea Tyrant, using Answerer's Cry to find the sea beast; Cai and Leda have no ships in Part I |
Solomon (south east, across the Danann Sea) | Theodora only | Desert-style one-way paths, and only Search Points to be found |
Exploration Across Routes and Parts
Map progress is kept between routes. Once a Hero's Part I route has been completed, a route started afterwards begins with the world map as far explored as it was, including dungeons, secret paths and hidden towns already found, and replaying a completed route from Chapter 1 carries the exploration over the same way. Starting a second route before the first is finished does not.
Part II has no free time and no world map exploration at all. The map returns in Part III, when its cities, carriage stops and temples all need repairing with materials, a job that takes a set number of turns per location. The army can split into squads that each move once per turn, two at first and up to five by the Fifth Section; Eshmel stays in Dagsion and joins battles from there.
Related Pages
The continent this map covers is described on Dagda, and the capital you set out from is Dagsion. Time spent travelling comes out of the same free stretch as the city activities on Between-Match Preparation.