Loading...
Loading...
Prebuilt Structures
April 27, 2026 at 02:01 PM
Rebuilt variants table with 3 entries (image, build cost, comfort)
Prebuilt Structures are full building blueprints that place in one click. Instead of snapping Walls, Floors, Roofs, and pillars one tile at a time, you pick a prebuilt shape, pay its lump-sum material cost, and drop a complete shelter or pier onto the ground in a single placement.
Windrose currently ships with three prebuilt structures: the Hut, the Hut Frame, and the Large Pier. All three sit in a dedicated Prebuilt Structures section of the Building Panel and all three drop at the starter material tier. They are designed to take a brand new player from naked-on-beach to stations-up-and-running inside the first hour.
Prebuilt Structures are one of the fifteen main categories in the full Base Building system, alongside the individual Building Pieces that make up the rest of the build menu. Blueprints and manual pieces share the same grid, the same material-refund rules, and the same Bonfire radius check, so you can mix the two freely: stamp a Hut, then extend a custom Settlement Building around it.
Open the Building Panel with the B key. The panel splits pieces into fifteen categories across the top (Walls, Floors, Roofs, Pillars and Beams, Doors and Doorways, Windows, Stairs, Fences, Farming, Cornices, Fireplaces, Piers, Decorations, Stockades, and Prebuilt Structures). Select the Prebuilt Structures tab to see the three blueprints laid out as large preview cards.
Hover a blueprint card and the full material cost appears in a tooltip. Selecting the card locks the blueprint to your placement cursor, which immediately shows a ghost preview of the whole structure at the cursor location. Green means the piece will place as-is, yellow means the ground is uneven but placement will still succeed, and red means either the footprint is blocked, the terrain is too steep, or you are short on materials. Confirm placement with the usual left-click.
The placement preview rotates with the scroll wheel. You can spin the whole structure in 90-degree increments before committing, which is the only shape adjustment the blueprint allows. There is no way to stretch, resize, or reshape the blueprint; the footprint is fixed.
Exact material costs for prebuilt structures vary across community databases and in-game builds because the game is still in Early Access and numbers have shifted between patches. The table below uses the costs most commonly reported by players and lists ranges where sources disagree. Always double-check the in-game tooltip on your current patch before committing materials.
Blueprint | What It Places | Material Cost |
|---|---|---|
Hut | A complete one-room shelter in the leaf-and-stick starter tier: floor, four walls, a door, and a roof, all dropped as a single prefab. | Wood and Plant Fiber in the low-tens range (community reports vary between about 20 Wood + 30 Plant Fiber and a rough 200 fiber total for the small prebuilt shack; treat as an approximate early-game cost) |
Hut Frame | The structural skeleton of a hut: floor, pillars, and roof only, with no walls. Designed for players who want to swap the wall tier manually. | Plant Fiber x56 (community-reported figure; drops at the starter tier) |
Large Pier | A full dock layout extending several tiles out over the water: pier piles, pier flooring, and a finished pier cap, all snapped into position in one click. | Wood in the low-tens range (community-reported cost; roughly the same as placing the 10 to 15 individual Piers pieces manually but paid as a single lump sum) |
All three blueprints drop at the cheapest material tier the game offers. The Hut looks like a leaf-and-stick starter shack, the Hut Frame shows plain wood pillars and a thatch-roof skeleton, and the Large Pier uses basic plank piles and deck boards. Upgrading the visual style is done by demolishing individual pieces and rebuilding them in a higher tier, not by placing the blueprint in a different material.
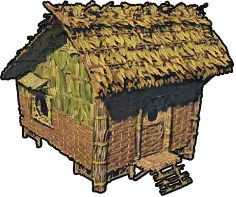
The Hut is the all-in-one starter shelter. One placement drops a small, square, fully enclosed room with a single door, four walls, a pitched roof, and a solid floor. It is aimed at players who want a shelter that just works without learning the snap rules for walls and roofs.
Because the Hut ships with a roof, it satisfies the Shelter tag for every covered crafting station, so you can drop the Workbench, Alchemy Table, Weaponsmith Workshop, Armor and Clothing Workshop, and Millstones inside it and all of them will register as powered and usable. Combined with a bonfire placed inside, the Hut is the fastest path from landed on beach to crafting is online.
The downside is footprint: the Hut is genuinely small, so fitting four or five stations, a couple of chests, and a bed inside it gets cramped fast. Most players use the Hut as a first-night shelter for the first day or two, then extend it by snapping extra floor tiles off one edge and building a second room manually alongside it.
The Hut Frame is the structural skeleton of a hut without the walls. You get a floor, the pillars that would support the walls, and a roof over the top, but the walls themselves are absent. This sounds less useful than the full Hut at first, but the Hut Frame is actually the most popular blueprint among players who plan to live in their base for more than a day.
The reason is the upgrade path. Walls are the most visible part of any building, and starter-tier leaf walls are also the weakest (750 HP) and the ugliest. By stamping a Hut Frame instead of a full Hut, you pay for the floor, pillars, and roof at the cheap tier (56 Plant Fiber per the community-reported figure) and then place the walls yourself in whatever material you already have unlocked: Sticks, Planks, Clay, Stone, or whatever higher tier you have a plan for.
The Hut Frame also satisfies the Shelter tag for covered stations the moment you drop it, because the roof is already in place. You can even leave the walls off entirely for the first few hours and still use the stations underneath; the roof is what the stations check for, not the walls. Once you are ready, snap the first plank or stone wall into the gap between pillars and the Hut Frame visually transitions from raw skeleton to finished cottage.
This is the blueprint that the strongest early-game builds tend to use. Stamp one, place your Bonfire in the middle, ring the walls with chests, and squeeze your workbench, weaponsmith, armor bench, and alchemy table along the remaining walls. You can upgrade wall by wall over the next several in-game days without ever needing to demolish the roof or pillars.
The Large Pier is the time-saver for waterside bases. Manually extending a pier out over water means placing a pier pile piece, snapping a floor tile to it, placing another pile off the floor edge, snapping another floor to that, and repeating 10 to 15 times until the dock reaches usable water depth. It is the single most tedious phase of Piers construction and is the main reason new players skip building ships at all.
The Large Pier blueprint collapses that entire process into a single placement. One click drops a full dock: a row of pier piles driven into the seabed, a deck of plank flooring across the top, and a finished pier cap at the end. The cost is paid in a single lump sum, and the whole structure snaps into the correct orientation relative to the shoreline when you drop it.
The layout is fixed, which is the main trade-off. If you want an L-shaped dock, a T-shaped marina, or a pier with a custom-width dock for a specific ship, you still have to build it manually out of individual pier pieces. But for the common case of I just need a dock long enough to moor a sloop, the Large Pier is the correct answer every time.
After placement, each individual pier piece can be demolished and replaced the same way the Hut Frame's pieces can. Many players use the Large Pier as the spine of a bigger custom dock, then extend it sideways with manual pier pieces to add branch docks for each ship.
The decision between a prebuilt blueprint and manual placement comes down to flexibility versus speed. Blueprints are strictly faster and strictly less flexible. The table below covers the practical differences.
Aspect | Prebuilt Blueprint | Manual Placement |
|---|---|---|
Time to build | One click per structure | Dozens of individual placements for a hut or pier |
Shape flexibility | Fixed layout; cannot adjust size or footprint before placement | Fully flexible; any footprint, any pitch, any pillar spacing |
Material tier | Always the cheapest tier (leaves, sticks, starter wood) | Any unlocked tier: Sticks, Planks, Clay, Stone, Mahogany, and beyond |
HP pool | Starter-tier pieces cap around 750 HP each | Depends on tier: 750 HP starter, 1,500 HP mid, 2,500 HP late |
Plan requirement | Base three unlock by default; additional decorative prebuilts sold at Tortuga faction vendors | Higher-tier pieces require reading a plan first |
Demolition refund | 100% refund per individual piece after placement | 100% refund per individual piece after placement |
Best use | First-night shelter, forward outpost, pier-heavy waterside base | Permanent base, fortress, multi-story estate, custom layout |
The general rule: use a blueprint for your first shelter and your first pier, then switch to manual placement for anything that is going to be permanent or visible. Most late-game screenshots you see from the community are manual builds, because the customization options (material tier, footprint shape, roof pitch, window placement) simply are not available through the blueprint system.
Prebuilt structures follow the same snap and terrain rules as individual building pieces, plus a few that are specific to the blueprint form.
Terrain leveling: The Hut and Hut Frame prefer flat ground. On steep slopes the preview turns red because the floor cannot seat cleanly. Drop a Basements and Foundations first to level the ground, then stamp the blueprint on top.
Water edge for the Large Pier: The Large Pier must start at the shoreline. The near end of the pier needs to sit on solid ground or a foundation at the water's edge; the rest of it will extend out over the water automatically. If the preview stays red at the shore, you are either too far inland or the water is too deep at that spot.
Bonfire range check: Like every building, a prebuilt structure only powers its crafting stations if those stations sit inside a Bonfire radius. A Hut with stations inside but outside a bonfire's reach is a hut with useless stations. Always drop the bonfire first and stamp the blueprint beside it, not the other way around.
Rotation: Scroll wheel rotates the preview in 90-degree increments. Aim the door toward your bonfire and your chests so that foot traffic flows naturally between them, not through a wall.
No mid-air placement: Prebuilt structures cannot float. The Hut and Hut Frame need ground or foundation contact under every support pillar; the Large Pier needs shore contact at its near end. There is no way to drop a Hut on top of a cliff face or over a chasm without building a foundation platform first.
Blueprints always drop at the starter tier, which is great for the first hour and a liability for anything that has to survive a raid. The standard upgrade pattern turns a leaf-and-stick Hut into a proper plank or stone cottage without ever leaving the original footprint.
Step | What to Do | Why It Works |
|---|---|---|
1 | Place a Bonfire first, then stamp the Hut or Hut Frame near it. | Every wall the blueprint drops must sit inside the bonfire radius or crafting stations inside will not register as powered. |
2 | Drop your starter Craft Stations under the prebuilt roof. | The Hut and Hut Frame both satisfy the roof requirement for covered stations like the Alchemy Table, Weaponsmith Workshop, and Millstones without needing you to snap pillars and roofs by hand. |
3 | Demolish individual walls one at a time. | Every piece from a blueprint is still a normal building piece once placed, so middle-mouse Destroy Mode removes them individually and refunds 100% of the materials. |
4 | Rebuild each removed piece in the next material tier up. | Starter leaves become Sticks or Planks Walls as soon as you have the Wood and plan. The footprint and pillars stay in place, so alignment never breaks. |
5 | Extend outward by snapping new pieces onto the blueprint's edge. | The Hut and Hut Frame snap at their floor edges like any other Floors piece, so a second room can be attached by dropping floor tiles off one side and walling them in. |
The key insight is that a prebuilt structure is not a locked-in shape once placed. It is just a shortcut to a specific arrangement of normal building pieces. Every piece inside the Hut, Hut Frame, and Large Pier can be demolished and rebuilt the same way any other piece can, so your prefab becomes a growing, evolving base rather than a temporary toy.
All three prebuilt structures refund 100% of their materials when demolished, the same as every other building piece in the game. There is no penalty for using a blueprint as a prototype: if the layout does not work, destroy it, pick up the materials, and try again in a different spot.
Demolition is piece-by-piece, not structure-by-structure. Open the Building Panel with B, click the middle mouse button to switch into Destroy Mode, and click each piece you want to remove. The Hut and Hut Frame deconstruct into their individual walls, pillars, floors, and roof tiles, each refunded separately. The Large Pier breaks down into the 10 to 15 pier piles, floor tiles, and cap that composed it.
There is one catch: demolished materials go into your inventory first, and any overflow drops to the ground at the demolition site. If your pockets are full when you start tearing down a Hut, the plant fiber and wood will pile up in a loot stack where the piece used to stand. Pick it up before leaving or the materials despawn on the normal loot timer.
All three of the base prebuilt structures (Hut, Hut Frame, Large Pier) are available from the moment you open the Building Panel on a new character. You do not need to loot a plan or raise reputation with any Factions to access them; they are built into the default starter kit.
Higher-tier prebuilt options, including decorative canopy pieces and pier-side stalls, are sold by the Provisioner NPCs attached to each major faction at Tortuga. Reaching Reputation Level 3 with a faction typically unlocks their building-plan tier, and higher levels unlock more decorative and faction-themed options. These are not blueprints in the same prefab sense as the Hut, but they are the closest thing to additional prebuilt options the game currently offers.
The Steam community has been asking the developer for more prebuilt structures since Early Access launch, and the request is on the visible roadmap discussion, but no additional blueprints have shipped in the current patch. Plan around the three that exist today.
A common source of confusion: the Tent is not listed under Prebuilt Structures. The Tent is a craftable deployable from the Craft Stations category, costs 10 Plant Fiber and 4 Wood, and serves as a save point rather than a shelter. Prebuilt Structures do not set your respawn point; only a Tent does. Most camps benefit from both: a Hut Frame for the roof check and the crafting stations, plus a Tent alongside it to anchor respawn.
If you are setting up a forward camp near a boss arena or a Points of Interest you plan to repeatedly raid, the correct kit is a bonfire, a tent, and a small Hut or Hut Frame for covered crafting. All three are cheap enough to stamp and abandon once the raid is complete.
First-night shelter: Stamp a Hut on the starting beach with a bonfire inside. Three of the earliest stations (workbench, cooking fire, chest) fit comfortably and the walls keep predators out until you can upgrade.
Permanent starter base (recommended): Stamp a Hut Frame instead of a Hut. You get the same roof coverage at the same cost, but you control the wall material and can upgrade wall-by-wall as planks, clay, and stone come online.
Waterside outpost: Pair a Hut Frame on solid ground with a Large Pier at the shoreline. The frame covers the crafting stations and the pier gives you a dock for the Sloop or Brig without the 10-to-15 placement grind of a manual dock.
Forward raid camp: Stamp a Hut at the edge of an enemy point of interest. It is cheap enough to leave behind when you move on, and it satisfies shelter, roof, and bonfire-range requirements if you drop a bonfire inside it.
Pier extension: Use the Large Pier as the main dock spine, then manually snap additional pier pieces off the sides to create branch docks or a wider marina for a fleet of ships.
Prototype before committing: Stamp a Hut to test how a spot feels before building a fortress. Walk around, check the sightlines, see where the sun rises. If the spot does not work, demolish for full refund and try somewhere else.
Stamping the blueprint before placing the bonfire. The Hut's crafting stations will look installed but will not register as powered if they fall outside the bonfire radius. Always place the bonfire first.
Expecting the shape to match your plot. The Hut is small. The Hut Frame is small. The Large Pier is long but fixed-width. None of them resize. Check the ghost preview's footprint carefully before dropping, especially near cliffs or water edges.
Demolishing with a full inventory. Materials drop at the demolition site if you run out of pocket space. Clear a few slots before tearing down a whole Hut or Large Pier or you will leave a loot pile behind and potentially lose materials to the despawn timer.
Treating prebuilts as weak long-term. The starter-tier pieces the blueprint drops are weak (750 HP), but the blueprint itself is not locked at that tier. Demolish and rebuild individual walls in stone, plaster, or mahogany and the resulting structure is identical to a hand-built one.
Confusing the Tent with a prebuilt shelter. The Tent is a save point, not a Prebuilt Structure. It will not satisfy the roof requirement for covered crafting stations. Use a Hut or Hut Frame for coverage and a Tent for respawn.
Forgetting the rotation. The door on a freshly-stamped Hut can easily face a wall or a cliff edge. Scroll-wheel rotate the preview before clicking to commit, and aim the door toward your bonfire or chest stack so you are not pathing around the house every time you craft.
Stamp the Hut Frame over the Hut whenever you plan to live in the spot for more than a day. The Frame costs roughly the same but gives you wall-tier control.
Place the Bonfire in the exact centre of the Hut Frame so every wall along every side falls inside the range check and every station against every wall is powered.
The Large Pier is worth stamping even if you plan to expand the dock later. It gives you an immediate 10-to-15 pieces of pier for the flat lump-sum cost, which is faster and cheaper than doing it by hand.
Keep a stack of Plant Fiber and Wood in your personal inventory when adventuring. Dropping a Hut at a new island for a forward base is cheap enough that you can do it anytime.
When upgrading a Hut's walls, work one wall at a time: demolish, pick up materials, place the new wall, repeat. Demolishing all four at once turns the structure into a roof floating on pillars, which looks strange and makes it easy to lose track of where each wall went.
Prebuilts do not interfere with Moving Buildings once each piece becomes normal after placement. If you need to relocate the whole structure, demolish everything for the full refund and stamp the blueprint again at the new spot.
A complete list of Prebuilt Structures variants in Windrose is shown below, with thumbnail, build cost, and comfort bonus for each entry. Click any name to open its dedicated page.
Image | Variant | Build Cost | Comfort |
|---|---|---|---|
| Plant Fiber x240 | - | |
| Plant Fiber x56 | - | |
| Wood x16 | - |