Loading...
Loading...
Bosses
April 25, 2026 at 11:27 PM
Add per-boss reference table with rewards and prep details
Windrose's Early Access launch build is built around boss progression across its three launch biomes. The live Steam store description says the game ships with three biomes, each with its own quests, enemies, and bosses, and the current live wiki coverage consistently points to one major story boss for each of those biomes.
Boss | Where You Meet Them | Why They Matter |
|---|---|---|
First major boss and the opening step beyond the starter-island survival arc | ||
Major dungeon encounter; community coverage places it as an early major boss | First major dungeon boss; drops the Soul Eater greatsword | |
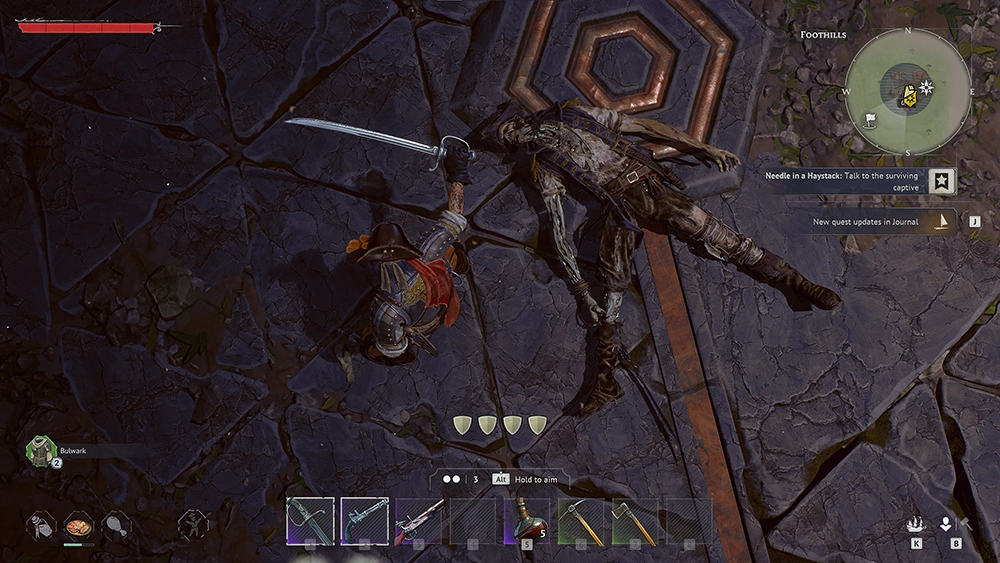
Foothills, through Needle in a Haystack | Blackbeard's lieutenant and the central mid-game story boss of the launch build | |
The late-launch-biome boss tied to the plague and supernatural side of the story |
The opening tutorial and early story get you through the shipwreck, the first base, and your first real ship.
The Coastal Jungle boss path introduces the first major dungeon-scale boss fight.
The Foothills boss path escalates into a broader hunt for Israel Hands and pushes the story deeper into Blackbeard's organization.
The Cursed Swamps cap the current launch-biome progression with a more supernatural confrontation.
Story progression across Chapter 1
Access to later-biome content and better crafting ladders
Named loot, higher-stakes quest rewards, and the next stretch of the world map
Bring food buffs and enough healing to survive multiple attempts.
Place a tent or Fast Travel Bell outside the approach if the area allows it.
Do not treat the fights as pure damage races. Windrose boss encounters reward stamina control, spacing, and reading committed attacks.
If you are struggling solo, co-op remains a valid option. The launch build supports up to 8 players, though the developers recommend smaller groups for smoother play.
Blackbeard is the game's main antagonist, but the current Chapter 1 live build frames him as the long-term threat rather than a clearly documented early resolved boss page. It is safer to treat Thomas Richards, Ghost Captain, Israel Hands, and the High Priestess as the current documented launch-build boss ladder, with Blackbeard remaining the larger story goal.
Quests - where the boss encounters fit into the story path
Dungeons - the hand-crafted spaces that lead into many major fights
Points of Interest - how boss spaces fit into Windrose's wider world structure
Enemies - broader enemy families around the boss fights
Boss | Biome | Quest | Recommended Level |
|---|---|---|---|
5 to 6 | |||
9 to 10 | |||
Temple dungeon | Needle in a Haystack / side | 10 to 12 | |
Swamp boss encounter | 12 to 15 |
Thomas Richards unlocks the Foothills.
Israel Hands completes the Needle in a Haystack main quest and unlocks the Cursed Swamps.
Ghost Captain is an optional fight with major loot payouts (see the boss article for details).
High Priestess is the deepest Cursed Swamps boss; most demanding at launch.
Two cooked food buffs active. See Cooking Recipes for build-matched meta dishes.
15 to 20 healing-tier potions or food, plus Bandages on hotbar.
Set a tent or Fast Travel Bell near the arena entrance.
Review Perfect Block mechanics; parry windows are tight but save stamina.
Match weapon to boss: fast weapons for phase-heavy bosses; heavy hitters for poise breaks. See Weapons.
The table below summarizes the three confirmed main-story bosses of the launch build at a glance. Detailed strategy, attack patterns, and phase notes live on each boss's individual article.
Boss | Biome / Quest | Recommended Level | Key Reward | Unlocks |
|---|---|---|---|---|
5 to 6, gear tier 5 | Gear tier cap raised to 10; iron-tier crafting access | |||
8 to 10, gear tier 10 | Soul Eater greatsword, 30x Undead Essence, Charon's Obol | |||
12 to 15, gear tier 15 | Second Charon's Obol; ends Chapter 1 launch progression | End of currently available main story |
Every boss in the launch build rewards the same preparation pattern. The specific items below are not flavor recommendations but the practical baseline used in community-verified clears:
Item Type | Recommended Setup |
|---|---|
Food buffs (two slots) | One stat-matching meal (Meaty Croc Kebab for Strength, Swamp Pie for Precision, Banana Coffee for Agility, Coffee for Endurance) plus one Vitality or HP-restoring dish. |
Rested buff | Stand inside the bonfire plot at your most decorated base before leaving so the Well-Rested timer ticks at maximum duration. See Comfort System. |
Healing supply | 10 to 20 Healing Potions of the highest tier you can craft, plus 10 Bandages on the hotbar for emergency stops. |
Elixir | Match the elixir to the boss's pressure profile. Elixir of Pain Relief for damage reduction; Elixir of Cruelty or Concentration for offensive scaling. |
Tent or Fast Travel Bell | Place a tent or Fast Travel Bell near the arena entrance so a death does not reset the approach. |
Weapon match | Crude damage (clubs, halberds, maces) is consistently effective against undead and supernatural enemies including the High Priestess. Pierce-heavy ranged loadouts (Pistol, Musket) handle ranged-pressure phases on every boss. |
Armor set selection meaningfully changes how survivable each fight is. The community-tested recommendations below are the most-cited combinations across launch-week clears:
Boss | 2-Piece Combo | 4-Piece Alternative |
|---|---|---|
2x Conquistador Set (15% Damage Resistance) + 2x Pikeman Set (+160 Max Health) | 4x Pikeman Set if running a halberd build for the +15% two-handed damage bonus | |
2x Conquistador Set + 2x Tracker Set for stacked DR plus healing efficiency | 4x Flibustier's Attire for one-handed Rapier-of-a-Thousand-Cuts builds | |
2x Conquistador Set + 2x Privateer Set for crit-stack pustule windows | 4x Pikeman Set for halberd burst during stun phases |
All three main-story bosses gate damage windows behind ranged pressure at some point in the encounter. Thomas Richards rewards Blunderbuss bursts during his cooldown windows; Israel Hands forces lateral movement while spectral projectiles fire and a Musket or Pistol turns those windows into damage; the High Priestess's pustule shield only breaks under firearm damage and cannot be popped by melee. A pure-melee loadout will clear the first two with effort, but the High Priestess is functionally unwinnable without a firearm in the secondary slot. Plan for at least one Pistol-class weapon in every boss-prep loadout, and stock a minimum of 30 to 40 bullets and the matching gunpowder stack before leaving base.