Loading...
Loading...
Base Building
April 16, 2026 at 05:35 AM
Append practical build-mode controls, bonfire supply zone, foundation on sticks, storage labels, dismantle economics, roof requirement, and extra tips
Base building in Windrose lets players construct everything from simple survival shelters to fully developed forts and mansions. The system offers over 690 individual building pieces across nine categories, using a snap-together block approach where silhouette previews lock into position before you commit materials. Dismantling any placed structure returns 100% of the materials used, so experimentation is always risk-free.
Every settlement begins with a Bonfire (5 Wood). The bonfire is the heart of your camp and defines a circular radius within which most crafting stations and structures must be placed to function. Only one bonfire can be placed per area, meaning bonfire radii cannot overlap. Always place your bonfire first before setting up any workstations.
After placing a bonfire, build a Tent (10 Plant Fiber + 4 Wood) nearby. Tents serve as revival points, so if you die you will respawn at the nearest tent rather than losing progress on a distant island.
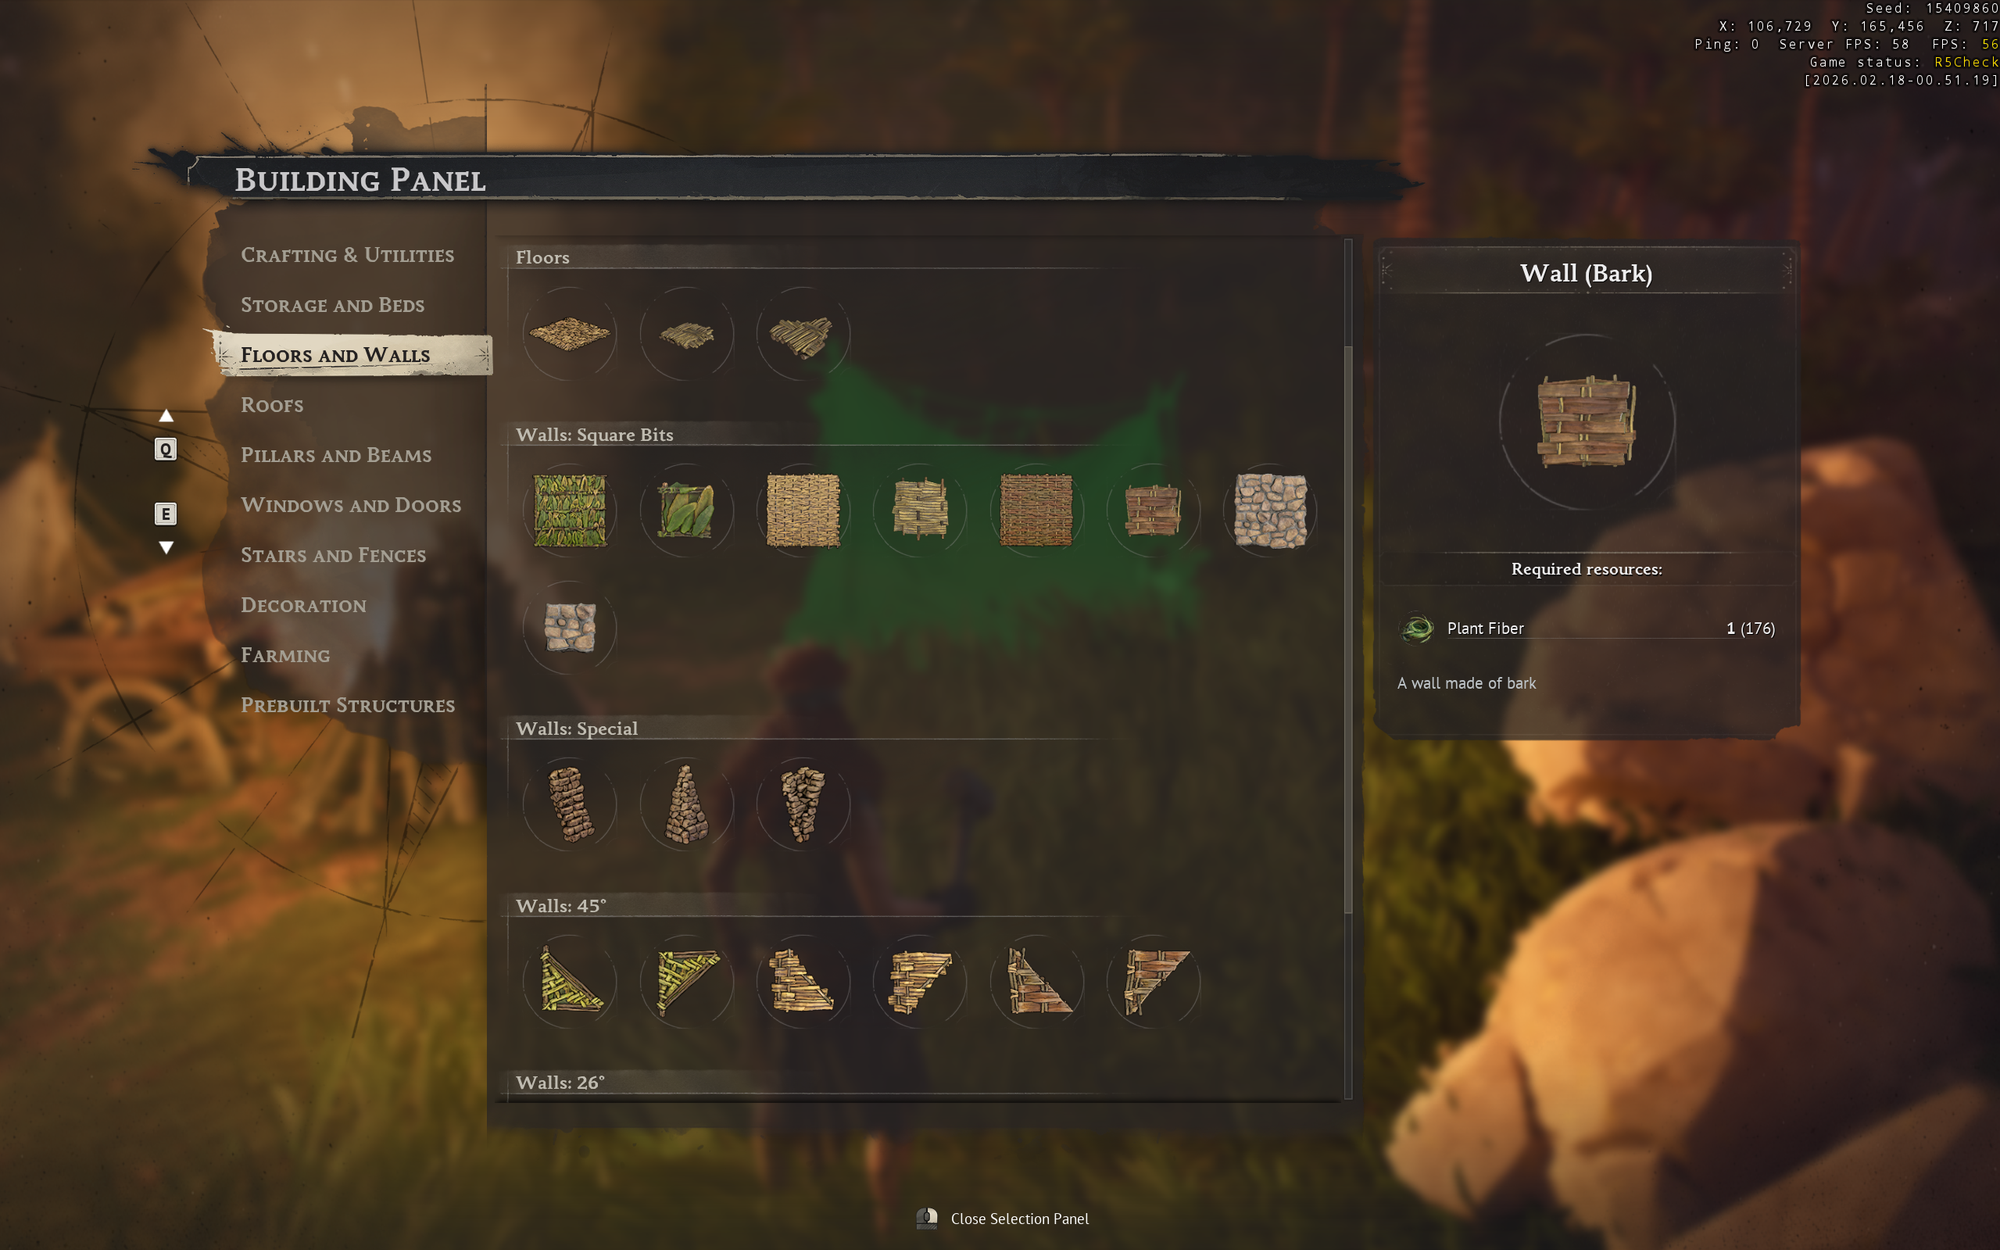
Press B to open the Building Panel. Right-click opens additional building options. The panel organizes all available pieces by category.
Key | Function |
|---|---|
B | Open/close the Building Panel |
Q | Adjust rotation angle of the selected piece |
L | Change rotation increment (15 to 90 degrees) |
V | Adjust camera angle during placement |
P | Toggle snap-to-grid vs. free placement |
Right-click | Open the building options menu |
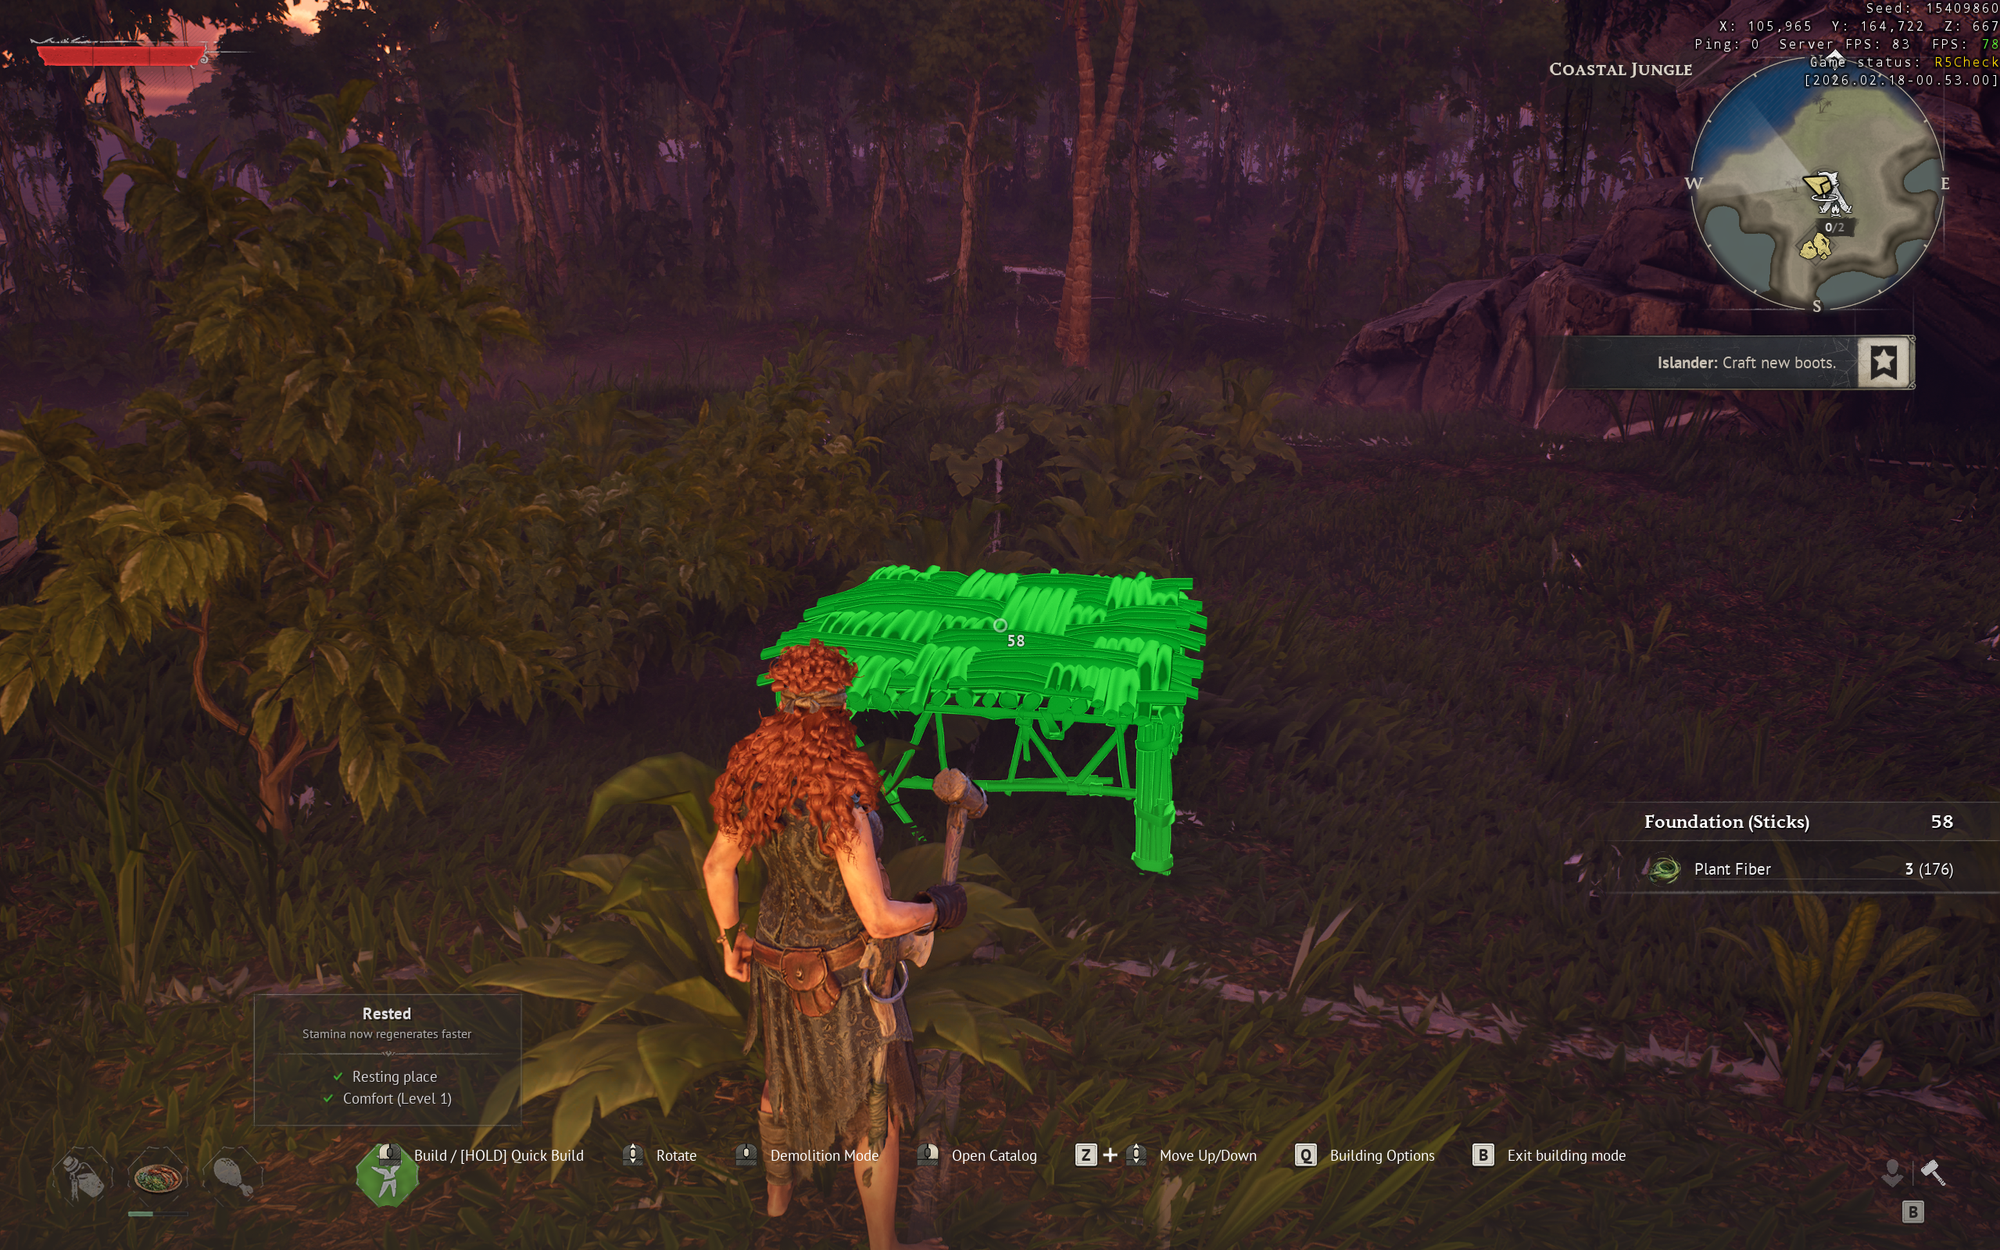
A material indicator on the building hologram shows whether you have enough resources: green means sufficient materials, yellow means you have some but not all, and red means you lack the key resources.
The duplication feature speeds up repetitive placement of identical pieces. Once you place a wall segment, for example, you can quickly stamp out copies without navigating back through the menu.
The Building Panel organizes all pieces into nine categories. Each category contains structural or decorative elements that snap together.
Category | Pieces | Examples |
|---|---|---|
Decoration | 293 | Trophies, plates, books, shelves, paintings, chandeliers |
Floors and Walls | 98 | Leaf walls, bark walls, plank walls, stone walls, window cutouts |
Windows and Doors | 63 | Wooden doors, window frames, shutters, doorways |
Pillars and Beams | 57 | Support columns, crossbeams, structural frames |
Roofs | 56 | Flat roofs, angled roofs, peaked roofs, roof trim |
Stairs and Fences | 37 | Staircases, railings, fences, ladders |
Crafting and Utilities | 37 | Workbench, cooking fire, smelting furnace, storage |
Storage and Beds | 34 | Chests, crates, barrels, beds, shelving |
Farming | 17 | Seedbeds, ground planters, farming equipment |
Structural pieces (walls, floors, roofs, pillars) come in six material styles. Players unlock higher-tier materials by exploring new islands and discovering new resources. Some recipes are also found as special items at Points of Interest scattered across the archipelago.
Material | Tier | Notes |
|---|---|---|
Leaf | Earliest | Basic shelter material available from the start |
Stick | Early | Simple structures using gathered sticks |
Bark | Early-Mid | Sturdier construction from processed bark |
Plank | Mid | Requires processed lumber; more refined appearance |
Stone | Mid-Late | Durable construction using quarried stone |
Stone/Timber | Late | Combination material for advanced architectural styles |
The Galaxies Showcase (October 2025) also introduced old-world estate building sets featuring Spanish and British mansion components. These let players construct Caribbean haciendas, colonial mansions, and other period-appropriate structures.
Several crafting stations only function when placed under a roof. The quickest way to satisfy this requirement is a Hut Frame, found under Prebuilt Structures in the Building Panel. It provides walls and a roof in a single buildable piece, so you do not need to place every individual wall and roof tile separately. Full enclosure is not required; just overhead coverage is enough.
Requires Roof | Must Be Outdoors |
|---|---|
Armor and Clothing Workshop, Weaponsmith Workshop, Alchemy Table, Enchanting Table, Jewellery Table, Millstones, Spinning Wheel, Tanning Rig, Shipwright's Workshop | Charcoal Kiln, Smelting Furnace, Large Smelting Furnace |
Placing decorations at your base increases your comfort level. Higher comfort directly improves your stamina pool size and stamina recovery rate through a Rested buff (or Well-Rested buff at higher levels). The buff activates almost instantly when you visit your base, and its duration extends with your comfort level. Without it, stamina recovery is noticeably sluggish, making combat harder.
Each unique decoration you place provides Comfort +1
Regular decorations do not stack. Two chairs provide the same comfort as one chair.
Build one of every subcategory in the Decoration menu for efficient gains.
Trophies are the exception: animal head trophies are unique items that do stack, providing up to 12 extra comfort total from all trophy types combined.
Maximum comfort level observed during alpha testing: 40
Category | Examples | Notes |
|---|---|---|
Furniture | Beds, chairs, tables | One per subcategory counts |
Lighting | Torches, lanterns, candles, iron lamps, chandeliers | One per subcategory counts |
Decorative Items | Plates, books, paintings, shelves with items | One per subcategory counts |
Trophies | Boar, Dodo, and other animal heads | Each trophy stacks; up to 12 total comfort |
Trophy Boar, for example, costs 5 Wood + 1 Boar Head and provides Comfort +1. Each different animal head trophy is a separate item, so collecting all of them is one of the best ways to push your comfort level higher.
As you explore the archipelago, you can establish outposts on different islands. Each outpost needs its own bonfire to anchor crafting stations and storage. The basic setup process:
Place a Bonfire (5 Wood) to establish the camp radius
Build a Tent (10 Plant Fiber + 4 Wood) for a spawn/revival point
Set up essential crafting stations within bonfire range (Workbench, Cooking Fire, storage chests)
Add a Fast Travel Point (1 Fast Travel Bell + 20 Wood) to connect the outpost to your network
You can maintain up to 10 Fast Travel Points simultaneously across all your outposts. Having at least two points is required for fast travel to function. When heading to a new island, always carry enough materials for a bonfire, a tent, and a basic workbench so you can set up a forward camp immediately.
Recruited NPCs can be assigned to your base to handle resource gathering and basic tasks. NPCs charge for their services using in-game currency, creating a gold sink while respecting the player's time. This is entirely optional.
NPC Type | Cost | Function |
|---|---|---|
Doctor (Galen) | Resettled via quest | Provides a free healing potion every hour at each camp; can be placed at multiple bonfires |
Merchant: Animal Products | 1 Merchant Contract | Buy and sell animal-derived resources at your base |
Merchant: Food | 1 Merchant Contract | Buy and sell food items at your base |
Merchant: Natural Resources | 1 Merchant Contract | Buy and sell raw materials at your base |
Farming Contractor | 10 Gold Coins (from Tortuga) | Provide 50 seeds + 20 Silver Coins; returns harvested crops after 8 hours |
Merchant NPCs require a roof and must be placed within bonfire range.
The Farming tab in the Building Panel contains 17 items for growing crops. Farming requires Seedbeds, which use Fertile Soil found at Ancient Farms on Foothill islands. Crops grow automatically once planted; no watering is needed. Harvesting returns both the crop and seeds, creating a sustainable loop.
Larger plants like shrubs, ficus, and palms can be placed directly on the ground without seedbeds.
Tip | Details |
|---|---|
Full material refund | Dismantling any placed building structure returns 100% of the materials. Experiment freely with layouts. |
Physics system | Falling trees can damage partially assembled structures. Clear the area before building. |
Hut Frames | Use Prebuilt Structures in the Building Panel for quick functional shelters. A Hut Frame provides walls and a roof in one piece. |
Container labels | Place signs above storage chests to stay organized as your base grows. |
Quick-drop | Press Q near a container to drop matching items into it without opening the inventory interface. |
Remote crafting | Materials stored in base chests are automatically accessible from all crafting stations within bonfire range. No need to carry everything in your inventory. |
Structure HP | All building structures have HP values and are marked as decayable. Keep your base maintained. |
Always carry camp supplies | When heading to a new island, bring materials for a bonfire (5 Wood), tent (10 Plant Fiber + 4 Wood), and workbench (5 Wood) to set up a forward camp immediately. |
Beyond the basic menu, there are several flow-improving shortcuts that the tutorial does not emphasise. Learning them turns base construction from a piece-by-piece chore into a fast, fluid process.
Hold and drag walls and foundations: after selecting a wall or foundation piece, hold the place button and walk. The game stamps identical pieces along your path, letting you raise an entire wall run in one sweep instead of clicking each tile.
Open the Q menu inside build mode: while placing a piece, press Q to open the build options menu. This is where camera modes and Destroy Mode live.
High Camera mode: one of the camera options in the Q menu. It pulls the view up to a bird's-eye angle so you can place roofs, second-storey walls, and rooftop decorations without wrestling with the standard over-the-shoulder camera.
Toggle Destroy Mode rebind: Destroy Mode defaults to middle mouse button. Many players rebind it to F2 because middle mouse also defaults to Target Lock during combat, and hitting the wrong mode in the middle of a fight can be disastrous. See Controls and Keybinds for the full rebind procedure.
The faint circle around your bonfire is more than a decoration budget. Every crafting station inside that circle can pull materials automatically from every chest that is also inside the circle. Open any station's recipe list and you will see an Available count next to each ingredient; those numbers come from all chests in range, not just your inventory.
This drives most base-layout decisions. A common pattern is to put the bonfire in the centre of your hut, ring the walls with chests, and squeeze the workbench, weaponsmith, armor bench, and alchemy table along the remaining walls. Everything overlaps the radius, so crafting menus always show the full shared pool.
Only one bonfire can exist in a given area. If you try to place a second one too close to an existing camp, the build preview turns red. To expand, either dismantle and re-place the bonfire once you understand the layout you want, or build entirely new outposts on other islands.
When starting a new camp, drop a Foundation on Sticks as your first building piece before laying any walls. Uneven ground is common on the starting island, and foundations on sticks level everything out at a consistent height. This makes it trivial to snap walls, doors, and roof tiles cleanly instead of fighting with clipping on a sloped beach.
Foundations also unlock the hold-and-drag batch placement. Once one foundation tile is down, most players stamp out the whole floor plan in a single motion, then switch to walls and repeat.
Chests in Windrose cannot be renamed and do not accept custom icons. To sort visually, open the Build menu, go to the Storage and Beds tab, and place a Wooden Label on the wall above each chest. The label set is fixed (a small roster of icons like wood, metal, food, and ammunition), but a label above every chest is still enough to grab the right storage at a glance during a frantic turn-in.
Pair this with the Deposit Similar shortcuts to speed up base returns. Standing in front of a chest and pressing Q runs Deposit Similar from the outside, moving every matching stack from your inventory into that chest without opening it. Opening a chest and pressing X does the same thing from the inside. Deposit All buttons are also available in every chest and stash UI for bulk dumps.
The 100% refund rule has a critical nuance. When you dismantle a wall, foundation, floor, or roof piece, all base materials go back into your inventory. When you dismantle a crafting station, the station's own base cost refunds, but any upgrade items placed on that station do not.
Example: a basic Workbench costs 5 Wood, so dismantling returns 5 Wood. An upgraded Workbench with a Sawhorse added refunds 5 Wood plus the 20 Wood and 10 Copper Ingot from the Sawhorse, because the Sawhorse is itself a placed structure. However, a Weaponsmith Workshop that has had an Anvil added to reach level two does not refund the 30 Foothills Iron Ingot used to craft that Anvil. The Anvil consumes those ingots permanently. Only the Weaponsmith's own 10 Wood and 5 Copper Ingot base cost comes back.
Before dismantling any upgraded station, check which of its upgrades were built on-site versus which required crafted items. The latter is a sunk cost.
Many crafting stations only function under a roof. The confirmed list includes the Weaponsmith Workshop, Armor and Clothing Workshop, Alchemy Table, Spinning Wheel, Tanning Rig, Millstones, Enchanting Table, Jewellery Table, and Shipwright's Workshop. A simple flat roof tile directly above the station is enough; you do not need a fully enclosed building with walls on every side.
A common minimal base pattern is a foundation large enough to host the bonfire plus six or seven stations, four pillars at the corners, and a roof. Walls are optional, which keeps the interior bright and makes it easy to walk in and out without bothering with doors during fast travel and resource runs.
Trophies from the Bird Hunt and Buccaneer in Training challenges award Comfort +1 each and count toward the higher Rested buff ceilings. Always mount them as soon as they drop.
Comfort 10 gives roughly 17 minutes of the Rested stamina buff. Pushing comfort toward 30 can extend the window to around 30 minutes, which is long enough for a full round-trip to another island.
Building with plant fiber pieces is dirt cheap and intended for early bases. You can rebuild in Stick, Bark, Plank, Stone, or Stone and Timber later without losing materials because of the full dismantle refund.
On multiplayer servers, chests and structures have no lock option. Before inviting anyone with questionable motives, move valuable contraband and Tumbaga Ingots into your single-player character's world; character transfer carries items between saves.