Overview
The Staglordalso known as Saigord, is a boss encounter in Crimson Desertencountered during the "Lord Amidst the Ruins" faction quest, set in the snowy ruins of a forgotten kingdom within the a snowy mountainous region. He is a humanoid warrior boss, a fallen king who sits upon a forsaken throne waiting to deliver judgment to any invader who enters his ashen stronghold. He was one of four bosses featured in the Gamescom 2024 hands-on demo, alongside the Queen Stoneback CrabReed Deviland White Horn.
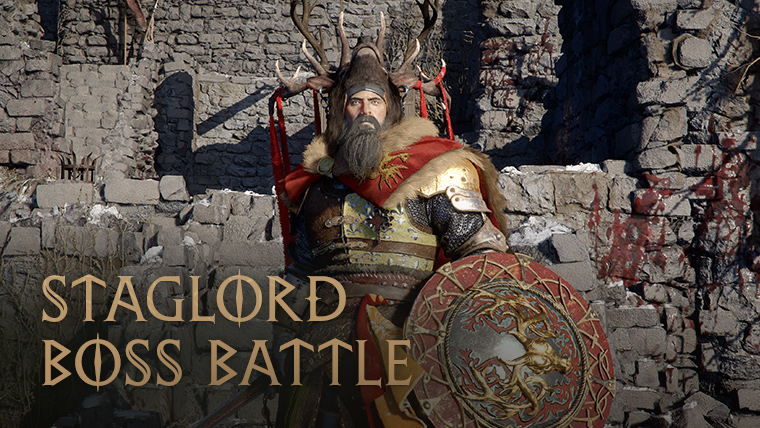
Pearl Abyss's official description reads: "In the ruins of a forgotten kingdom, a fallen king sits upon a forsaken throne. He waits in solitude, his blade poised to protect his ashen stronghold, ready to deliver judgment to any invader foolish enough to claim what's his."
Of all the demo bosses shown at Gamescom, the Staglord is the most conventional in execution. He is a straightforward melee warrior duel that tests the player's grasp of Crimson Desert's core combat mechanics: blocking, parryingdodgingstamina management, and weapon switching. Despite being the most traditional fight, he hits extremely hard and punishes passive play with relentless aggression.
Appearance
The Staglord is a muscle-bound warrior of huge stature, towering over Kliff. He wears the carcass and head of a stag draped over his shoulders like a mantle, a symbol of proven bravery and strength. Beneath the stag pelt, he is clad in ornate Celtic armor with intricate detailing. He wields a sword and large shield, making him a sword-and-board fighter.
His weaponry is described as "gorgeously ornate" and visually distinct from standard enemy equipment. The arena around him is littered with the bodies and weapons of fallen warriors who challenged him before, suggesting he has held his stronghold against many would-be conquerors. One preview journalist compared the visual dynamic of the fight to "prime Jon Snow versus prime Robert Baratheon."
Location
The Staglord's arena sits amid snowy ruins amid snowy mountain ruins, the remains of a forgotten kingdom. The battlefield is strewn with weapons from previous victims, which players can pick up and use during the fight. He guards the ruins from a forsaken throne, rising to engage Kliff when the player enters his domain. A quicktime event prompt triggers just before the battle begins.
Health and Phase Structure
The Staglord has three health bars. Each bar is color-coded, and depleting one triggers a phase transition where the Staglord briefly staggers, shakes off the damage, and shifts his fighting style.
Phase | ||
|---|---|---|
Phase 1 | Blue | Aggressively offensive. Opens combat with forward leaps and sword strikes, closing distance rapidly. Players should focus on defensive play, learning his attack timings while seeking safe openings for counterattacks. |
Phase 2 | Green | Shifts to leaping attacks and more mobile combat. The Staglord becomes harder to pin down, using jumping strikes to close distance and reposition. Players need to adapt to the increased movement and time their dodges against aerial attacks. |
Phase 3 | Red | Maximum aggression with increased speed. The Staglord drops his shield and switches to dual-wielding, combining devastating two-weapon combos with rapid offense and sudden defensive reads. His heavy strikes come faster and he chains attacks into longer combos. |
Each phase transition resets the dynamic of the fight. After depleting the first bar, players are commonly caught off guard when the boss shakes it off, grows another health bar, and begins swinging slightly differently. With three distinct phases, adapting to each shift is key to surviving the full encounter.
Attack Moveset
The Staglord's attacks are deliberate and powerful. He hits less frequently than faster bosses but each blow takes away large chunks of health. Learning which attacks are blockable versus unblockable is critical.
Attack | Description | Blockable | |
|---|---|---|---|
A two-swing sword combination that is his primary attack. Quick and often used as a combo opener. | Yes | Block the first swing, then parry the second for a counter window. | |
Positions his targe at chest level and delivers an outward bash with a brief wind-up. Moderate damage but fast recovery. | Yes | Evade with a backward slidethen counterattack during his recovery frames. | |
Slash and Shield Bash | A combination attack where a sword slash flows directly into a shield bash. Deals massive cumulative damage if both hits connect. | Partially | Evade the full sequence rather than trying to blockcounterattack during recovery. |
A linear charging attack used to close distance against players who try to create space. | Yes | Sidestep the charge to create an opening for back strikes. | |
Leap Attack | An aerial slash that covers significant distance. Used when the player is at medium range. | Yes | Block with shield and immediately counterattack, as his landing leaves him briefly vulnerable. |
Two-Hand Sword Swing | A heavy overhead attack with a two-second charge-up. Deals devastating damage if it connects. | No | Can be interrupted during the charging phase with a well-timed strike. If you miss the interrupt window, evade backward. |
Grab and Smash | An unblockable grab where the Staglord seizes Kliff and slams him into the ground. Deals heavy damage and leaves the player prone. | No | Create distance immediately when you see the grab animation start. Use the recovery window to heal. |
Combat Strategy
General Approach
The Staglord fight is about parrying rather than blocking. While his attacks can be blocked with a shieldchip damage accumulates quickly and drains health even through successful blocks. Parrying, on the other hand, opens post-parry counter windows where the Staglord staggers and takes significantly increased damage. The most efficient approach is to dodge into a parry timing and then land a heavy post-parry combo before he recovers.
Grappling and wrestling moves are completely ineffective due to his massive size. Do not waste time or stamina attempting them. This boss is strictly a test of timing-based melee combat.
Phase 1 Strategy
In Phase 1, the Staglord is highly aggressive and will close distance constantly. Let him come to you. Focus on learning his attack patterns during this phase, particularly the timing of his Double Slash and Shield Bash. Parry his attacks and use the post-parry window for two or three quick hits before resetting to defensive posture. Do not overcommit to long combos yet.
Phase 2 and Phase 3 Strategy
In Phase 2 (green bar), the Staglord introduces leaping attacks and becomes more mobile. Dodge his aerial strikes and punish his landings. Phase 3 (red bar) is the most dangerous. His attack speed increases and he chains multiple attacks together. Stay patient and do not panic. The fundamentals are the same as Phase 1 (reactive parrying into counter-combos) but the timing windows are tighter. Use restorative items when you have distance, and keep the bow available for chip damage when he briefly pauses between attack chains.
Using Ranged Weapons
The bow can be used for opportunistic shots between melee exchanges, but it should not be treated as a primary strategy. Weapon switching takes a moment, and the Staglord will punish prolonged attempts at ranged combat with his Charge Strike and Leap Attack, both of which close distance rapidly. The bow is best used during brief pauses in his attack chains or after a particularly long combo that leaves him winded.
Players can also pick up weapons scattered across the battlefield from previous fallen challengers. These provide temporary extra firepower but break after limited use.
Tips
Parry, don't block. Chip damage through blocks is the most common way players lose this fight slowly. Invest the effort in learning parry timings.
Watch your stamina. Defensive actions (blocking, parrying, dodging) all drain stamina. Running out at the wrong moment is usually fatal. Manage it carefully and avoid unnecessary dodges.
Don't try to grapple him. His massive size makes all grapple and wrestling moves fail completely. Stick to sword combat.
The Two-Hand Sword Swing can be interrupted. If you are close enough when he starts charging this attack, a quick strike will stagger him out of it. Missing the window means you need to evade backward instead.
Restorative items are essential. Demo sessions came pre-loaded with Veal Burgers. Use them when you have distance, especially during phase transitions when the Staglord briefly pauses.
Adapt to each phase. Playing Phase 2 like Phase 1 (waiting passively) will not work because his defensive stance creates fewer openings. Similarly, Phase 2 is too fast for the deliberate approach of Phase 1.
Design Context
Within Crimson Desert's roster of boss encounters, the Staglord is the most traditional fight, a test of the core combat system mechanics. Where the Queen Stoneback Crab is a climbing puzzle, the Reed Devil involves environmental destruction, and White Horn centers on magical mechanics, the Staglord is a pure swordfight. This variety is intentionalPearl Abyss has stated they want each boss to demand a different approach from the player.
Despite being the most conventional of the demo bosses, the Staglord is by no means easy. Preview journalists consistently noted his punishing damage output. One reviewer from being "punched out of the map" by one of his attacks (likely a bug that the developer acknowledged), while another from being "launched into a wall with bone-crunching force." The consensus across previews was that the fight feels very hard at first, but once the parry timing and phase patterns click, it becomes a deeply satisfying duel.
Public Debut
The Staglord was first shown to the public in an official gameplay trailer released at Gamescom 2024. He is one of at least 76 bosses (per the Knowledge system) in Crimson Desertwhich also includes White HornSplit HornMatthiasMyurdinWalter LanfordCassius MortenMuskanKearush the Slayer, and Golden Star.