
Loading...
Loading...
Hexe Marie
March 27, 2026 at 11:18 AM
Fixed 1 broken wikilink: boss-battles -> bosses
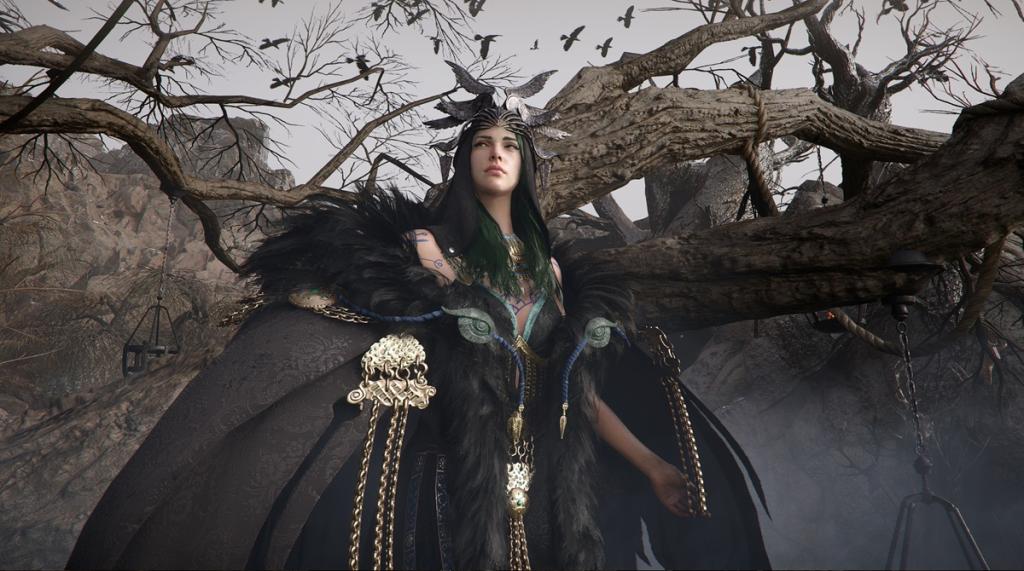
Hexe Marie is a mandatory boss encountered in Crimson Desert, fought in a location known as the Smoking Lands. Titled the "Follower of Darkness," she commands crow magic, shadow manipulation, and summoned minions across a two-phase battle. Marie has roots in the Black Desert universe, where she first appeared in 2014, but her story in Crimson Desert stands on its own. After the fight concludes, she flees rather than dying, leaving the possibility of future encounters open.
The encounter takes place during the main quest "Black Witch" (mission #133), part of Chapter 9: The Sage of the Desert, within the Veiled Witch sub-chapter. Players reach this fight after completing the preceding quest "Pursuit Beyond the Veil," where they must destroy four totems in the Hexe Sanctuary while avoiding Marie's premature attacks. The Hexe Marie fight is considered a mid-to-late game boss encounter that tests a player's mastery of combat mechanics, crowd control, and resource management.
Hexe Marie is described as a woman who was "enraptured by the mesmerizing shadows" and "infused darkness even into her own child." She holds a deep grudge against the Greymanes for killing her child from Raventine Monastery, and this vendetta drives her to confront Kliff directly. During the encounter, she attempts to deceive Kliff and recruit him to her cause before the fight begins, blurring the line between ally and enemy.
Marie's adopted son is Draven the Crowcaller, who leads the Crow Brothers. Draven's Fextralife entry states: "The son of Hexe Marie the Black Witch. Recognizing his talent, Hexe Marie took him in as her own." This dynamic adds emotional weight to both boss encounters; players who fight Marie first may recognize echoes of her magic in Draven's later fights, and vice versa.
Attribute | Detail |
|---|---|
Boss Name | Hexe Marie |
Title | Follower of Darkness |
Quest | Black Witch (Main Mission #133) |
Chapter | Chapter 9: The Sage of the Desert (Veiled Witch) |
Location | The Smoking Lands (urn stockpile area) |
Type | Humanoid (Witch) |
Phases | Two (Blue HP bar, then Red HP bar) |
Key Abilities | Crow magic, minion summoning, teleportation, shadow manipulation |
Elemental Weakness | Fire (effective on both Marie and her minions) |
Related Boss | Draven the Crowcaller (her adopted son) |
Outcome | Flees after defeat |
Rewards | Earring of Dark Magic (Accessory), Crow Whisperer (Two-Handed Weapon) |
The fight takes place in the Smoking Lands, specifically in an area filled with stockpiled urns. These urns are not just set dressing; they are directly tied to Marie's minion-summoning abilities. The arena is relatively open but the presence of urn clusters and summoned minions can make positioning challenging, especially during Phase 2 when the battlefield becomes increasingly crowded.
Proper preparation before the Hexe Marie fight significantly reduces its difficulty. The encounter is long enough that running out of healing supplies mid-fight is a real risk, so stocking up beforehand is essential. Visit a grindstone and an anvil just before entering the arena, and make sure your food inventory is well-stocked.
Sharpen your weapon at a grindstone and reinforce your armor at an anvil immediately before entering the boss arena. These temporary buffs increase your Attack and Defense values at no material cost. The bonus is use-based rather than time-based, which means it will not expire before you start the fight. Maximizing your Reinforcement stat through grindstone and anvil usage provides a noticeable edge, especially during Phase 2 when Marie's attacks hit harder and the summoned Urn Swordsmen can chunk your health quickly.
Crimson Desert bosses are designed so that you will take damage, and the difficulty of each encounter depends heavily on how much healing you bring. Bring at least 100 pieces of Grilled Meat (the cheapest and most accessible healing item) or equivalent food items. Ronnie's Chewy Rice Cakes and hearty soups or porridges are stronger alternatives that restore more HP per use. There is no cooldown between eating, so you can consume food even while performing attack animations. This means you can effectively tank through Marie's crow attacks by eating between your own melee swings.
By the time you reach Hexe Marie in Chapter 9, you should have access to Tier 6 or higher equipment. Prioritize defensive armor (Tier 8 Canta armor or similar if available) since the fight involves sustained damage from crow projectiles and minion swarms. For your weapon, any high-tier sword works, but weapons with fire elemental imbues are particularly effective against both Marie herself and her summoned minions. If you have access to a fire-imbued weapon, equip it for this fight.
Slot the following skills into your cores before entering the fight. Crow's Pursuit helps close the gap when Marie teleports away. Spirit Restore on Hit keeps your spirit topped off during extended melee combos. Spirit's Judgment provides burst damage during the windows when Marie stands still after her channeled attacks.
If you have unlocked Nature's Snare, equip it. This ability is arguably the single most effective tool for this encounter, as it can absorb Marie's crow projectiles and redirect them as focused energy blasts. See the Strategy section below for details.
Hexe Marie has several named attack patterns that she uses throughout both phases of the fight. Her primary offensive strategy revolves around ranged crow projectiles combined with minion pressure to overwhelm the player.
Attack | Phase | Type | Description |
|---|---|---|---|
Crow Swarm | Both | Ranged | Primary attack where Marie sends a cluster of crows at the player. The crows fly in a straight line and are relatively easy to dodge sideways. Fast and difficult to react to at close range, but predictable from mid-distance. |
Crow Barrage | Both | AoE, Unblockable | Wider area-of-effect attack with multiple waves of crows. Covers more ground than Crow Swarm and can catch players mid-dodge. Cannot be blocked, so you must evade by moving out of the cone entirely. Backsliding directly away from Marie is more reliable than side-dodging. |
Crow Storm | Phase 2 | Channeled, High Damage | Channeled spell that drops crows from the sky in a frontal cone. Signaled by purple-hued casting animations. The most damaging attack in the fight. Move perpendicular to her facing direction to avoid the cone. After channeling, Marie has a brief recovery window that can be punished with heavy attacks. |
Shadow Clone Barrage | Phase 2 | Ranged, Wide Coverage | Marie creates multiple shadow versions of herself, and all copies simultaneously launch a large crow swarm. This covers a much wider area than any of her normal attacks. Sprint away from the clones rather than trying to dodge through the barrage. |
Relocate | Both | Movement | Marie transforms into a murder of crows and reappears at a random location in the arena. Used to maintain distance and reposition for attacks. Frequency increases significantly in Phase 2, making it harder to maintain consistent damage pressure. |
Summon Urn Soldiers | Both | Summon | Spawns multiple stone soldiers with urn-shaped heads from the scattered urns. They die in a single hit but attack in groups and can interrupt your melee combos on Marie. |
Summon Urn Swordsman | Phase 2 | Summon | Summons a larger, tougher clay-pot construct that moves slowly but deals significant damage. Has substantially more health than Urn Soldiers and should be prioritized for elimination when they appear. |
Marie summons two distinct types of minions from the urns scattered around the arena. Managing these adds is critical to surviving the fight, though the optimal approach is to focus primarily on Marie while clearing minions only when they become an immediate threat.
Minion | Threat Level | Description |
|---|---|---|
Urn Soldiers | Low (individually) | Clay automatons with urn-shaped heads. Weak individually and die in one hit, but attack in groups. Dangerous when they swarm alongside Marie's crow attacks, as they can stagger you out of dodges. |
Urn Swordsmen | Medium-High | Larger, stronger minions made of stacked clay pieces. They hit harder and have more health than Urn Soldiers. Should be prioritized for elimination when they spawn. Their attacks can interrupt your melee combos on Marie. |
During the first phase, Hexe Marie relies on Crow Swarm and Crow Barrage attacks while periodically summoning waves of Urn Soldiers. She uses Relocate to keep her distance when the player closes in. Her attack patterns in this phase are manageable once the player learns to read the crow animation telegraphs and prioritize clearing minion waves before they accumulate.
Phase 1 is the more forgiving half of the encounter. Marie is less aggressive overall and does not summon minions as frequently, giving you longer windows to deal damage. The key is to establish a rhythm: dodge or absorb her crow attacks, close the distance while she recovers, and land a series of heavy attacks before she teleports away. Whenever she stands still after an attack, dodge her next projectile to get behind her and land four heavy attacks followed by light attacks until she relocates.
If you have Force Palm available, use it during Phase 1 to practice the timing. Hitting Marie with Force Palm briefly locks her in place and prevents her from teleporting, giving you a wider damage window. This technique becomes critical during the more hectic Phase 2.
When Marie's health drops into the red bar, a cutscene plays where she attempts to deceive Kliff and recruit him. Once the fight resumes, her abilities escalate significantly. She begins using Crow Storm, the devastating channeled attack that drops crows from the sky in a frontal cone. The purple-hued casting animation provides a brief warning window. She also starts summoning Urn Swordsmen alongside regular Urn Soldiers, making add management more demanding. Her Relocate usage increases in frequency, making it harder to maintain consistent damage pressure.
The Shadow Clone Barrage is a Phase 2 exclusive where Marie creates multiple copies of herself and all copies launch crow swarms simultaneously. This is her most visually overwhelming attack and covers a wide area. When you see the clones forming, immediately sprint away rather than trying to dodge through the barrage. The copies despawn after the attack completes.
Despite the increased intensity, the core strategy remains the same: stay aggressive, tank through unavoidable chip damage while healing, and punish Marie's recovery windows with heavy attack combos. The fight drags on much longer if you play too defensively, and a drawn-out fight means more minion waves and more chances for things to go wrong.
The Hexe Marie fight rewards aggression over caution. Attempting to dodge every attack extends the encounter and limits your damage windows. The most effective approach is to tank through her attacks while healing and focus your damage during the brief moments she stands still. Below are the key tactical approaches.
Force Palm is one of the most effective tools against Hexe Marie. When you land Force Palm on her, it briefly staggers her and prevents her from teleporting away. Follow up immediately with heavy attacks to capitalize on the extended damage window. The optimal combo is:
Land Force Palm while Marie is stationary (after she finishes a Crow Swarm or Crow Barrage)
Immediately follow with four heavy attacks while she is staggered
Chain into light attacks until she breaks free and teleports
Repeat whenever you find another opening after her next ranged attack
This combo is the fastest way to burn through both health bars. Force Palm solves the core frustration of the fight, which is Marie constantly teleporting away before you can deal meaningful damage. Learning the timing to land Force Palm consistently will dramatically reduce the length of the encounter.
If you have unlocked Blinding Flash, you can chain it into the Force Palm combo for even longer stun windows. Cast Blinding Flash when Marie is within range to stun her, then immediately follow with heavy attacks while she is stunned. You can also chain Blinding Flash into Force Palm for a double stagger that keeps Marie locked down for an extended period. The Blinding Flash Finisher skill amplifies this further, letting you rip through her health during the stun window.
Upgrading Focus to Level 3 unlocks Focused Insight, which adds an instant parry to any incoming melee strike while Focus is active. Activating Focus slows time and regenerates your spirit, and at Level 3 it also allows you to parry her attacks with much easier timing since everything moves in slow motion.
This is particularly useful against Marie's faster attack patterns. When she starts chaining crow attacks rapidly in Phase 2, popping Focus gives you breathing room to assess the battlefield, regenerate spirit, and react to attacks you might otherwise miss. It essentially functions as a "get out of jail free" card when the fight becomes overwhelming. Successful parries also build Marie's stagger meter, opening additional damage windows.
If you have unlocked Nature's Snare, this single ability can trivialize the Hexe Marie encounter. Nature's Snare creates a barrier that absorbs all incoming projectiles, which means it directly counters Marie's primary offensive tool: crow attacks. Hold the ability to generate a wind barrier, absorb her crow projectiles, then release the stored energy as a pinpointed laser beam aimed directly at Marie.
The Unleash variant of Nature's Snare performs an area-of-effect shockwave instead, which is useful for clearing groups of Urn Soldiers without taking your focus off Marie. By alternating between the laser beam (for Marie) and the shockwave (for minion waves), you can control the entire battlefield with a single ability.
Tip | Details |
|---|---|
Prioritize Urn Swordsmen | When both minion types are present, kill the Urn Swordsmen first. They deal significantly more damage and can interrupt your attacks on Marie. Regular Urn Soldiers die in one hit and can be ignored until they cluster up. |
Use AoE for add control | Ice arrows, explosive arrows, and area-of-effect attacks efficiently clear Urn Soldier swarms. Save these for moments when multiple minions cluster together. |
Backslide, don't sidestep | Evade crow attacks by backsliding rather than side-dodging. The cone-shaped attack patterns are easier to escape by moving directly away from Marie. Sidestepping can put you in the path of a wider Crow Barrage. |
Punish recovery windows | Close distance for melee damage whenever Marie finishes a Crow Barrage or Crow Storm. She has brief recovery windows after these channeled attacks where she stands still and cannot teleport. |
Watch the purple glow | The purple-hued casting animation telegraphs Crow Storm in Phase 2. This is the most damaging attack in the fight and must be avoided. Move perpendicular to her facing direction as soon as you see the purple charge-up. |
Don't over-commit | Getting surrounded by Urn Soldiers while Marie launches Crow Barrage is one of the most common ways to take lethal damage. Be aware of minion positions before pressing the attack. |
Fire imbues are effective | Elemental weapon imbues (particularly fire) deal bonus damage against both Marie and her summoned minions. If you have a fire-imbued weapon available, equip it for this fight. |
Heal aggressively | There is no food cooldown in Crimson Desert. You can eat healing items while performing attack animations. Weave in Grilled Meat or stronger food between melee swings to sustain through chip damage rather than retreating to heal. |
Target Marie, not adds | Summoned minions respawn indefinitely. Clearing every wave wastes time and resources. Focus your damage on Marie and only clear adds when they are directly threatening you or blocking your path to her. |
Parry her melee strikes | Marie's personal attacks can be parried, but her summons cannot. Successful parries open counter-attack windows and build her stagger meter. Use Focus Level 3 to make parry timing easier against her faster attacks. |
If you die during the Hexe Marie fight, the game presents three options:
Option | Effect |
|---|---|
Instant Revive | Resume the fight at your current position with 30% HP. Consumes one Palmar Pill. Enemies can still attack during the revive animation, so positioning matters. Use this when Marie is nearly dead and you just need a few more hits. |
Retry | Restarts the entire fight from the beginning. Your inventory (food, arrows, supplies) is restored to the state it was in before the fight started. This is essentially a free reset with full resources, making it a useful option if you burned through most of your healing items before dying. |
Give Up | Respawns you at the last checkpoint before the boss arena. Useful if you want to restock supplies, visit a grindstone/anvil, or change your skill loadout before trying again. |
Craft Palmar Pills before attempting the fight. Once you obtain the recipe in Whisper Cave, you can craft them in bulk. The standard version revives with 30% HP, while the Refined Palmar Pill fully restores your health on revival. Having two or three pills in your inventory provides insurance against unexpected deaths in Phase 2.
Defeating Hexe Marie completes the "Black Witch" main quest and provides the following confirmed rewards:
Reward | Type | Description |
|---|---|---|
Earring of Dark Magic | Accessory | An earring tied to Marie's shadow and crow magic. Provides bonuses aligned with dark arts abilities. |
Crow Whisperer | Two-Handed Weapon | A signature weapon that channels crow magic. Equipping this weapon grants access to Marie's dark arts combat style. |
Marie also drops Abyss Fragments and crafting materials used for weapon and armor upgrades. Boss-dropped Abyss Artifacts are used for skill tree progression, and the Crow Whisperer weapon provides a unique combat style inspired by Marie's own crow-summoning abilities.
Marie flees after the fight rather than dying, so the encounter does not conclude her story arc. Given her connection to Draven, players may encounter her influence again later in the narrative.
Hexe Marie's boss fight was first showcased publicly by Pearl Abyss in an official gameplay video released during the G-STAR demo period in 2024.
The word "Hexe" is German for "witch," making her name literally translate to "Witch Marie."
During the "Pursuit Beyond the Veil" quest immediately before the boss fight, Marie appears near the totems you must destroy. Engaging her at this point is a waste of resources, as she cannot be defeated during this quest and disappears after taking some damage.
Marie shares thematic DNA with Hexe Marie from the Black Desert universe, but the Crimson Desert version is treated as a standalone character within its own narrative.
