The Reed Devil
Boss guide for the Reed Devil, a mandatory boss on the Mountain of Frozen Souls in Crimson Desert. Includes preparation, food recommendations, gear and skill loadout, phase-by-phase attack breakdown with detailed strategy, rewards including the Sunset Reed Cloth Gloves, and the learnable Swift Stab skill.
On This Page
Overview
The Reed Devil, also called "The Devil of the Reed Fields," is a mandatory boss encountered on the Frozen Soul Mountain in Crimson Desert. He was shown in a 2024 gameplay demo as one of four playable boss fights in the demo, alongside the Staglord, Queen Stoneback Crab, and White Horn. Pearl Abyss released a dedicated gameplay trailer for the encounter.
The Reed Devil is a short, fast swordsman who fights with iaijutsu (quick-draw sword techniques) and retreats into the surrounding wheat and reed fields between attacks. a preview called the fight "less about dodging and more about letting go and embracing the chaos," making it one of the more unusual boss encounters in the game. The encounter takes place during the Chapter 3 main quest "Dance with the Devil," part of the sub-chapter "The Face Behind the Mask" on Kliff's story path. After following the Reed Devil's trail with a lantern through the reed fields, players arrive at the boss arena for the confrontation.
Lore and Backstory
The Reed Devil is an outcast terrorizing the Hernand region from his lair on the Frozen Soul Mountain. He is a slum-dweller of Hernand who was cursed with a leprous face and exiled by his own father. This exile drove him to become the masked bogeyman that haunts the reed fields, turning his suffering into a source of fear for others.
The lore describes him as "a mythical creature born of hatred and rage" who "manifested in Hernand one day." The narrative frames the Reed Devil as a product of systemic corruption rather than pure evil; the cruelty of society created the monster it now fears.
His mask is both a practical concealment for his disfigured face and a symbol of the identity he has constructed in exile. The wicker totems he summons during the fight suggest a connection to folk magic or ritualistic practices he adopted after being cast out from society.
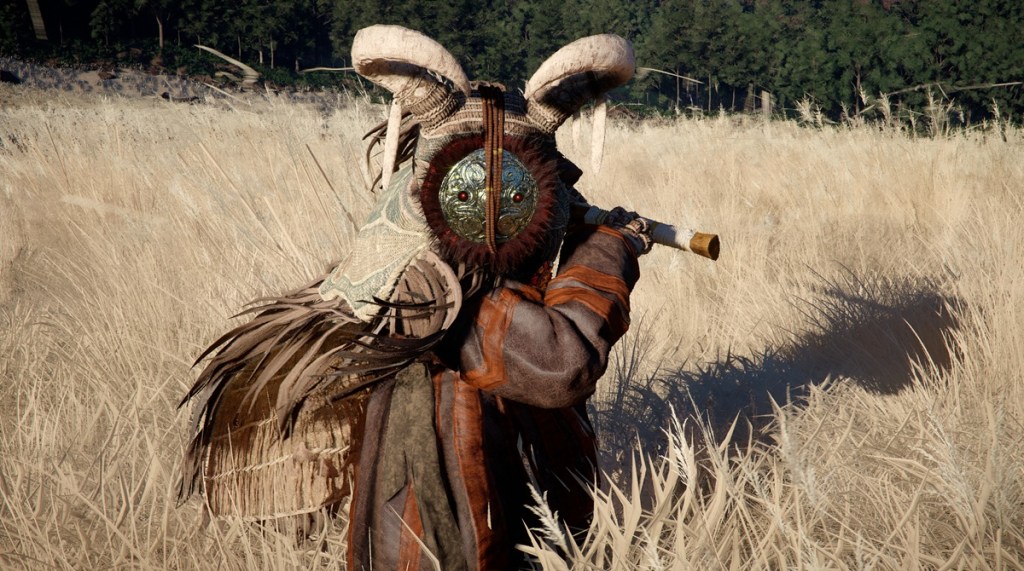
Appearance
The Reed Devil is a short, slight figure wearing a distinctive mask that conceals his leprous face. He carries a katana-style blade suited to his iaijutsu fighting technique. His small stature and speed make him difficult to track in the dense reed fields that surround his arena. The visual design emphasizes his role as a bogeyman: the mask, the isolated mountain setting, and the surrounding wheat fields all create an atmosphere closer to horror than typical fantasy combat.
Arena
The fight takes place on the Frozen Soul Mountain in a clearing surrounded by dense wheat and reed fields. The reeds are tall enough to conceal the Reed Devil completely, which he uses to his advantage. He disappears into the fields between attack chains, forcing the player to react to sudden strikes from unpredictable directions.
The terrain itself becomes a core combat mechanic rather than just a backdrop. The reeds are dynamically chopped and destroyed throughout the fight, gradually opening up the arena as the battle progresses. This means the later stages of the fight give the player slightly better visibility, though the Reed Devil compensates with increased speed and aggression.
Preparation
Before entering the reed fields, look for a small camp next to a rocky outcrop to the east near the cliffs. This camp contains a bonfire, a grindstone, and supplies including raw meat. Take the time to prepare as many meals as possible using Field Grill Cooking and Field Pot Cooking. The fight is attritional and will burn through food quickly.
Recommended Food
There are four strong food options available near the arena. The amounts you can cook depend on extra ingredients you have on hand.
Food | Healing | How to Get Recipe | |
|---|---|---|---|
240 HP | +22 Spirit | Hernand Grocer (requires fruit ingredients) | |
240 HP | None | Hernand Inn (requires extra vegetables) | |
240 HP | None | Complete "Renee's Request" quest (requires extra Salt) | |
180 HP | None | Guaranteed recipe; reliable fallback option |
If you have the recipe and a stock of fruit, Chewy Rice Cakes are the best choice since they recover both Health and Spirit, giving you more reliable access to heavier-hitting skills. Clear Soup is the only option you are guaranteed to have the recipe for, making it a dependable fallback despite providing less healing.
Recommended Gear
Use a Sword and Shield with heavy armor for this fight. The Reed Devil attacks primarily through weapon strikes, so upgraded plate armor significantly reduces incoming damage. Purchase Canta Plate Armor in Hernand if you lack heavy armor; if funds are tight, prioritize the chest piece and refine it. The Sword of the Lord from Kailok (the Hornsplitter) is a solid weapon choice.
Recommended Skills
Invest in these skills before the encounter to give yourself the best tools for the fight:
Skill | Level | Why |
|---|---|---|
Level 3 | Unlocks the Charge ability, which helps you close the gap when the Reed Devil appears and can knock him off balance | |
Proficiency | The finishing slash deals strong damage and chains well after parries | |
Level 2 | Unlocks the Dodge ability for avoiding unblockable attacks | |
Any | Restores stamina mid-combat; essential for sustained blocking |
Focus attribute upgrades on Health, Stamina, and some Spirit. The Reed Devil can burn through all three quickly. Stamina is particularly valuable since you can block most of his attacks without taking damage if you have enough stamina to sustain it.
Combat Phases
The Reed Devil fight is divided into two main combat phases separated by a totem-destruction transition. He has a blue health bar in Phase 1 and a red health bar in Phase 2. His attacks individually deal moderate damage but come at high frequency, creating cumulative danger rather than single devastating blows.
Phase 1
At the end of the introductory cutscene, the Reed Devil charges an attack. When the black cinematic bars disappear, dodge to the side after roughly one second, as he will perform a dash attack. Blocking this opening strike with a shield is not effective.
Attack | Type | Description |
|---|---|---|
Ronin Slash | Blockable | Primary attack: draws katana and slashes in a swift motion. Can be blocked with a shield for counterattack opportunities. |
Poof and Slash | Blockable | Disappears in a puff of smoke, reappears nearby with swift consecutive slashes. A set of three attacks that can be parried. |
Unblockable | Lightning-fast forward stab triggered at distance. Your vision turns blue before it hits. Unblockable; dodge sideways to avoid. This is the learnable skill. | |
X Strike | Blockable | Two diagonal slashes forming an X pattern. Can be blocked with a shield. |
Fury Slash | AoE | Furious radius attack that deflects all incoming attacks. Requires backslide or sidestep to evade. |
Dagger Throw | Ranged | Throws three kunai in a linear pattern. Predictable trajectory; block with shield or sidestep. |
Overhead Stab | Unblockable | Telegraphed by a dust plume that suddenly disappears. Run out of the way, then prepare to counter when he kneels to sheathe his sword. |
Phase 1 Strategy
Despite the speed and red coloration of his sword swings, the Reed Devil's standard combo is a set of three attacks that can be parried. Start by blocking these attacks to learn his timing, then work on parrying the second or third hit. Note that his attacks deal significant chip damage through blocks, so you cannot rely solely on blocking.
A reliable damage combo after a successful parry is: Parry > Forward Slash > Force Palm > continue Forward Slashes until he teleports to reset. Since the Reed Devil is lightly armored, Forward Slashes are very effective when chained.

Handling Disappearance Phases
When the Reed Devil disappears, keep moving with your shield raised and use Evasive Roll to refill stamina. Watch for plumes of dust around you, as they show where his next attack will come from. If the dust suddenly disappears, run out of the way because he is about to perform an overhead stab. After landing this attack, he kneels and sheathes his sword parallel to the ground. This is his most vulnerable moment; raise your shield and use your Charge ability to knock him off balance, then follow up with attacks while he is down.
If you are confident, you can take the offensive and Charge at him whenever he appears. Even if you do not knock him off balance, you will still deal a small chunk of damage and fill his Yellow Bar. By consistently parrying, using Force Palm between attacks, and charging, you can fill the Yellow Bar to exhaust him, creating an extended window for serious damage.
Learning the Swift Stab
During Phase 1, the Reed Devil will occasionally use his Swift Stab attack. Your vision turns blue right before he executes it. Dodge to the side to avoid the strike. After observing this attack twice, a notification confirms you have learned the technique. To use the Swift Stab yourself, land a fully charged Stab attack and then follow it up with a light attack.
Transition Phase: Destroy the Totems
After depleting the Reed Devil's blue health bar, he spawns duplicates to surround and overwhelm you. Five totems rise out of the ground around the arena, and your objective shifts to destroying them. Progress is tracked at the top of the screen, with each lit red circle representing a totem.
Do not fight the duplicates. Focus entirely on sprinting to each totem and destroying it. A Turning Slash (hold both attack buttons for a charged strike) will one-shot each totem, and the wind-up animation makes you resistant to flinching. Dodge and run away from duplicate attacks between totems. Once all five totems are destroyed, land an attack on the Reed Devil to trigger a short cutscene and begin Phase 2.
Phase 2
Phase 2 depletes the Reed Devil's red health bar. He retains all Phase 1 attacks but becomes significantly more aggressive, with faster combos and more frequent appearances from the reeds. He also gains two new unblockable attacks:
Attack | Type | Description |
|---|---|---|
Slashing Wave | Unblockable | Launches arcs of energy at you from a distance. Between each wave, he repositions to attack from an unguarded angle. Keep looking around and dodge side to side. |
Crimson Slash | Unblockable | The strongest attack in the fight. Releases crimson-tinted energy waves. Sidestep to avoid, then counterattack during the recovery animation. |
Phase 2 is mostly the same fight with higher aggression. The Reed Devil swings more aggressively and chains longer combos that chip away at your health faster. Continue using the same strategy of parrying, attacking, using Force Palm, and charging. Maintain your distance when you see him preparing the Slashing Wave, and look for the recovery window after Crimson Slash for counterattack opportunities.
Strategy Summary
Tip | Details |
|---|---|
Watch the Reeds | The Reed Devil creates visible disturbances in the wheat and reed fields as he moves. Dust plumes are your primary tell for where his next attack will come from. |
Keep Your Shield Up | Between attacks, always have your shield raised. Use Evasive Roll to refill stamina, then raise the shield again immediately. |
Parry, Then Combo | His standard three-hit combo can be parried. A successful parry into Forward Slash, Force Palm, and more Forward Slashes is your best damage window. |
Charge When He Kneels | After the overhead stab, he kneels and sheathes his sword. Charge him to knock him off balance for bonus damage. |
Fill the Yellow Bar | Consistent parries, Force Palms, and charges build his Yellow Bar. Once full, he becomes exhausted and vulnerable to extended punishment. |
Sprint Through Totems | During the transition phase, ignore duplicates. Sprint to each totem and use Turning Slash to one-shot them. |
Stay Near the Center | Being in the middle of the clearing gives you the most reaction time regardless of which direction the Reed Devil approaches from. |
Cook Beforehand | Prepare Chewy Rice Cakes (240 HP + 22 Spirit) if possible, or Clear Soup (180 HP) as a fallback. Bring plenty; the fight is long. |
Phase 2 Unblockables | Slashing Wave and Crimson Slash cannot be deflected. Sidestep and re-engage only after the recovery animations complete. |
Learnable Skill: Swift Stab
The Reed Devil's Swift Stab is a learnable skill. During the fight, your screen turns blue right before the Reed Devil performs this attack. Dodge sideways to avoid it. After observing the Swift Stab twice, a notification confirms the skill has been learned. Once acquired, Swift Stab gives Kliff a lightning-fast forward thrust that is unblockable by enemies. To execute it, land a fully charged Stab attack and then immediately follow up with a light attack.
Rewards
Defeating the Reed Devil yields the following confirmed rewards:
Reward | Type | Description |
|---|---|---|
Gloves with Attack 11 and Defense 1 at Refinement Level 1. Grants the Slashing Reeds ability: when you press B/Circle after being hit to counter-attack, your attacker is hit by a flurry of deadly reeds. Also provides +0.2 Health regeneration per second. | ||
Learnable lightning-fast forward thrust (see above). Must be observed twice during the fight. |
The Sunset Reed Cloth Gloves are particularly valuable for dodge-based builds thanks to the Slashing Reeds counter effect. Even players who favor heavy armor benefit from the passive +0.2 HP/sec regeneration between fights and during travel.
Post-Fight
After some dialogue and a cutscene, the Reed Devil is defeated and Kliff destroys his enchanted mask, revealing the disfigured face beneath. The Reed Devil retreats, concluding the "Dance with the Devil" quest. The follow-up quest "Hope After the Draught" begins immediately, dealing with the aftermath of the battle. Andrew is injured during the fight, and you must return to camp to tend to him.
Related Armor Set
In addition to the Sunset Reed Cloth Gloves earned from the boss fight, the full Sunset Reed armor set and the Hollow Visage sword can be found scattered across the Hernand region. These pieces are not dropped by the boss; they must be discovered through exploration.
Item | Location | How to Access |
|---|---|---|
Hollow Visage Sword | Small lake south of Hernand with waterfalls | Use a Stab attack to thrust through the waterfall and enter the cave behind it. The sword is in a chest at the back. |
Grace Estate (ruined mansion northeast of the sword location) | Find a chest behind bars with two torches on either side. Ignite both torches to lower the bars. | |
Large waterfall northeast of the Frozen Soul Mountain | Approach from the ocean side. Use a Stab attack to enter the cave behind the waterfall. Multiple chests inside. | |
Sanctum of Absolution (west of the sword location) | Located in a series of ruins on a mountain. Explore the hidden areas within the sanctum. |
Boss Roster Context
The Reed Devil stands out in Crimson Desert's boss roster as a fight that subverts typical action RPG boss design. Rather than a massive creature or an armored warrior, the player faces a small, fast opponent who uses terrain and stealth as primary weapons. The encounter has more in common with a horror game ambush than a traditional boss duel, and preview journalists consistently highlighted it as one of the most memorable fights in the Gamescom demo. See Bosses for the full boss roster.
Identity: Aldrin of House Grace
The Reed Devil's mortal name is Aldrin. He was the bastard heir of Count Alistair Grace, sired during one of the count's traveling affairs and brought into house grace as a possible successor. Aldrin's standing collapsed when he fell sick with the plague in early youth. The disease left him disfigured and the count, who had built his public reputation on a sponsoring role in cloud-cart development and could not afford a scandal, decided that an unwell heir was unfit for the line. Aldrin was locked away inside Glenbright Manor and forced to wear a mask to disguise the face of a leper.
When Aldrin crawled out of his room one day because he could no longer endure the confinement, the count and his wife ordered him removed permanently. The order, witnessed in a memory inside the manor, instructs the butler to take Aldrin to the Reed Fields in the south and have the work done quietly so that the family's honor would not be touched. Whether the butler obeyed in full or took pity and let Aldrin run is left ambiguous. The memory shows the butler hesitating; the eventual mask of the Reed Devil was found in sunset valley, far enough from Glenbright that either reading is possible.
The Reed Fields and the Wraith
The Reed Fields themselves are not innocent ground. The book Tales of the Sunset Valley, kept in a shrine in the village of the same name, describes a shunned expanse south of Glenbright where lepers were once cast to rot. More corpses came in on stretchers than there were sick men to fill them: the slain, the silenced, the disappeared. Then a great stone fell from the heavens. Ever since, the reeds have grown thick and unnaturally lush over the burial ground, and dying whispers ride the breeze when the wind moves through them.
The stone was a piece of the abyss. Where it landed, the abyssal power soaked into both the soil and the buried dead. The same pattern that produced Umbra, an abyssal consciousness reflecting the worst of mortal hearts, produced something smaller and more local in the Reed Fields: a wraith built from the loneliness, malice, and lust for revenge of every nameless corpse left there. The wraith reaches for the living, particularly for those whose hearts are eaten through with hate. The book is explicit that anyone who heeds its whispers feels their soul hollowed out until they are no longer human.
The Scarecrows
The masked scarecrows that stand watch around Reed Fields are an extension of the wraith. Tales of the Sunset Valley calls them "straw men" and "silent companions to the broken and lost." They appear next to people whose lives have collapsed and speak as if they were the only kind voice left. The book is explicit about the trap: when a soul comes to believe the scarecrow's whisper is its only counsel, and when it feels the whole world has turned its back, the possessed effigies begin to move and coax their chosen toward vengeance. They are the Reed Devil's recruiting tool, not a separate force.
Aldrin was the model case for this. Noble blood, then cast out, then alone, then surrounded by scarecrows. By the time the abyssal power had finished filling the cracks his family left in him, the boy and the wraith were one. The mask of the Reed Devil that he eventually wears is not really a disguise; it is the form the wraith uses to walk on two legs.
The Sunset Valley Shrine
sunset valley, the small village immediately south of the Reed Fields, is a settlement of lapers and the healers who care for them. Walking its streets, a visitor would not necessarily know that it is built on sickness; most patients spend their days tending crops and living idealistically. The exception is a single house in the middle of the village. Stepping inside, the room is a shrine to scarecrows wearing reed devil helms, identical to the one Aldrin once wore. The Reed Devil's definitive mask is kept there. The book Tales of the Sunset Valley is also kept in this house.
After Kliff defeats Aldrin in the reed fields, the villagers' reactions in this same house complete the picture. They describe the helms as crafted by a nameless man, lament that a lonely lad must have needed a friend, observe that sorrow is etched on every mask, and note that they cannot say whether he turned against the world or the world turned against him. The shrine is what is left of his time among them before the wraith took him entirely.
Why the Reed Devil Cannot Be Killed
Kliff defeats Aldrin's body in the present cycle, but the Reed Devil's lines during the fight make the larger truth plain: "You may kill this single form, but you cannot kill me. The grudge born by this mask shall live on within every hateful heart." The wraith is anchored to the burial ground and to the abyssal stone that fell on it. It cannot be undone without undoing the soil it grew from. The fact that the Reed Devil himself does not resurface in the rest of the present cycle is treated by the closing villagers' dialogue as a sign that this particular form may have been put to rest for now, but the lesser scarecrows still keep watch over the fields, ready to start the recruitment again whenever the world produces another Aldrin.
Thematic Connection to Umbra
In the final chapter, Umbra speaks for a long list of dark desires: the ache for immortality, the longing for beauty, the longing for power. One of the longings it claims as its own is the longing for a friend amidst overwhelming loneliness. The Reed Devil is the case study for that line. He embodies the desire to not be alone in the way Umbra embodies the desire to consume. The connection is structural, not coincidental: both are abyssal consciousnesses formed by reflecting the worst of mortal hearts back at the world. The Reed Devil is what Umbra would look like if it had only one burial ground to feed on instead of an entire continent.
Database Stats
Combat attributes recorded in the game database for DUAL SWORDS.
Stat | Value |
|---|---|
HP | 484 |
Attack | 28 |
Defense | 20 |
Stamina | 100 |
Knockout | 400 |
Fatal | 5 |