
Loading...
Loading...
Kearush the Slayer
March 18, 2026 at 09:06 PM
Added 2 internal links
Kearush the Slayer is a massive, gorilla-like beast and one of the optional boss encounters in Crimson Desert. It is encountered at Hernand Castle in the Hernandian Territory, where it has been unleashed upon the castle's helpless troops who seek outside help to contain it. Kearush is one of the game's imposing boss encounters, and its size hints at even larger creatures elsewhere in Pywel.
Kearush was first revealed on October 22, 2025 as part of an IGN First exclusive showcase alongside Muskan and Walter Lanford, with approximately 23 minutes of gameplay footage showing all three boss fights. The official Crimson Desert social media accounts promoted the reveal.
Kearush is a gargantuan beast that moves with a gorilla-like posture, using its massive arms to charge, climb, and slam the ground. Its body is covered with armor, a helmet, and chains, suggesting it was previously captured or restrained before being unleashed at Hernand Castle. Despite its Hulk-like intensity in combat, journalists noted that Kearush looks "strangely fluffy and pettable," with IGN describing it as a "prototypical Big Smashy Dude" whose fuzzy appearance creates an odd contrast with its lethal fighting style.
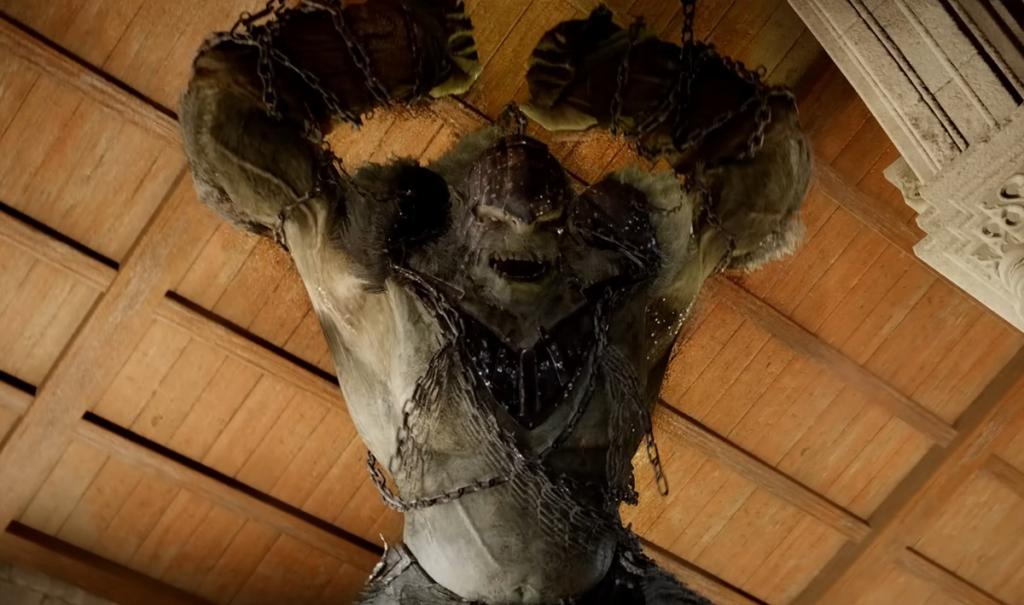
Kearush is encountered at Hernand Castle in the Hernandian Territory. The Fextralife wiki describes the scenario: "A beast unleashed on the Hernand Castle, the helpless troops seek help in containing this enormous ground shaking slayer." This framing suggests Kearush was deployed as a weapon against the castle's garrison, and Kliff intervenes to help contain the creature.
The armor, helmet, and chains on Kearush's body raise questions about its origin. Something or someone outfitted this beast with restraints, which implies it was captured and held before being set loose. Whether this was the work of the Black Bear forces, a rival faction, or some other group has not been confirmed in pre-release materials.
Kearush has three health bars, a fight-extending mechanic shared with several other Crimson Desert bosses including the Staglord. The encounter is a prolonged, physically demanding fight that emphasizes swift, kinetic movement and forces players to stay mobile throughout all three phases. Each depleted health bar triggers increased aggression from Kearush, with its attack combinations becoming faster and more unpredictable.
Kearush's attacks are built around raw physical power. It uses its massive arms and body weight to create area-of-effect damage zones that punish stationary players. Learning the visual tells for each attack is essential because many of its strikes cover wide areas and chain into follow-ups.
Attack | Description | Counter |
|---|---|---|
Ground and Pound | Beats its chest, then slams the ground with both hands, followed by a continuous rampaging series of smash attacks. This is its most dangerous combo and covers a large area. | Roll away at the chest-beating tell. Do not try to block the full combo; create distance and wait for it to end. |
Wall Climb Leap | Climbs nearby walls, then lunges from the wall toward the player's position. The leap covers significant distance and deals heavy impact damage. | Watch for Kearush moving to a wall. Roll sideways when it launches. The landing has recovery frames you can exploit. |
Instant Body Slam | Jumps high from the ground for a body slam directly at the player's current location. Faster than the wall climb variant. | Dodge roll at the apex of the jump. Staying mobile reduces the chance of being directly under the landing zone. |
Stomp and Swing Combo | Tries to stomp the player with its feet, then follows up with sweeping hand swing attacks that cover a wide arc. | Dodge the initial stomp, then roll behind Kearush during the hand swings to avoid the arc. |
Multi-Hit Hand Smash | Smashes the ground with its bare hands multiple times in rapid succession, then finishes with a heavy elbow slam. | Back away during the hand smashes. The elbow slam at the end has the longest recovery window for counterattacking. |
Two-Hand Smash | Distances itself from the player, observes their movement, then jumps forward to crush them with a two-handed overhead strike. | The observation pause is the tell. Sidestep when Kearush commits to the jump. |
Rampage Mode | Enters a berserker state with increased attack speed and aggression. Chains multiple attacks together with shorter recovery windows. | Play defensively during rampage. Focus on dodging and wait for it to exhaust itself before re-engaging. |
Like the Queen Stoneback Crab encounter, Kearush can be mounted. Players can clamber onto its back in a Dragon's Dogma-style interaction and stab it repeatedly with their sword to deal significant damage. This is one of the most efficient ways to drain its health bars, but it comes with a major risk.
Mounting Kearush and stabbing its back is one of the most efficient damage strategies, but players should be ready to disengage when it begins thrashing violently.
The Kearush fight rewards aggressive players who can read attack patterns and find openings between combos. Standing at mid-range is the most dangerous position because most of Kearush's attacks are designed to punish players at that distance. Either stay very close (to exploit gaps between swings) or far away (to avoid area attacks entirely).
Exploit recovery frames. Every major attack has a brief recovery window. The elbow slam at the end of the Multi-Hit Hand Smash and the landing from the Wall Climb Leap are the best openings for sustained damage.
Mount for burst damage. Climbing onto Kearush and stabbing its back deals more damage per second than ground combat. Disengage when it starts thrashing to avoid being thrown off.
Watch for wall approaches. When Kearush moves toward a wall, it is almost always preparing a Wall Climb Leap. Position yourself away from the wall's trajectory to give yourself more dodge time.
Stay mobile during Ground and Pound. This combo has the widest coverage and the longest duration. Do not try to counterattack mid-combo; just survive it and punish the recovery.
Manage healing items carefully. With three health bars, this is a long fight. Do not burn all restorative items in the first phase.
Kearush's chest-beating animation always precedes the Ground and Pound. Use it as a consistent cue to create distance.
The Two-Hand Smash has the longest wind-up of any attack. If you recognize the observing stance early, you can get in a full combo before dodging the strike.
During Rampage Mode, do not attempt to mount. The increased aggression makes it nearly impossible to stay on safely.
Ranged attacks (bow) are effective during the pauses between Kearush's attack chains, but the window is short. Prioritize melee damage when safe.
Kearush the Slayer is one of at least 76 bosses (per the Knowledge system) in Crimson Desert. It was revealed alongside Muskan (an eight-foot brawler) and Walter Lanford (a shotgun-wielding gunman) in the October 2025 IGN First showcase. Where Muskan tests close-range brawling and Walter Lanford demands precision and evasion, Kearush combines area-of-effect avoidance with the mounting mechanic, giving the fight a unique verticality compared to the game's other encounters.
