Loading...
Loading...
Esper Cycle System
April 23, 2026 at 11:05 AM
Clarified Esper wheel adjacency, added six paired reactions list, character passive stacking (off-field active), and Blossom passive examples (Nanally, Mint, Jun)
The Esper Cycle is the core elemental combat system in Neverness to Everness. Six elements are arranged in a circular wheel, and only adjacent pairs on that wheel can trigger elemental reactions. This constraint shapes every aspect of team building, because picking characters from opposite sides of the wheel means forfeiting reaction synergy. Understanding the Esper Cycle is essential for clearing high-difficulty content, where raw stats alone are not enough.
Each element has an associated color and thematic identity. All playable characters belong to exactly one element, which determines their reaction compatibility.
Element | Color | Theme |
|---|---|---|
White | Light, order, celestial energy | |
Teal | Nature, life force, organic growth | |
Pink | Magic, ritual, arcane power | |
Chaos | Purple | Entropy, dark energy, destruction |
Blue | Mind, cognition, mental force | |
Yellow | Form, physicality, structural power |
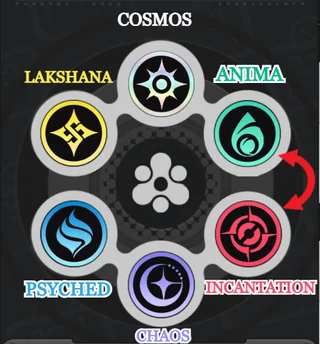
The elements form a continuous ring: Cosmos, Anima, Incantation, Chaos, Psyche, Lakshana, and then back to Cosmos. Only neighboring pairs on this ring can produce duo reactions. Elements that are two or more steps apart on the wheel do not interact at all.
The six elements sit around a ring called the Esper wheel, and only the elements that sit next to each other on that wheel can combine into elemental reactions. The adjacency order, moving around the ring in a single direction, is listed below. The last element connects back to the first, so the ring has no break.
Cosmos sits next to Anima on one side and Lakshana on the other.
Anima sits next to Cosmos on one side and Incantation on the other.
Incantation sits next to Anima on one side and Chaos on the other.
Chaos sits next to Incantation on one side and Psych (Psyche) on the other.
Psych (Psyche) sits next to Chaos on one side and Lakshana on the other.
Lakshana sits next to Psych on one side and Cosmos on the other.
Adjacency is the gate that decides whether two characters can produce a reaction together. If an Esper on your squad uses an element that is two or more steps away from every other squad member on the wheel, nothing lights up when you swap into them. Picking at least two adjacent elements is the minimum bar for reliable reaction coverage, and extending to three adjacent elements opens the door to trio reactions on top of the duo list. This makes element coverage and wheel adjacency, not raw damage numbers, the first consideration when locking in a squad for the combat system.
Characters pulled from the same adjacent pair also stack their individual contributions on top of the shared reaction, which is covered under Character Passives and Off-Field Stacking below.
Each character has a personal Esper Cycle Meter displayed near their portrait during combat. The meter charges through three main actions: dealing damage with normal attacks, activating skills, and successfully executing parries (see the Parry System article for details). When the meter fills completely, the character's portrait begins to glow, signaling that they are ready for a powerful Esper Cycle swap.
An Esper Cycle swap is not just a tag-in. When you swap to a character whose meter is full, they enter the field with an enhanced entrance attack and immediately trigger any applicable elemental reaction with the element last applied by the previous character. This makes meter management the central rhythm of NTE's combat: attack, fill the meter, swap, trigger a reaction, repeat.
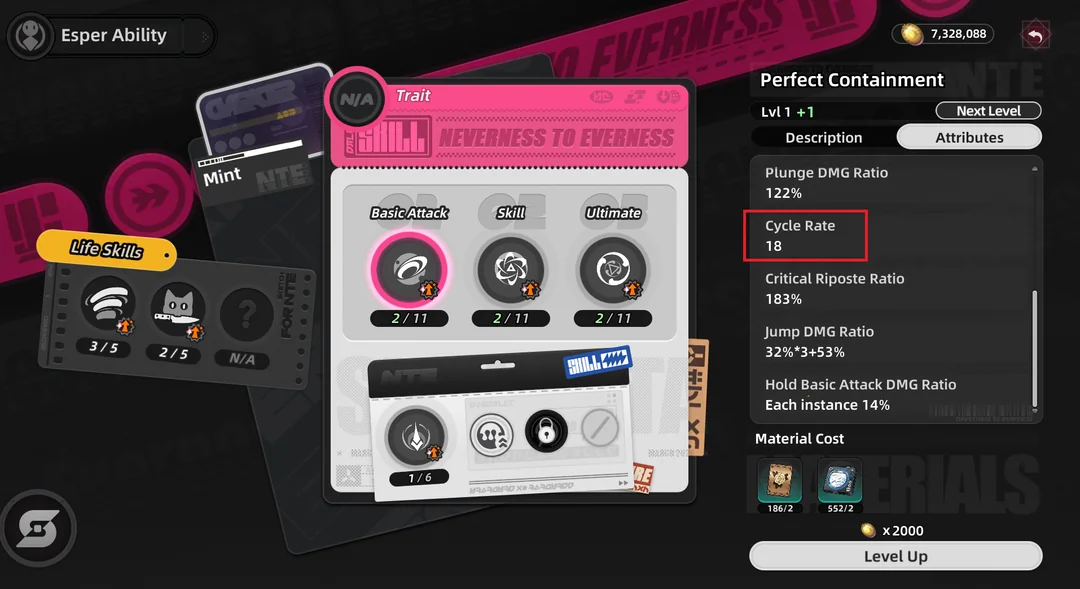
Cycle Rate is a stat that governs how quickly the Esper Cycle Meter fills. A higher Cycle Rate means faster meter gain per action, allowing more frequent swaps and reactions. Most characters have a moderate base Cycle Rate, but some, like the MC (Esper Zero) and Fadia, have skills with 100 Cycle Rate that can instantly fill the meter in a single use. This makes them excellent enablers for rapid reaction chains.
Cycle Rate can also be boosted through the KongMu equipment system. Certain Disk set effects and Drive Block substats provide Cycle Rate bonuses, and stacking this stat is a viable build path for characters whose primary role is to enable reactions rather than deal direct damage.
Every playable character in Neverness to Everness has a standardized ability kit composed of four distinct abilities. Understanding these four components is essential for mastering the combat system and building effective teams around the Esper Cycle.
Ability | Description | Role in Esper Cycle |
|---|---|---|
Basic Attack | Standard attack combo string. Each character has a unique attack chain with different hit counts, speed, and range. | Builds Esper Cycle Meter steadily through continuous hits. Faster attack strings fill the meter more quickly. |
Skill | Active ability on a cooldown timer. Skills deal significant damage and often apply the character's element in a burst. | Provides a large chunk of meter charge per use. Skills are the most efficient way to fill the meter quickly. |
Ultimate | Powerful burst ability that requires ultimate energy to activate. Deals heavy damage or provides major team support. | Does not directly charge the Esper Cycle Meter, but benefits from it. Charge trio reaction generates ultimate energy. |
Esper Ability | Unique ability specific to each character. Esper Abilities range from special movement skills to transformation states. | Varies by character. Some Esper Abilities have high Cycle Rate values (like MC's 100 Cycle Rate skill) that can instantly fill the meter. |
The interplay between these four abilities defines each character's playstyle. DPS characters typically focus on weaving basic attacks between skills to maximize both damage and meter generation. Support characters may rely more heavily on skills and Esper Abilities to enable reactions for teammates. Characters with high Cycle Rate on their Esper Ability, like Esper Zero (the MC) and Fadia, can serve as rapid swap enablers, filling their meter almost instantly and cycling through reactions at a faster pace than other characters.
Every character possesses a unique Esper Cycle Passive ability. These passives enhance the character's contribution to elemental reactions and remain active even when the character is off-field. For example, a passive might increase the damage of a specific reaction type, extend a reaction's duration, or apply a debuff to enemies affected by the character's element.
Because Esper Cycle Passives work from the bench, they add a hidden layer of depth to team composition. A character who seems underwhelming on the field might be extremely valuable as an off-field reaction amplifier. Always read a character's passive description before dismissing them.
Every character carries a unique Esper Cycle passive tied to the reactions their element can participate in, and that passive is active for as long as the character is a member of the squad. This is the key off-field rule: the passive still fires while the character is sitting on the bench, not just while they are the active on-field fighter.
Because of this, two or three characters drawn from the same adjacent pair stack their separate passive effects on top of the same shared reaction. A squad with two Cosmos plus Anima characters, for example, will see both passive enhancements applied to every Blossom it triggers, regardless of who is swapped in when the reaction goes off. The same stacking logic applies to any other adjacent pair on the wheel: pair Incantation with Chaos for stacked Scorch passives, pair Psyche with Lakshana for stacked Stain passives, and so on. Element coverage and wheel adjacency therefore directly drive how much passive value your squad is getting from each reaction.
Blossom, produced by the Cosmos and Anima pair, spawns a peashooter turret that fires on nearby targets. Several Cosmos and Anima characters have observed Esper Cycle passives that modify exactly this peashooter. The examples below illustrate how different passives stack when these characters share a squad: Nanally adds more projectiles per shot, Mint expands the area each projectile covers, and Jun spawns additional peashooters and lifts the cap on how many can be on the field at once. Running all three at once applies every modifier to the same Blossom turrets.
Character | Passive Effect on Blossom |
|---|---|
Blossom peashooters fire more projectiles per volley, raising the total damage output from every Blossom spawned while Nanally is in the squad. | |
Blossom peashooter projectiles cover a larger damage area on each shot, letting a single Blossom hit more enemies clustered around the target. | |
Jun | Blossom spawns additional peashooters and raises the on-field peashooter cap, so more turrets can be active at the same time. |
The same stacking principle applies to the other five reactions on the wheel, each with its own roster of element-matched passives. When planning a squad around a specific reaction, check each candidate character's Esper Cycle passive to see exactly what effect they stack onto that reaction while they are in the squad.
Duo reactions occur when two adjacent elements on the wheel are applied to the same target. Each adjacent pair produces a unique reaction with distinct combat effects. The table below lists all six duo reactions.
Reaction | Elements | Effect |
|---|---|---|
Blossom | Spawns a peashooter turret that attacks nearby targets with area damage for several seconds. | |
Hexed | Triggers extra Unison damage based on the total elemental damage the target has taken recently. | |
Scorch | Incantation + Chaos | Inflicts a damage-over-time burn effect that lasts approximately 15 seconds. |
Nova | Chaos + Psyche | Marks the target. After 5 seconds, the mark detonates for a large burst of Cognito damage. |
Stain | The target takes 50% more Psyche and Lakshana damage for 12 seconds. Powerful for sustained DPS windows. | |
Remora | Marks the target, reducing both movement speed and attack speed for the duration. |
Trio reactions are advanced combos that require specific duo reactions to overlap on the same target. They are harder to set up but deliver exceptionally powerful effects. Currently, two trio reactions have been confirmed.
Reaction | Trigger | Effect |
|---|---|---|
Charge | Blossom hits a Remora-marked target | Each hit from the Blossom peashooter grants ultimate energy, rapidly filling the team's burst gauges. |
Discord | Nova and Scorch overlap on the same target | Reduces the target's break meter by a large percentage, providing the fastest path to a stagger state. |
To trigger Charge, you need characters from three adjacent elements: Lakshana, Cosmos, and Anima. First apply Remora (Lakshana + Cosmos), then trigger Blossom (Cosmos + Anima) while the Remora mark is still active. For Discord, you need Incantation, Chaos, and Psyche. Apply Scorch (Incantation + Chaos) and then Nova (Chaos + Psyche) before Scorch expires.
The most effective team compositions focus on two or three adjacent elements, creating a "reaction lane" along the wheel. Picking three adjacent elements gives access to two duo reactions and potentially one trio reaction, which is usually sufficient for any content in the game.
The fourth team slot can be filled with a character from any element based on what the team needs. Some players use it for a dedicated healer or shielder regardless of element. Others slot in a fourth character that extends the reaction lane to four elements, unlocking additional duo reaction coverage at the cost of less focused damage. There is no single correct approach; it depends on the encounter and your roster.
For a deeper look at team composition strategies, see the Team Building Guide. For information on how elemental reactions interact with the break mechanic, see the Stagger System article.