Loading...
Loading...
The Reed Devil
March 12, 2026 at 12:07 PM
Add 1 relevant image to article
The Reed Devil, also called "The Devil of the Reed Fields," is a boss encountered on Frozen Soul Mountain in Crimson Desert. He was first shown at Gamescom 2024 as one of four playable boss fights in the demo, alongside the Staglord, Queen Stoneback Crab, and White Horn. Pearl Abyss released a dedicated gameplay trailer for the encounter. The Reed Devil is a short, fast swordsman who fights with iaijutsu (quick-draw sword techniques) and retreats into the surrounding wheat and reed fields between attacks. ButWhyTho's preview called the fight "less about dodging and more about letting go and embracing the chaos," making it one of the more unusual boss encounters in the game.
The Reed Devil is an outcast, a figure terrorizing the Hernand region from his lair on Frozen Soul Mountain. According to the Fextralife wiki, he is a slum-dweller of Hernand who was cursed with a leprous face and exiled by his own father. This exile drove him to become the masked bogeyman that haunts the reed fields, turning his suffering into a source of fear for others.
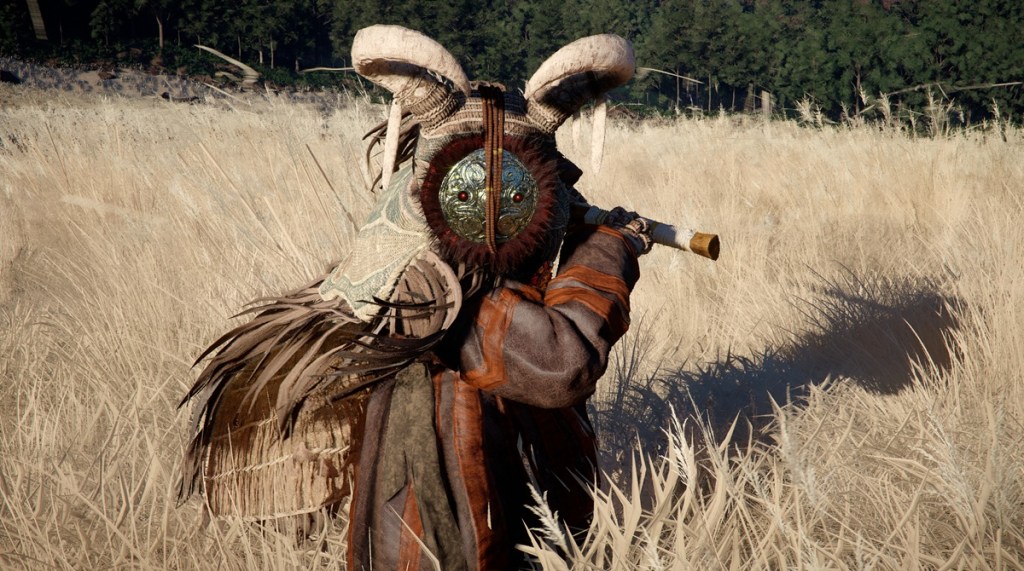
His mask is both a practical concealment for his disfigured face and a symbol of the identity he has constructed in exile. The wicker totems he summons during the fight suggest a connection to folk magic or ritualistic practices he adopted after being cast out from society.
The Reed Devil is a short, slight figure wearing a distinctive mask that conceals his leprous face. He carries a katana-style blade suited to his iaijutsu fighting technique. His small stature and speed make him difficult to track in the dense reed fields that surround his arena. The visual design emphasizes his role as a bogeyman: the mask, the isolated mountain setting, and the surrounding wheat fields all create an atmosphere closer to horror than typical fantasy combat.
The fight takes place on Frozen Soul Mountain in a clearing surrounded by dense wheat and reed fields. The reeds are tall enough to conceal the Reed Devil completely, which he uses to his advantage. He disappears into the fields between attack chains, forcing the player to react to sudden strikes from unpredictable directions. The terrain itself becomes a core combat mechanic rather than just a backdrop. The reeds are dynamically chopped and destroyed throughout the fight, gradually opening up the arena as the battle progresses.
Phase | Mechanic | Description |
|---|---|---|
Phase 1 | Iaijutsu Strikes | Emerges from the surrounding reeds to deliver rapid quick-draw strikes, then retreats into cover. Almost no wind-up on attacks. The player must read the direction of his approach from visible movement in the reeds and respond with timed counter-strikes. |
Phase 2 | Wicker Totems | Summons wicker totems around the arena that create additional hazards. Totems project area-of-effect attacks or serve as decoys. Destroying them is optional but recommended; explosive arrows can be used to take them out efficiently. |
Phase 3 | Accelerated Aggression | Combines iaijutsu strikes with increased speed and longer attack chains. Emerges from the reeds more frequently and may attack from new angles. Movement patterns become less predictable. |
While individual attacks do not deal massive damage compared to bosses like the Staglord or Queen Stoneback Crab, the speed and frequency of strikes create cumulative danger. The Reed Devil's health bar is a single phase with no armor or shield segments.
Tip | Details |
|---|---|
Watch the Reeds | The Reed Devil creates visible disturbances in the wheat and reed fields as he moves. This is your primary tell for where his next attack will come from. |
Attack Into His Charges | Trying to dodge every iaijutsu strike is exhausting and often fails due to their speed. Committing to a preemptive swing as he emerges is more effective. |
Destroy the Totems | Phase 2 becomes significantly easier if the wicker totems are destroyed rather than ignored. Use explosive arrows for efficient removal. |
Stay Near the Center | Being in the middle of the clearing gives you the most reaction time regardless of which direction the Reed Devil approaches from. |
Do Not Chase | He has the advantage in the dense fields. Stay in the open and let him come to you. |
Parry and Counter | Perfect blocks and timed guards create openings for counterattacks. This fight demands faster pacing than traditional dodge-heavy encounters. |
The Reed Devil stands out in Crimson Desert's boss roster as a fight that subverts typical action RPG boss design. Rather than a massive creature or an armored warrior, the player faces a small, fast opponent who uses terrain and stealth as primary weapons. The encounter has more in common with a horror game ambush than a traditional boss duel, and preview journalists consistently highlighted it as one of the most memorable fights in the Gamescom demo. See Boss Battles for the full boss roster.