Overview
The Exploit system is a unique combat mechanic in The Expanse: Osiris Reborn that ties together environmental awareness, tactical positioning, and companion abilities into a single powerful action. Rather than simply shooting enemies directly, players can identify interactive environmental areas, maneuver enemy groups into position near those areas, and then command their companions to execute specialized attacks that leverage the environment itself. When executed successfully, an Exploit can eliminate an entire group of enemies in a single action, making it one of the most impactful tools in the player's tactical arsenal.
The system encourages players to constantly scan their surroundings for opportunities rather than relying purely on direct firepower. Every encounter space is designed with environmental elements that can be exploited, but matching the right companion to the right opportunity is the key to success.
How Exploits Work
Using an Exploit follows a three-step process that requires both awareness and timing:
Identify the opportunity: The player must spot an interactive environmental area in the combat zone. These can include unstable structures, exposed electrical systems, fuel containers, loose overhead fixtures, and other hazards scattered throughout the level geometry.
Position enemy groups: Once the environmental opportunity is identified, the player needs to maneuver enemies into the area of effect. This can be done through aggressive flanking to push enemies back, using grenades to flush them from cover, or drawing their attention so they cluster near the hazard.
Command the companion: With enemies in position, the player orders a companion to execute their Exploit ability on the environmental element. The companion carries out a specialized attack based on their Exploit category, triggering the environmental hazard and dealing massive damage to all enemies in the area.
The result is often devastating. A well-executed Exploit can clear out an entire squad of enemies that might otherwise require a prolonged firefight. However, using the wrong companion category on an environmental element will not produce the desired effect, so players must pay attention to which category matches each situation.
Exploit Categories
Each companion in the game has one of four Exploit categories. These categories determine what kind of environmental interactions the companion can trigger. The four categories and their associated companions are:
Category | Effect | Companion(s) |
|---|---|---|
Precision | Identifies and targets vulnerable environmental points; triggers hazards and collapses | |
Demolition | Destroys cover and terrain outright, forcing enemies into the open | |
Malfunction | Wrecks and disables electrical systems; scrambles enemy equipment | |
Cyber-attack | Turns electrical systems against enemies rather than destroying them |
Precision
Precision Exploits focus on identifying and targeting structural weak points in the environment. When a Precision companion is ordered to act on a vulnerable element, they deliver a carefully aimed attack that triggers a chain reaction. This might cause overhead fixtures to collapse onto enemies below, destabilize catwalks and platforms so they give way, or trigger stored hazardous materials that were held in check by a single support point. The key characteristic of Precision is accuracy: the companion targets the exact point that will cause the most environmental damage.
The companions with the Precision category are J and Regina. Having either of them in the squad ensures access to Precision Exploits, which are particularly effective in environments with overhead structures, scaffolding, or precariously balanced objects.
Demolition
Demolition Exploits take a more direct approach. Rather than targeting a specific weak point, Demolition companions destroy cover and terrain outright. When enemies are hunkered behind solid barriers, a Demolition Exploit can obliterate those barriers entirely, leaving enemies exposed and vulnerable to follow-up fire. This category is especially useful against heavily entrenched enemy positions where conventional weapons cannot penetrate their cover.
The companions with the Demolition category are Polly and Michael. Demolition Exploits shine in encounters where enemies use fortified positions with destructible cover elements.
Malfunction
Malfunction Exploits target electrical systems and electronic infrastructure. When a Malfunction companion activates their ability on an electrical element, they wreck and disable it in a way that damages nearby enemies. This can cause power conduits to overload and arc electricity into anyone standing close, computer terminals to explode, or enemy equipment to short-circuit and become useless. The distinction between Malfunction and Cyber-attack is important: Malfunction destroys the system, while Cyber-attack repurposes it.
The companions with the Malfunction category are Teo and Zafar. Malfunction Exploits are common in space station interiors and industrial areas where electrical infrastructure is everywhere.
Cyber-Attack
Cyber-attack is the rarest Exploit category, held by only a single companion. Instead of destroying electrical systems, a Cyber-attack Exploit turns them against the enemies. This means automated turrets can be hacked to fire on their own allies, security doors can be sealed to trap enemies in kill zones, and environmental control systems can be weaponized to flood areas with harmful atmospheres or extreme temperatures. The creative potential of Cyber-attack is enormous, but its availability is limited to a single squad member.
The only companion with the Cyber-attack category is Aleesha. Because she is the sole source of Cyber-attack Exploits, including her in the squad unlocks tactical options that are simply unavailable otherwise. Players who want access to the full range of Exploit possibilities should consider building their squad around Aleesha for missions in electronically dense environments.
Tactical Considerations
Squad composition is critical for getting the most out of the Exploit system. Since the player brings two companions on each mission, the combination of Exploit categories in the squad determines which environmental opportunities can be leveraged. Having two companions with different Exploit categories provides the broadest tactical flexibility. This keeps that the squad can respond to multiple types of environmental elements in any given encounter.
For example, pairing a Precision companion with a Malfunction companion means the squad can handle both structural hazards and electrical systems. Pairing a Demolition companion with a Cyber-attack companion covers both destroying enemy cover and turning automated systems against foes. Players should assess the likely environment of upcoming missions and select companions whose categories match the expected opportunities.
It is also worth noting that Exploit opportunities are not always obvious at first glance. Players who invest time in scanning each combat area before engaging will often discover hidden environmental elements that can turn an otherwise difficult fight into a decisive victory. The tactical visor and general environmental awareness are just as important as raw firepower when it comes to mastering the Exploit system.
The Exploit system rewards preparation and observation. Players who rush into combat without checking their surroundings will miss opportunities that could end fights in seconds. Those who take the time to identify environmental elements, choose the right companions, and position enemies carefully will find that Exploits are among the most satisfying and efficient tools in the game.
Closed Beta Details
The closed beta offers only one companion (J, the player's twin) as a ground teammate, with Zafar providing support from the ship. That limited roster still shows two of the four Exploit categories in action: J defaults to Precision in every beta playthrough, while Zafar's ship-based Exploit uses the Gemini's point-defense cannons. The beta mission, set on Pinkwater Four Station shortly after the Eros incident, is deliberately built to teach Exploits across roughly one to two and a half hours of combat, with Normal and Hard difficulty options.
J's Precision Exploit in the Beta
J's Precision Exploit is the player's primary introduction to the system. With a single Engage command, J can be sent to fire at weak points in cover to collapse it, or to precision-hit explosive objects clustered around an enemy group. A well-placed Precision shot at a stack of pressurized pipes or a fuel canister routinely wipes out an entire squad along with the walls or barricades they were using for cover. Because cover is destructible throughout the game, Precision Exploits also function as a way to strip entrenched enemies of their protection without closing distance.
Precision is therefore both an offensive and a positioning tool. Players in the beta who spent time scanning each new combat room before engaging consistently found explosive objects and load-bearing supports that could be triggered with J's Exploit, turning potentially long firefights into a single clean kill chain.
Re-Speccing J to Malfunction
Although J starts with Precision, their default Exploit is not permanent. J's Gadget skill tree contains a node that converts their Exploit type from Precision to Malfunction, letting a solo-J party still handle electrical-hazard encounters once Precision opportunities run out. This is a companion-only option: the player's own Gadget tree does not expose an Exploit-swap node, so the choice belongs to each companion's individual build rather than to the player character's progression.
Respeccing a companion's Exploit has squad-composition implications. Because beta missions lean heavily on contextual environmental hazards, shifting J away from Precision means losing access to weak-point collapses for the rest of that build, so the decision should be weighed against whichever second companion the player expects to bring on later missions.
Zafar's PDC Ship-Support Exploit
Zafar does not deploy to the ground team during the beta. Instead, he operates the Gemini in orbit and can be called on for a ship-level Exploit: the Gemini's point-defense cannons open fire on the station exterior or a marked battlefield position, shredding cover and enemies with rapid heavy-calibre rounds. In the closed-beta show, Zafar's PDC run tears through a station wall to flush enemies out of a fortified room, turning what would be a grinding room-clear into a brief overwhelm.
The PDC Exploit is framed as the blueprint for how non-ground companions will contribute to combat throughout the full game: each such crewmate is expected to have at least one unique, context-dependent Exploit tied to their role on the ship or station. This is also one of the clearest examples of Exploit availability being contextual, since PDC fire only makes sense in specific external, mission-linked settings.
Active Pause and Exploit Execution
Exploits are triggered through the game's tactical pause, the same active-slow system that handles most companion commands. On keyboard the default binding is F, which slows the battle to a crawl (not a full freeze) so the player can line up an Exploit setup without being shot in the meantime. During the slow, the player can cycle targets, switch to a companion, and direct them to act on a highlighted interactive object. Releasing the pause resumes combat and plays out the Exploit in real time.
This workflow is important because Exploits are usually most effective when the player has also maneuvered grenades, suppressive fire, or another gadget to herd enemies near the hazard first. Using the active pause to chain a frag grenade, a scanner highlight, and a Precision Exploit into the same clustered group is the kind of multi-kill setup the system is designed around, and it rewards planning in a way that pure reflex shooting cannot.
Leader Skill Tree Synergy
Exploits are locked behind the Engage command on a cooldown, which means investing in the Leader skill tree directly increases how often Exploits come online. Leader nodes can significantly shorten Engage's cooldown, so a Leader-focused player can Engage their companion (and therefore trigger Exploits, signature gadgets, or both) noticeably more frequently than a player who spreads their points across Shooter, Gadget, and Survivalist. Leader also boosts companion damage and companion armor, making the follow-up fire after an Exploit itself more lethal.
A build that leans into Leader turns Exploits from occasional showpieces into a core loop: scan the area, herd enemies, call the Exploit, Engage again on the next group as soon as cooldown allows. Players who ignore Leader will still see the Exploit system, but it will fire roughly as often as their companion's signature gadget comes off cooldown rather than becoming a moment-to-moment tactical option.
Signature Versus Swappable Slots
Because every companion's Exploit type is tied to their gadget loadout, the distinction between signature and swappable slots directly shapes which Exploits are actually available on a given mission. Each companion carries one signature gadget and one signature subsystem that can never be removed, plus a second gadget slot and additional subsystem slots that the player can freely customize. The signature items are the ones bonded to that companion for the entire playthrough.
The practical rule is to invest upgrade materials in a companion's signature gadget and signature subsystem first, because those are the ones locked to them forever. Exploit interactions frequently key off the signature gadget (J's wrist-mounted Multi-Shot launcher, for example, is the hardware that actually delivers a Precision hit), so an upgraded signature usually means a more lethal Exploit. The second gadget slot can hold anything the player wants, which opens the door to hybrid builds like a Malfunction-respecced J who still runs a frag grenade in their free slot.
Notable Beta Exploit Moments
Several specific Exploit set-pieces in the closed beta demonstrate how varied the system gets even with only one ground companion:
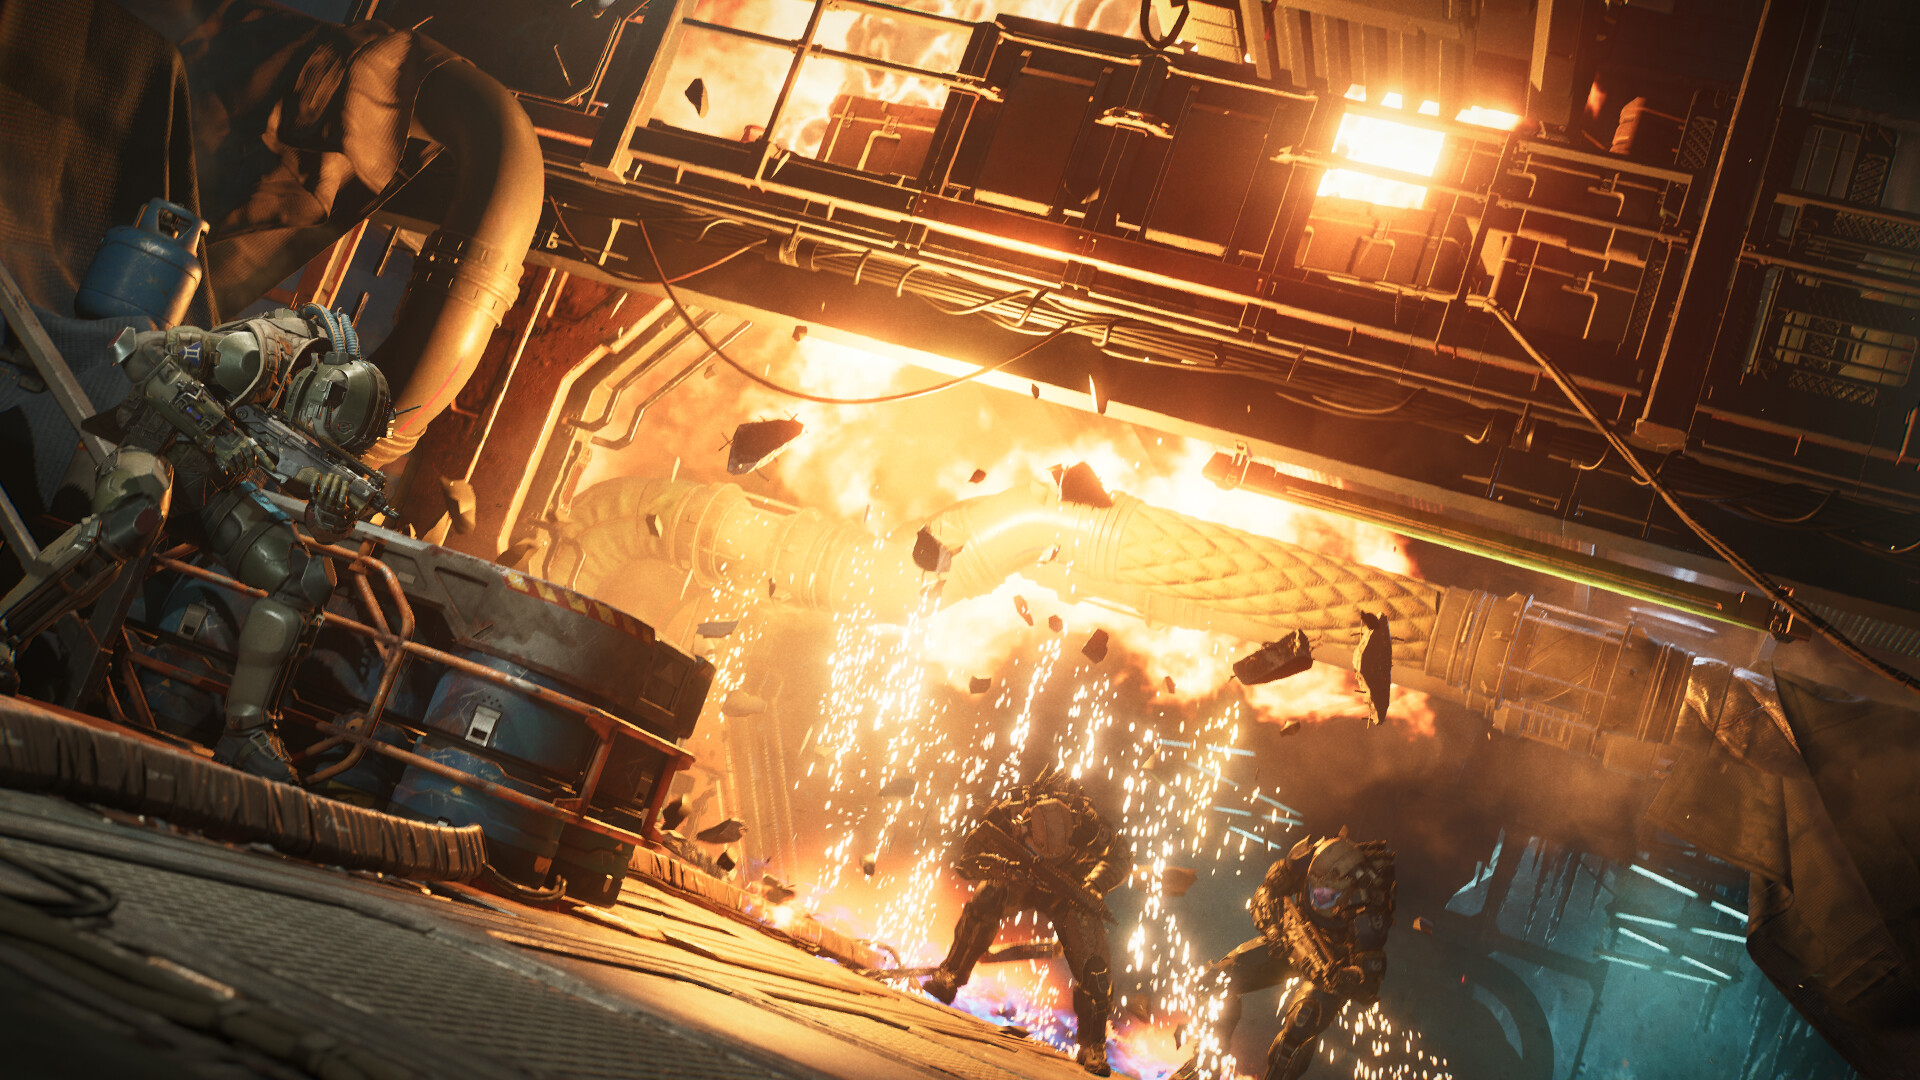
Pipe-cluster room-clear: Ordering J to precision-shoot a cluster of pressurized pipes next to a squad of entrenched mercenaries disables the entire group at once, since the rupture damages everyone inside the pressure radius and knocks loose the cover they were hiding behind.
Station-wall PDC strike: Calling in Zafar's PDC fire through an exterior wall of Pinkwater Four Station tears the wall open and flushes defenders out of the room behind it, giving the ground team a clean lane of fire on enemies they could not otherwise see.
Zero-G permanent kill: Exploit chains carry into the vacuum sections on the station's exterior. Detonating a container near enemies in zero gravity sends their bodies drifting off into open space permanently, since anyone whose magnetic boots lose grip is simply gone from the battlefield.
Scanning for Exploit Opportunities
Exploits are contextual rather than persistent, which means the catalogue of triggerable hazards changes from map to map. The closed beta shipped with recurring object classes that players learned to look for: explosive pipes, pressurized vents, destructible walls, electrical panels, fuel canisters, and loose overhead fixtures. None of these are flagged with glowing outlines during free-roam exploration, so the habit that pays off is a slow scan of each new combat space before triggering the first enemy wave.
This is also where party composition closes the loop with the environment. Bringing a squad whose Exploit categories match the likely hazards in the upcoming mission (Precision for structural encounters, Malfunction or Cyber-attack for electrically dense stations, Demolition for heavily fortified areas) is the difference between consistently finding Exploit opportunities and walking into rooms full of unusable hazards. Because the player can adjust J's Exploit type through the Gadget tree, even a single-companion run retains some of that flexibility on the beta mission.