Overview
Crimson Desert has an integrated economic system woven throughout its single-player open world. Rather than a dedicated market simulation, the economy operates through regional vendor networks, camp-based commerce, faction reputation that gates access to merchants, and resource gathering life skills. Each settlement across Pywel houses its own set of vendors with region-specific inventories, and the player's standing with local factions determines what goods and services are available. The in-game currency is silver, earned through quests, exploration, completed missions, and selling gathered materials.
Unlocking the Trading System
Trading in Crimson Desert is not available from the start. The system unlocks in stages as you progress the Greymane questline beginning in Chapter 3. The first requirement is setting up camp on Howling Hill and following the Greymane "Grounds of the Sunrise" quest path, which involves finding missing comrades and expanding the Greymane Camp.
As you complete the quest "A Rumor in Glenbright Farm," a comrade named Brice joins the group. Brice is the Greymanes' wagonmaster, a pragmatic fatalist who handles all logistics and wagon operations from the camp. Once recruited, Brice sets up the Wagon Management Office at camp, which is where you deploy wagons, load cargo, and initiate new wagon construction.
Wagon Access Requirements
However, recruiting Brice alone is not enough to start running trade routes. You also need a comrade with the Engineering skill to actually build a wagon. Arnold is the first engineer most players encounter; his recruitment quest, "A Rumor in St. Halssius," becomes available early in the Greymane faction storyline. Until you have both Brice and an engineer, the wagon trading system remains locked.
Before wagon trading unlocks, you can still sell unpackaged trade goods at Goldleaf Tradeposts once you reach Chapter 2. These early sales provide an initial income stream while you work toward the full wagon system.
Regional Vendors
Cities and villages across Pywel are populated by blacksmiths, tailors, merchants, and other vendors. Importantly, vendor inventories vary by region. Each settlement is expected to have a varying selection of gear that matches the wider area's specialties. Equipment shops display named items tied to local factions or cultures. For example, the Equipment Shop interface shows items such as the Dekare Dagger, Dekare Sword, Dekare Shield, Lambert Axe, and Palkanese Musket, suggesting regional naming conventions for locally crafted goods.
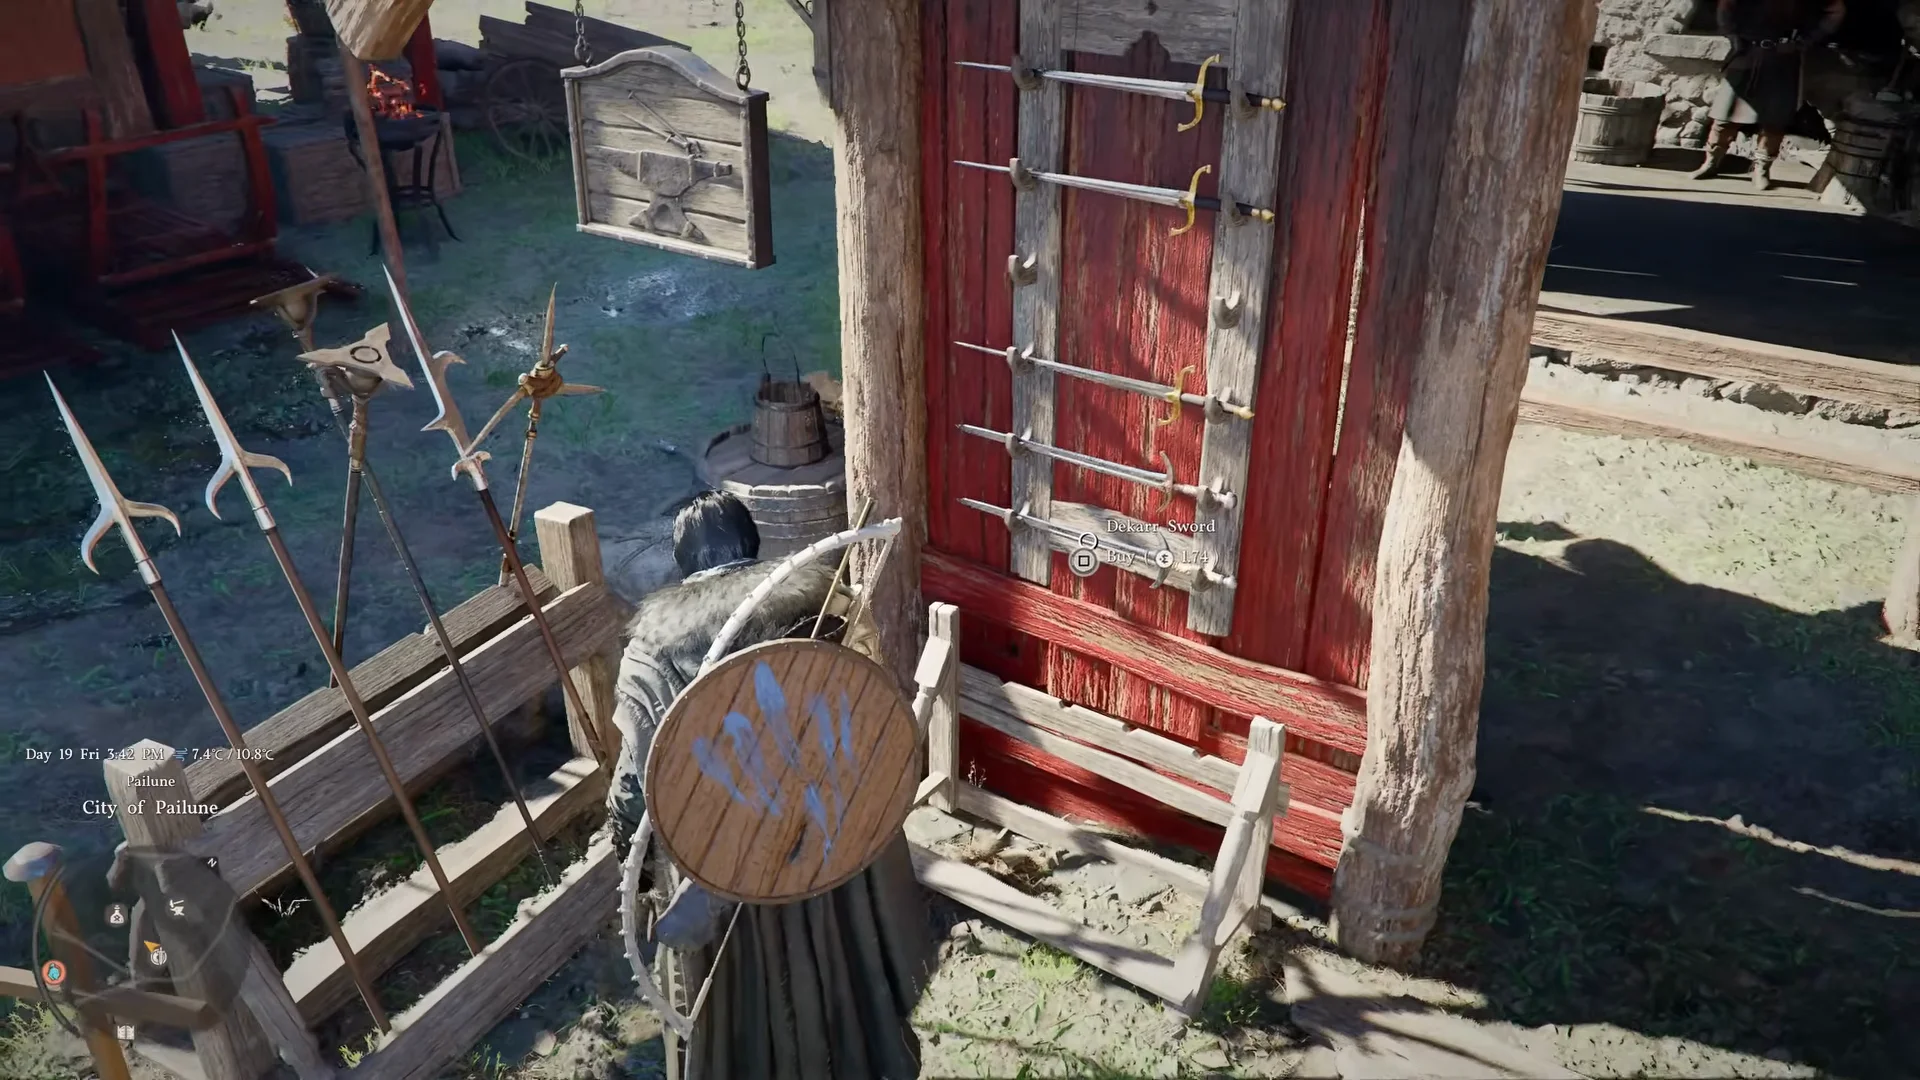
Any settlement in Pywel has its share of vendors who are willing to open their doors to the player should the need for resources arise. Some goods can be purchased by simply interacting with the item displayed on a market stall, providing an immersive shopping experience rather than purely menu-based purchasing.
Trade Goods
Trade goods are a distinct item category identified by a blue background in your inventory. They fall into two types, each handled differently by the economy.
Unpackaged Trade Goods
Unpackaged trade goods are items you pick up while exploring the world, loot from defeated enemies, or produce through life skills. Examples include pelts, swords, firearms, and specialty produce. You can sell these directly from your personal inventory at Goldleaf Tradeposts and Black Market vendors without needing a wagon or any packaging step.
One confirmed Black Market location is the Goldleaf Trading Post east of Springtide Mill, southeast of Hernand, where a vendor named Groks buys unpackaged goods for silver and copper. Stolen goods, including stolen livestock, can also be sold at Back Alley Vendors and through specialized fencers like Edmond, the Livestock Fencer west of Muckroot Ranch.
Trade goods appear as black packages scattered throughout the open world. You need a minimum of 25 units of a given good to sell it via wagon. Individual trade goods in small quantities can also be sold at black market vendors for smaller amounts, though the profit margins are significantly lower than bulk wagon sales.
Packed Trade Goods
Packed trade goods are processed versions of raw items. To pack goods, speak to Karl, the Provisions Keeper at the Greymane Camp, and open the "Camp Provisions" menu. Packing costs 100 copper per item and is irreversible; once Karl processes an item, it moves from your personal inventory into the Camp Provisions section and cannot be unpacked.
Packed goods are what you load onto a wagon for bulk trading runs. Trading posts that buy packed goods require a minimum purchase of 25 units of a single item, so you need to stockpile before making a delivery. The most reliable way to produce large quantities of trade goods is through the companion dispatch system, where comrades with specific skills generate goods over time.
Camp Trading
The Greymane Camp in Hernand is the player's central economic hub. It starts as a small tent settlement and can be expanded into a bustling base using resources and currency earned through exploration. The camp includes several commerce-related facilities.
Facility | Function |
|---|---|
Trading Center | Dedicated merchant area where goods can be bought and sold |
Food Shop (Ronnie) | Sells provisions including barley, meat jerky, salt-grilled fish, and fruit juice |
Blacksmith | |
Farms and Ranches | Produce cooking and crafting materials from crops and livestock |
Workshops | Crafting stations for gear, consumables, and equipment |
Dyehouse | Armor and equipment dyeing services |
Players invest resources such as wood, minerals, and food alongside silver to expand camp facilities. Upgrading the camp directly improves character stats, unlocks new skills, and expands the roster of available companions.
Carl at Greymane Camp manages both provisions and trade goods. He tracks what trade goods you have collected and can help organize them for wagon deliveries. Make sure to visit him before setting out on a trade run to confirm you have enough of a particular good to meet the 25-unit selling threshold.
Faction Reputation and Commerce
Crimson Desert has a reputation system called Hernandian Contribution that directly affects economic access. The HUD displays Contribution and Contribution EXP for the player's standing with regional factions. Completing quests, side missions, and activities for a faction increases standing, while criminal behavior decreases it.
How Reputation Affects Trading
Reputation Level | Effect on Commerce |
|---|---|
High Contribution | Access to additional vendors and resource nodes; potential discounts |
Low Contribution | Reduced vendor access; lost discounts; hostile reception in some settlements |
Crime Penalties | Each crime reduces Contribution by 5 to 30 points depending on severity |
Aligning with specific Houses unlocks reputation that gives access to additional vendors in a region along with resource nodes. Will Powers, Pearl Abyss marketing director, explained that faction relationships progress through states: "at war" to "neutral" to "alliance." Factions at war can blockade regions and hunt the player, while allied factions may send troops and open up trade access.
Beyond regional faction standing, every vendor in Pywel also tracks an individual NPC trust level tied to your relationship with that specific merchant. Building trust with a vendor unlocks tangible benefits: lower prices on their inventory, new dialogue options and side quests, expanded shop inventories, and eventually Trade Agreements that give you access to exclusive stock. Repeatedly buying from and selling to the same vendor is the most straightforward way to raise trust over time.
Liberating Settlements
When the player liberates territories from hostile factions, the economic landscape of that area changes. Structures are rebuilt, new vendors become available, and trade routes unlock. Residents return and go about their daily routines, including commerce. This creates a tangible connection between the player's military actions and economic opportunity.
Region-Locked Materials
The game uses a region-locked material system that creates economic regionalism. Will Powers explained the design: "Your level is gear-based, so there are smart ways of limiting how much you can advance your upgrade of your gear by changing the material requirements at certain thresholds of materials that are only in that area that you're in." This means certain crafting materials can only be found in specific regions, encouraging players to explore and interact with each area's economy.
Unique gear comes from boss drops, blueprints, and crafting recipes rather than randomized loot. Weapon refinement at blacksmiths increases stats incrementally, such as raising a weapon's Attack value from 10 to 12.
Resource Gathering
Players gather materials through various life skills that feed into the broader economic loop. Several of these skills can be learned by observing NPCs performing them in the world.
Life Skill | Resources Produced |
|---|---|
Fish and aquatic ingredients for cooking | |
Animal materials and cooking ingredients | |
Ore, minerals, and stone; Oongka's pickaxe doubles as a mining tool | |
Flowers, insects, mushrooms, lavender, and alchemy ingredients | |
Wood for construction and crafting | |
Crops, milk, meat, and other produce from Greymane Camp facilities | |
Dyes, consumables, and elemental weapon imbues |
Freesword Dispatch Missions
The Freesword Dispatch System adds a strategic economic layer. Players dispatch recruited Greymane mercenaries on off-screen missions that cost resources (silver, wood, clay, or other materials) and yield currency, materials, or unlock new areas and services upon completion. Each companion has individual stats including Health, Attack, Defense, Attack Speed, Movement Speed, and Critical Hit Chance, and selecting the right team composition affects success rates.
Wagon Trading
Wagon trading is the primary method for earning large profits from commerce. Once Brice has been recruited and you have an engineer comrade, you can build wagons at camp and use them to haul packed trade goods between trading posts across Pywel.
Trading posts are marked on the map with a two scales icon. Look for this symbol when planning your trade routes. As an example of a profitable run: you can buy packaged black pepper at one trading post for 179 copper per unit, then sell it at another location for 252 copper per unit. With a full load of 140 units, that comes out to roughly 10,000 copper in profit per trip. The process requires physically driving your wagon between locations, which can be tedious but is reliable income.
To get started with wagon trading, progress your camp upgrades and use the engineer to build a wagon. Royal trading posts with higher-value goods unlock later in the game through specific quests.
Building a Wagon
To build your first wagon, speak to Ross at camp and select Mission Dispatch. Look for the "Timberturner Wainwright" task in the dispatch list and assign your engineer (such as Arnold) along with any additional workers. Larger wagon types require more workers, longer build times, and additional resources.
There are three wagon types available:
Wagon Type | Characteristics | Best For |
|---|---|---|
Old Wagon | Cheapest and fastest to build; easiest to maneuver; limited cargo capacity | New traders getting started with the system |
Moderate cost and build time; increased cargo slots; slower and less agile | Mid-game traders with steady supply chains | |
Most expensive; highest cargo capacity; slowest and bulkiest; requires the most workers | Experienced traders making long-distance high-volume runs |
Starting with the Old Wagon is recommended. It lets you begin earning trading income immediately while you accumulate the resources and workers needed for larger wagons. You can always upgrade later once your operation is more established.
Selling Locations
Several types of trading post buy packed wagon goods across Pywel. Each post maintains its own list of goods it buys and sells, with prices that fluctuate over time.
Location | Details |
|---|---|
Located south of Unicorn Cliff; opens after the Kailok the Hornsplitter boss fight; minimum 25-unit bulk purchase required | |
Found inside large cities such as west of Hernand Castle; arriving with goods triggers a cutscene where the post accepts your delivery automatically | |
Black Market (Wagon) | Scattered across the map (one example is north of Unicorn Cliff); accepts goods that legitimate posts may not buy |
Before driving to a destination, check the post on the world map and inspect its "Buying Items" and "Selling Items" tabs. This confirms whether the post accepts what you are carrying and shows current prices. Buying goods at one location when prices are low and selling them at a distant post where prices are higher is the core profit strategy.
Wagon Black Market
In addition to selling trade goods, you can sell entire wagons at the wagon black market located outside Hernand. Stolen wagons, bandit wagons left behind after combat, and merchant wagons found on the road can all be driven here for a quick profit. Merchant wagons are worth between 100 and 200 silver depending on their condition and type. Even empty wagons sell for around 12 silver. This is a low-effort way to earn extra income whenever you encounter an unattended wagon during your travels.
Road Dangers
Trade routes are not safe. Bandits patrol the roads between settlements and will attack wagons on sight, especially larger and slower ones. The Freight Wagon and Trading Wagon are particularly vulnerable because their bulk makes evasion difficult. Losing a wagon to bandits means losing the goods loaded on it, so planning your route and bringing capable companions as escorts is important for longer deliveries.
Shorter routes to nearby posts carry less risk but also less reward. Longer routes to distant locations like Demeniss or Pailune offer significantly higher profits, but the extended travel time through hostile territory increases the chance of ambush. Balancing risk against reward is a constant consideration for wagon traders.
Trade Challenges
The journal tracks five Trade Challenges, which are special trade-related objectives that appear under the Missions tab. These challenges task you with delivering trade goods to specific locations, including the royal courts of Hernand, Demeniss, Varnia, and Delesya. Completing all five Trade Challenges unlocks the The Golden Merchant trophy and achievement.
Trade Challenges serve as a structured introduction to the trading system's geography. Each challenge pushes you to open new routes to regions you may not have visited yet, and the deliveries themselves require building up enough stock and wagon capacity to meet the requirements. They are worth pursuing early since the silver rewards and achievement make the effort worthwhile.
Crime and the Economy
The game's wanted system has direct economic consequences. Pickpocketing NPCs generates stolen goods like coin pouches. Players can steal items displayed on market stalls. A "Threaten" dialogue option allows the player to intimidate NPCs for information or goods. However, criminal actions trigger guard responses, bounties, potential imprisonment, and reduction of Hernandian Contribution, which can lock the player out of vendor access and discounts in the affected region.
Monetization
Crimson Desert is a premium single-player experience with no microtransactions. Will Powers stated: "This is made to be a premium experience that you buy, and you enjoy the world and not something for microtransactions." There is no online marketplace, no player-to-player trading, and no live service economy. All economic interactions take place between the player and NPCs within the game world.