
Loading...
Loading...
Lacrimosa
May 2, 2026 at 03:22 AM
Replaced em-dashes with context-appropriate punctuation (3)

Lacrimosa is an S-Class Chaos character affiliated with the Bureau of Anomaly Control's ETD-4 unit. Recognizable by her striking black-and-white hair and her gothic aesthetic, Lacrimosa is a sustained damage dealer who specializes in applying stacking damage-over-time effects to enemies. Her combat style revolves around transformation abilities that let her shift between multiple forms, each with distinct attack patterns and visual flair.
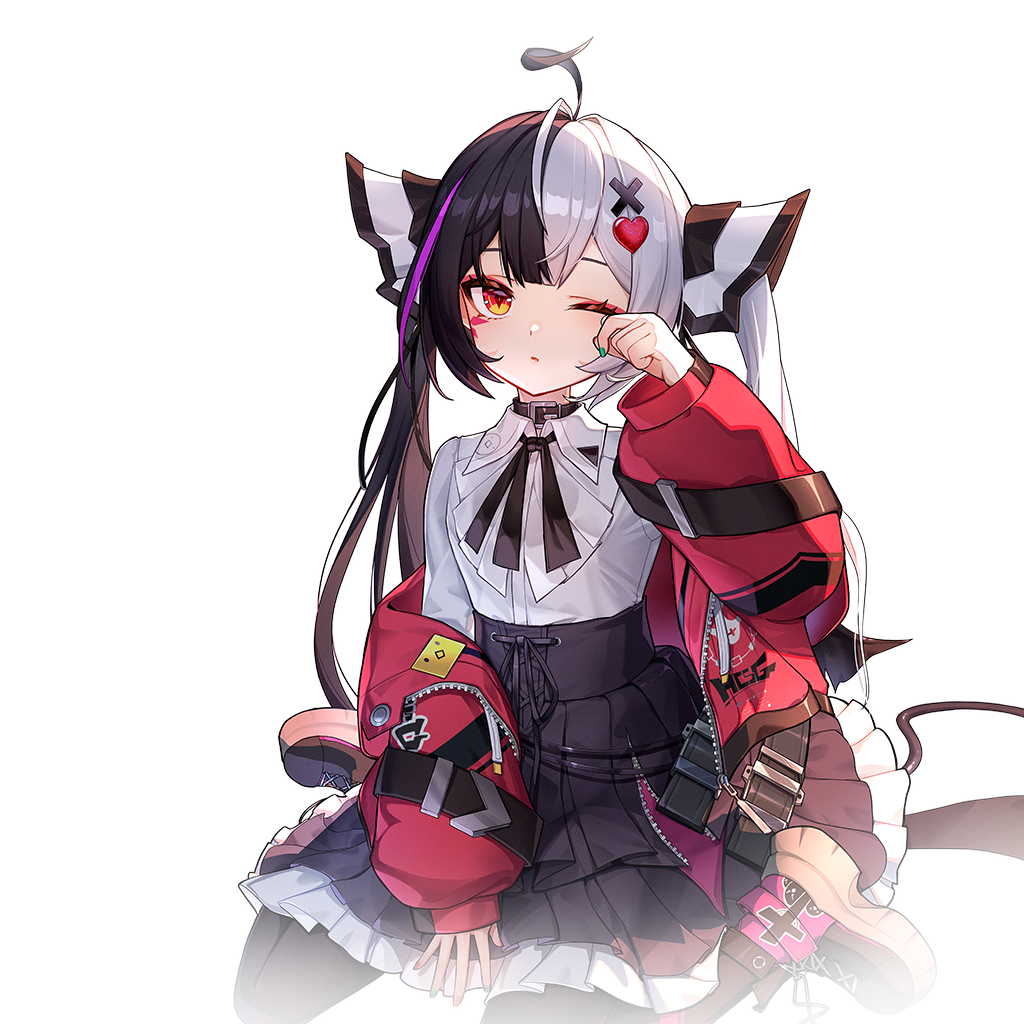
Where burst DPS characters like Baicang deliver concentrated spikes of damage, Lacrimosa takes the opposite approach. She layers DoT effects that tick away at enemy health consistently, punishing enemies over the course of an encounter. This makes her less flashy in the moment but extremely effective in total damage output over longer fights.

Attribute | Detail |
|---|---|
Element | Chaos |
Weapon | Esper Constructs |
Rank | |
Role | Sustained DPS / DoT Specialist |
Faction | Bureau of Anomaly Control (ETD-4) |
Arc Compatibility | Gas |

Lacrimosa's combat revolves around summoning Esper constructs and transforming into different forms. Her normal attacks summon bats that strike enemies with Chaos energy, each hit applying a stack of her signature DoT. As stacks accumulate on a target, the tick damage intensifies, creating a ramp-up effect that rewards keeping pressure on the same enemies.
Her skills trigger transformation sequences. One of her most notable transformations turns her into a small demon form, granting enhanced attack speed and additional Chaos damage on each hit. Another transformation turns her into what players have nicknamed the "trashcan dog," a creature that spews flaming trash at enemies in a cone-shaped area. This transformation provides her strongest AoE coverage and is effective for softening up groups before focusing on priority targets.
Lacrimosa's Ultimate unleashes a massive Chaos burst that deals heavy immediate damage while also refreshing and extending all active DoT stacks on affected enemies. This creates a synergy loop: build stacks through normal attacks and skills, then use the Ultimate to amplify and extend those stacks for continued damage pressure.
What truly defines Lacrimosa's playstyle is her construct summoning mechanic. She creates ethereal constructs that fight on her behalf while she herself falls asleep. This is not a metaphor; Lacrimosa literally enters a sleeping state during certain abilities, and her summoned constructs continue attacking autonomously. The constructs deal sustained Chaos damage independently of player input, making her one of the most unique damage dealers in the game's roster.
Lacrimosa also summons bats as part of her attack patterns. These bat swarms function as both visual flair and actual damage sources, swarming enemies and applying Chaos damage ticks. The bats work in conjunction with her other constructs, creating multiple sources of autonomous damage that pressure enemies from different angles simultaneously. In practice, a fully set-up Lacrimosa can have her constructs, bats, and DoT effects all damaging enemies at once while she rests.
This sleep-and-summon approach makes Lacrimosa a unique summoner-type character with autonomous damage output. She does not need to be on the field actively attacking to maintain her damage contribution. Once her constructs and bats are deployed, the team can swap to another character while Lacrimosa's summons continue their assault in the background. This off-field damage potential is what makes her so powerful in the Esper Cycle rotation system.
Strong sustained damage through stacking damage-over-time effects that continue ticking even while she is off-field
Transformation abilities provide both AoE and single-target coverage depending on the form used
Better survivability than many other DPS characters due to built-in defensive scaling during transformations
Chaos element pairs with Incantation for Scorch (DoT burn) and with Psyche for Nova (burst damage) reactions
Her DoT continues dealing damage when swapped off-field. This adds to team DPS during the Esper Cycle
Damage ramps up over time rather than being immediately available, making her less effective in content requiring quick burst kills
Transformation cooldowns can create downtime if abilities are not managed carefully
In very short encounters, faster burst characters will outperform her total damage
The trashcan dog form, while powerful, has limited mobility and can be interrupted by certain boss mechanics

Lacrimosa pairs naturally with Incantation characters to trigger the Scorch reaction, which applies an additional burn DoT on top of her existing stacks. Baicang is the strongest Incantation partner, as his burst damage and her sustained damage complement each other perfectly. While Baicang spikes during Ultimate windows, Lacrimosa's DoTs keep damage flowing during his downtime.
She also works well alongside Psyche characters for the Nova reaction, which provides burst AoE damage when Chaos and Psyche effects overlap. Fadia can fill the Psyche slot while also providing healing, creating a self-sustaining team that deals consistent damage without needing to retreat.
In the Esper Cycle System, Lacrimosa excels as a character who is swapped in to refresh DoT stacks and then swapped out while those stacks continue ticking. This lets her contribute steady off-field damage that complements whichever teammate is currently on the field.
Lacrimosa's autonomous constructs make her an exceptional sub-DPS in quick-swap team compositions. She can deploy her constructs, summon her bats, and then swap out to let a main DPS like Nanally or Hathor take the field while her summons continue dealing Chaos damage. This layered damage approach is central to high-end team building strategies.
Her Chaos element also pairs with Haniel's Psyche element to trigger the Nova reaction, creating a delayed damage burst that complements Lacrimosa's sustained DoT output. The combination of Nova bursts and ongoing construct damage creates a damage profile that never lets up.
Despite her intimidating gothic appearance and combat transformations, Lacrimosa has a layered personality that unfolds through character bond stories. She is more complex than her brooding exterior suggests, and her backstory ties into the wider lore of ETD-4 and the anomalies the Bureau investigates. Players who invest in her character bonds discover a softer side beneath the Chaos-wielding exterior.
Lacrimosa is a member of ETD-4, a specialized unit within the Bureau of Anomaly Control. She works alongside Fadia and Skia in the unit. Her distinctive black-and-white hair is her most recognizable visual feature, making her instantly identifiable even among the game's large character roster. The duality of her hair color mirrors the duality of her character: the sleeping girl and the deadly constructs she commands.
Focus on building DoT stacks before using her Ultimate. The Ultimate refreshes and extends all active stacks, so using it early wastes potential damage.
Swap to Lacrimosa periodically to refresh her DoTs, then swap back to your main on-field character. Her off-field damage is a significant portion of team DPS.
In AoE situations, use the trashcan dog transformation to spread Chaos stacks across multiple enemies quickly.
For team building, pair her with Baicang and Fadia for one of the strongest elemental reaction teams at launch.
Her survivability is higher than most DPS characters, but she still benefits from a healer in challenging content.
Quick numerical reference compiled from the in-game character profile. Stats listed at character Level 1 represent the base values before Awakening, Console Modules, Cartridges, or Arc weapons modify them.
Attribute | Value |
|---|---|
Birthday | June 26 |
Rarity | S-Rank |
Element | Chaos |
Arc Class | Liquid |
Faction | Bureau of Anomaly Control, ETD-4 |
Damage Role | Main DPS |
Lacrimosa's starting numerical baseline before progression systems begin layering bonuses on top.
Stat | Lv.1 Value |
|---|---|
HP | 1320 |
ATK | 80 |
DEF | 75 |
CRIT Rate | 5% |
CRIT DMG | 50% |
Each character is built from a fixed grid of skills, console-side passives, and progression tiers. The counts below describe the maximum slots ever exposed for this Esper, regardless of which ones are unlocked at any given Awakening rank.
System | Slot Count |
|---|---|
Skills | 4 |
Awakening Nodes | 8 |
Breakthrough Tiers | 4 |
Lacrimosa is voiced across the three primary localizations supported on launch.
Language | Voice Actor |
|---|---|
English | Baraka May |
Japanese | 長縄まりあ |
Mandarin Chinese | 宴宁 |
These are the in-game skill names for this character. Skill effects are described elsewhere in the article.
Type | In-Game Name |
|---|---|
Basic Attack | Sweet and Sour |
Critical Riposte | fff Rest |
Skill | Morning Tomato |
Ultimate | Working Day Judgement |
Each skill block lists the in-game slot it occupies, the official skill name, and the short description shown on the character menu, followed by the named sub-actions of that skill. Sub-action descriptions are quoted from the in-game tooltip text.
Deals Chaos DMG.
Sub-Action | Effect |
|---|---|
Basic Attack: Tomato Metal | Swings her Frying Pan, performing up to 5 consecutive attacks, dealing Chaos DMG. The projectile generated by the 2nd attack can be shattered by subsequent attacks, causing an explosion and dealing extra Chaos DMG. |
Basic Attack: Tomato Percussion | Manipulates Red Jelly, performing up to 5 consecutive attacks, dealing Chaos DMG. |
Flavor Variation | Flavor Variation can be used at any time via the Aim button. Tosses her Frying Pan and performs a flying kick forward when using Tomato Metal, dealing 1 instance of Chaos DMG to each target hit. Switches her attack module to Tomato Percussion. Leaps into the air and slams the ground, dealing 1 instance of AoE Chaos DMG when using Tomato Percussion. Switches her attack module to Tomato Metal. The current Basic Attack style determines the attack pattern of Working Day Judgement. |
Basic Attack: Devilish Inspiration | Hold to enter Aim mode. Deals 1 instance of Chaos DMG to an enemy in the crosshair and learns their combat technique. Temporarily forgets Morning Tomato and uses the learned technique upon successful learning. Learned techniques are stored permanently in Lacrimosa's memory. New techniques can be learned to replace existing ones, or Lacrimosa can actively forget a technique on the Skill page to recall Morning Tomato. |
Basic Attack: Lycopersicum Meteors | Manipulates Esper Ability Constructs in the air and plunges, dealing 1 instance of Chaos DMG to an area upon impact. Increases DMG based on fall height, up to 100%. |
Critical Riposte: fff Rest | Triggers when using Basic Attacks after a Critical Dodge. Seizes the opening created by the enemy's missed attack and violently hurls a large amount of Red Jelly onto the enemy's head, dealing 6 instances of Chaos DMG to an area and reducing Break. |
Nightmare | Inflicts Nightmare on the target when attacks hit, up to 10 stacks. Inflicts 1 stack of Nightmare per damage instance when a single Basic Attack deals multiple instances of damage. |
Deals Chaos DMG to an area and inflicts Nightmare.
Sub-Action | Effect |
|---|---|
Skill: Morning Tomato | Ah… Achoo! Throws a barrage of unfinished Esper Ability Constructs, dealing 1 instance of Chaos DMG to all targets within the area and inflicting Nightmare on the targets. Combos into the 5th instance of Tomato Metal or Tomato Percussion after casting Morning Tomato. |
Redirect Skill: Devilish Gift | Creates mobs identical to those of the original skill owner using Lacrimosa's Esper Ability and initiates an attack, simultaneously triggering the corresponding skill's additional effects. Matches the skill duration of the original skill owner. Prevents Lacrimosa from moving during the cast but allows her to actively cancel the cast or switch to other characters. Causes Lacrimosa to take damage if she is attacked during the cast. Grants Lacrimosa a percentage of the original skill owner's ATK upon casting Devilish Gift. |
Deals Chaos DMG to an area and inflicts Nightmare.
Sub-Action | Effect |
|---|---|
| Controls the Truck when using Tomato Metal, dealing 10 instances of Chaos DMG to an area and inflicting Nightmare on all targets in range. Dismantles the Car when using Tomato Percussion, dealing 5 instances of Chaos DMG to an area and inflicting Nightmare on all targets in range. |
Deals Chaos DMG to an area.
Sub-Action | Effect |
|---|---|
| Lacrimosa get this done, and Lacrimosa get to sleep… Manipulates Esper Ability Constructs, dealing 1 instance of Chaos DMG to an area. |
Discord Enhancement: Deals additional DMG equal to 400% of ATK to the target when Discord is triggered, if the target is already Broken.
Grants 1 additional attempt of Morning Tomato after Lacrimosa uses Tomato Metal or Tomato Percussion 5 times during the skill cooldown. Activates only 1 time per skill cooldown.
Lacrimosa transforms into a bat in her dream, flying freely. When out of combat, hold dodge to enter flight. Flight costs stamina.
Lacrimosa has 8 Arcs flagged as a thematic match by the in-game character recommendation panel. Refinement effects below are quoted from each Arc's tooltip and do not represent a tier ranking.
Arc | Rarity | Refinement | Refinement Effect |
|---|---|---|---|
Fluff of Fleetness | 5-Star | Motor Candy | Increases 5% ATK every 1s while the wearer is the active character, up to 5 stacks. Resets when the wearer leaves the field. |
The Last Rose | 5-Star | Bohemian Rose | Increases ATK by 14%. Grants 1 stack of Chaos Thorn each time the wearer deals DoT. Increases CRIT DMG by 6% per stack for 3s. Triggers at most once every 0.3s, up to 10 stacks and refreshes the duration when retriggered. Grants 10 stacks of Chaos Thorn immediately when the wearer casts a Redirect Skill. Extends the Broken state of a Broken enemy by 3s when the wearer deals damage to them (triggers at most once per Break Effect). |
Youthful Fantasy | 5-Star | "Black Tome" | Increases Break Intensity by 60. Seals Arc: Black Tome with two chains by default. Unleashes 1 chain each time any character on the team casts a Support Skill. Makes Arc: Black Tome available when all two chains are unleashed. Arc: Black Tome. Summons the Black Tome for 20s. Designates an enemy every 5s. Increases the wearer's Chaos DMG dealt to designated enemies by 20%. Deals Chaos DMG equal to 200% of the wearer's ATK to designated enemies when they take Break Damage. |
Call of the Twisted City | 4-Star | Cardboard Castle | Increases Healing Bonus by 12% for 10s after the wearer casts a Redirect Skill. Effect does not stack. |
Clear Skies | 4-Star | Paper Squadron | Increases Anima DMG dealt by the wearer's Redirect Skill and Ultimate by 20%. |
Mind Royale | 4-Star | Inspiration Terminator | Grants the wearer 10 Ultimate Energy when casting a Redirect Skill. Triggers up to once every 20s. |
Shiny Days | 4-Star | Film - MANISH | Increases Break Intensity by 48. Increases DMG by 10% against Broken units. |
"Real Music" | 3-Star | Haunted Record | Grants the wearer a 12% Redirect Skill DMG bonus. |
Ascension lifts Lacrimosa's level cap one step at a time. Each phase requires the listed Coins (the world currency) plus a fixed list of materials. World Level shown is the minimum required to access the breakthrough.
Phase | Lv Cap | World Lv | Coins | Materials |
|---|---|---|---|---|
Phase 1 | 30 | 1 | 25,000 | Lost Whispers x5 |
Phase 2 | 40 | 2 | 50,000 | Lost Whispers x12, Confessional Flower Seed x2 |
Phase 3 | 50 | 3 | 75,000 | Obscure Whispers x6, Confessional Flower Seed x8 |
Phase 4 | 60 | 4 | 100,000 | Obscure Whispers x12, Confessional Flower Seed x16 |
Phase 5 | 70 | 5 | 125,000 | Paradoxical Whispers x6, Confessional Flower Seed x24 |
Phase 6 | 80 | 6 | 150,000 | Paradoxical Whispers x9, Confessional Flower Seed x36 |
Lacrimosa's base HP, ATK, and DEF at key level milestones. These numbers are the raw character base values before Awakening, Console Modules, Cartridges, or Arc bonuses modify them.
Level | HP | ATK | DEF |
|---|---|---|---|
Lv 1 | 1,056 | 40 | 60 |
Lv 10 | 2,006 | 76 | 114 |
Lv 20 | 3,062 | 116 | 174 |
Lv 30 | 5,174 | 196 | 294 |
Lv 40 | 7,286 | 276 | 414 |
Lv 50 | 9,398 | 356 | 534 |
Lv 60 | 11,510 | 436 | 654 |
Lv 70 | 13,622 | 516 | 774 |
Lv 80 | 15,734 | 596 | 894 |
Awakenings unlock through duplicate copies of the character. Each tier from A1 to A6 grants a named upgrade.
Tier | Awakening Name | Effect |
|---|---|---|
A1 | Clock Out Clemency | Increases Nightmare DMG Ratio by 50%. |
A2 | Rise and Shine | Increases Lacrimosa's damage dealt by 15% for 15s when she switches in using a Support Skill. |
A3 | Molten Ice Cream | Triggers all accumulated Nightmare effects on the target at once when the 5th hit of Tomato Metal or Tomato Percussion lands. |
A4 | Almighty Lord of Tomatoes | Extends Nightmare duration to 6s. |
A5 | Tempered Glass Judgement | Prevents Nightmare stacks from being removed when the target is healed and reduces the target's Max HP by 200% of the damage of a single Nightmare instance. |
A6 | Morning Spell | Allows Lacrimosa to automatically cast her Support Skill and trigger the corresponding cycle without Cycle Rate accumulation when switching to her from any character that can trigger Esper Cycle: Nova, Scorch, or Discord within 5s after casting Devilish Gift. |
Resonance bonuses unlock at specific Awakening milestones, not from additional duplicates. R1 activates when the character reaches A3, and R2 activates at A6. Both stack on top of the named Awakening node effects.
Tier | Resonance Name | Unlocks At | Effect |
|---|---|---|---|
R1 | The Heart's Drowsy Flames | A3 | Increases the skill level of Sweet and Sour, Morning Tomato, Devilish Gift, and Working Day Judgement by 1. |
R2 | Lullaby | A6 | Lacrimosa's damage ignores 10% of the target's DEF. |
Each character has a Console passive that activates when the matching Module type is equipped on their Console grid. This is a flat passive that scales linearly with the count of matching Modules and is the strongest reason to commit to a single Module type when building this Esper.
Type III Specialization: Increases Chaos DMG Bonus by 10% for each Type III Module equipped.
Life Skills are out-of-combat benefits unlocked while Lacrimosa is assigned to a non-combat activity (shop owner duty, dispatch trips, City Tycoon shifts, or other passive systems). Each level unlocks an additional or stronger benefit and stacks with the previous levels.
Level | Effect |
|---|---|
Level 1 | Lacrimosa increases dish prices by 1% for each Dessert tag on dishes. |
Level 2 | Lacrimosa reduces ingredient consumption rate by 1%. |
Level 3 | In Owner's Selection, a special dish "Special Tomato Juice" appears, made by adding tomato juice to a glass. |
Level 4 | Lacrimosa reduces ingredient consumption rate by 1%. |
Level 5 | Lacrimosa increases dish prices by 1.5% for every 2 Dessert tags on dishes. |
