Loading...
Loading...
Duo Reactions
April 28, 2026 at 01:45 PM
Updated with verified launch data: added Vita Bud/Vita Pistil terminology, Hexed 20% follow-up formula, Remora decay-on-reapply, Sakiri's Scorch passive specifics
Duo reactions are the foundational element interactions in Neverness to Everness. Each duo reaction combines two adjacent elements on the Esper Cycle wheel to produce a specific combat effect: a damage-over-time, a debuff, an autonomous attack, or a vulnerability stack. Six duo reactions exist, one for each pair of adjacent elements on the wheel.
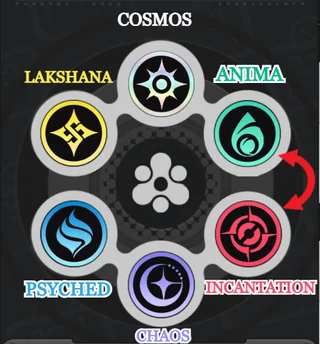
Triggering a duo reaction requires two elements landing on the same target within a short window. The element wheel runs Cosmos, Anima, Incantation, Chaos, Psyche, Lakshana and back to Cosmos, so each element pairs only with its two neighbors. Building a team within 2 to 3 adjacent elements (a reaction lane) is the foundation of effective team building.
Reaction | Elements | Effect |
|---|---|---|
Remora | Lakshana + Cosmos | Slows movement and attack speed for 5 seconds. Decays over time and shortens with repeated application. |
Blossom | Cosmos + Anima | Spawns a Vita Bud that releases 5 Vita Pistils, exploding every 2s for area damage. Up to 3 Buds on the field at once. |
Hexed | Anima + Incantation | Adds a follow-up hit equal to 20% of all Anima and Incantation damage taken in the last 12 seconds. |
Scorch | Incantation + Chaos | Inflicts a 15-second burning DoT effect. |
Nova | Chaos + Psyche | Marks the target. After 5 seconds, the mark detonates for a burst of Mental damage. |
Stain | Psyche + Lakshana | Target takes 50% more Psyche and Lakshana damage for 12 seconds. |
Remora is the Lakshana + Cosmos duo. It slows the target's movement and attack speed for 5 seconds. The effect decays over time and has a shorter duration if repeatedly applied, so spamming Remora on the same target offers diminishing returns. The slow creates breathing room for a team to set up burst windows or chain skills without being interrupted by enemy follow-ups. Remora is also the setup half of the Charge trio reaction; landing it on a target opens up the full Charge interaction with Blossom.
Blossom is the Cosmos + Anima duo. It spawns a Vita Bud that blossoms 5 Vita Pistils. The Pistils fly toward enemies in range and explode every 2 seconds, dealing area damage. Up to 3 Vita Buds can exist on the field simultaneously, so a team that triggers Blossom regularly saturates a target with persistent autonomous damage. Stacking Anima passive buffs from Nanally or Mint enhances the reaction's output (more Pistils per Bud, larger explosion radius, etc). Blossom is also the active half of the Charge trio.
Hexed is the Anima + Incantation duo. After the trigger, the target takes a follow-up hit equal to 20% of all Anima and Incantation damage they have taken in the last 12 seconds. The reaction rewards consistent pressure rather than one-shot setups: teams that pile sustained Anima and Incantation damage into a target see Hexed payoffs grow as the rotation progresses.
Scorch is the Incantation + Chaos duo. It inflicts a damage-over-time effect that runs for 15 seconds, the longest base duration of any duo. Sustained DoT pressure makes Scorch a strong passive damage source while the active character handles other tasks. Scorch is one of the two reactions that feed the Discord trio: layering Scorch and Nova on the same target triggers the trio's massive break-bar effect. Sakiri's Esper Cycle Passive 'Can I Eat This?' is the launch-window centerpiece for Scorch teams.
Nova is the Chaos + Psyche duo. It marks the target for 5 seconds and detonates for a burst of Mental damage when the effect ends. The delay is intentional: it gives players a window to swap characters and stack additional reactions before the burst lands. Nova is the second half of the Discord trio setup, and it pairs naturally with Scorch because their durations and trigger patterns overlap cleanly.
Stain is the Psyche + Lakshana duo. It debuffs the enemy with 50% additional vulnerability to Psyche and Lakshana damage for 12 seconds, creating a focused damage-amplification window. Stain is the simplest direct-amplification reaction and one of the easiest to build a team around. The duo struggles at launch because the Psyche character pool is thin (only Fadia, Haniel, and Aurelia), so dedicated Stain teams will become more flexible as the roster expands.
Two trio reactions overlay duo reactions to produce combined effects:
Charge (Lakshana + Cosmos + Anima): when a Vita Pistil from Blossom hits a Remora-marked target, the active character gains 10 additional Ultimate Energy per hit. Top-arc trio. See Charge teams for build details.
Discord (Incantation + Chaos + Psyche): when Scorch and Nova are simultaneously active on the same target, the target takes massive break-bar damage. Bottom-arc trio. See Discord teams for build details.
The Trio Reactions page goes deeper on these two interactions.
Effective teams build around a reaction lane: 2 to 3 characters whose elements sit adjacent on the Esper Cycle wheel. A pure two-element lane runs one duo reaction at maximum frequency; a three-element lane unlocks two duo reactions and the matching trio. The fourth team slot is the flex pick: a healer, a shielder, or a buffer that solves whatever weakness the lane has.
Treat duo reactions as the planning layer. Pick the reaction first, then build the team around the elements that produce it.
Layer duos to enable trios. Charge and Discord both require two duos firing on the same target, so a team built for one duo can usually extend to the trio with one more character.
Mind the cooldowns. Each duo has its own internal interaction time; chaining the same duo back-to-back is less effective than rotating between two adjacent duos.
Save Stain teams for Hathor and Skia focus comps. Stain's amplification is most valuable when the active character pushes Psyche or Lakshana damage hard within the 12-second window.
Use the wheel position to predict synergy. Elements directly across from each other (Cosmos vs Chaos, Anima vs Psyche, Incantation vs Lakshana) cannot pair into duos and contribute nothing to reaction lanes.
Spread Remora across new targets rather than refreshing the same one. The decay-on-reapply rule means stacking Remora on a single target gives diminishing returns.